 Meet the new
 Create or Edit a Doc
This guide walks you through creating or editing a Sumo Logic doc: forking the repository, writing content in Markdown, previewing your changes locally, and submitting a pull request. Whether you're fixing a small error or adding a new page, the steps are the same.
If you have Claude Code installed, this repo's /doc, /audit-doc, and /seo-audit slash commands can help you draft and review docs locally against your fork. See the README for the full command list and which ones require internal access.
Prerequisites
- You'll need a GitHub account to contribute to Sumo Logic Docs.
- We recommend adding 2FA protection when contributing to Sumo Logic repositories.
- Help us keep Sumo Logic Docs open and inclusive by reviewing our Code of Conduct.
Recommended: New to GitHub or Markdown? Try VS Code, a development application to open the repo, edit and create files, and preview pages as you write, along with the following extensions:
- Markdown All in One.
- Markdown Preview GitHub Styling.
- Markdown Preview Enhanced.
- Markdown Preview Mermaid Support.
- Mermaid Markdown Syntax Highlighting for charts and graphs.
Quickstart
Submit a GitHub Issue
Short on time? You can report a bug or request more information by submitting a GitHub Issue to our repository. Enter as much information as you can, including content corrections, steps to reproduce, command/code updates, clarifying questions, and recommended fixes.
Before submitting an issue, you can browse our existing GitHub issues to see if someone has already reported it, and join the discussion via comments.
Submit a minor fix
You can submit a minor fix, like a typo correction, without cloning or forking the repository locally. Check out the instructions below.
Check out this brief tutorial on how to submit a basic change to our docs.
View text instructions
- Scroll to the bottom of that doc and click the Edit this page link. This will open your selected doc in Edit file mode on our GitHub repo website.
- Click Fork this repository to continue.
- Apply your edits to the file.
- Scroll down a bit on the page until you see the description field, enter a brief summary of your changes there, then click Commit changes.
- In the Propose changes dialog, enter a description of your change, enter a new name for your branch if desired, and click Propose Change.
This will fork and submit changes to the Docs Team for review.
Edit a doc
Step 1: Fork the Sumo Logic Docs repository
- Fork the Sumo Logic Docs repository locally.
- Review our README documentation guidelines.
- Create a new branch from your forked repo using a name that best describes the work or references a GitHub issue number. For example, if you wanted to submit a Pull Request (PR) to edit our Elasticsearch app doc, you'd write something like:
<your initials>-apps-elasticsearch.
Remember to sync your fork and update branches as needed.
Step 2: Edit your doc
In your new branch, edit the doc Markdown file. See our Style Guide to learn how to style content, add code snippets, import multimedia, and more. Doc body text content is written in GitHub-flavored Markdown, with some customizations.
Step 3: Preview your changes
Before proceeding, you'll need to preview your changes. See the Build Locally section in our README for instructions.
This constructs and deploys a local version of the Sumo Logic Docusaurus site. Our site relies on Docusaurus, a static site generator. It creates your site as basic static HTML, JavaScript, and CSS files.
Step 4: Submit your request
- Commit your changes to the branch with a meaningful message.
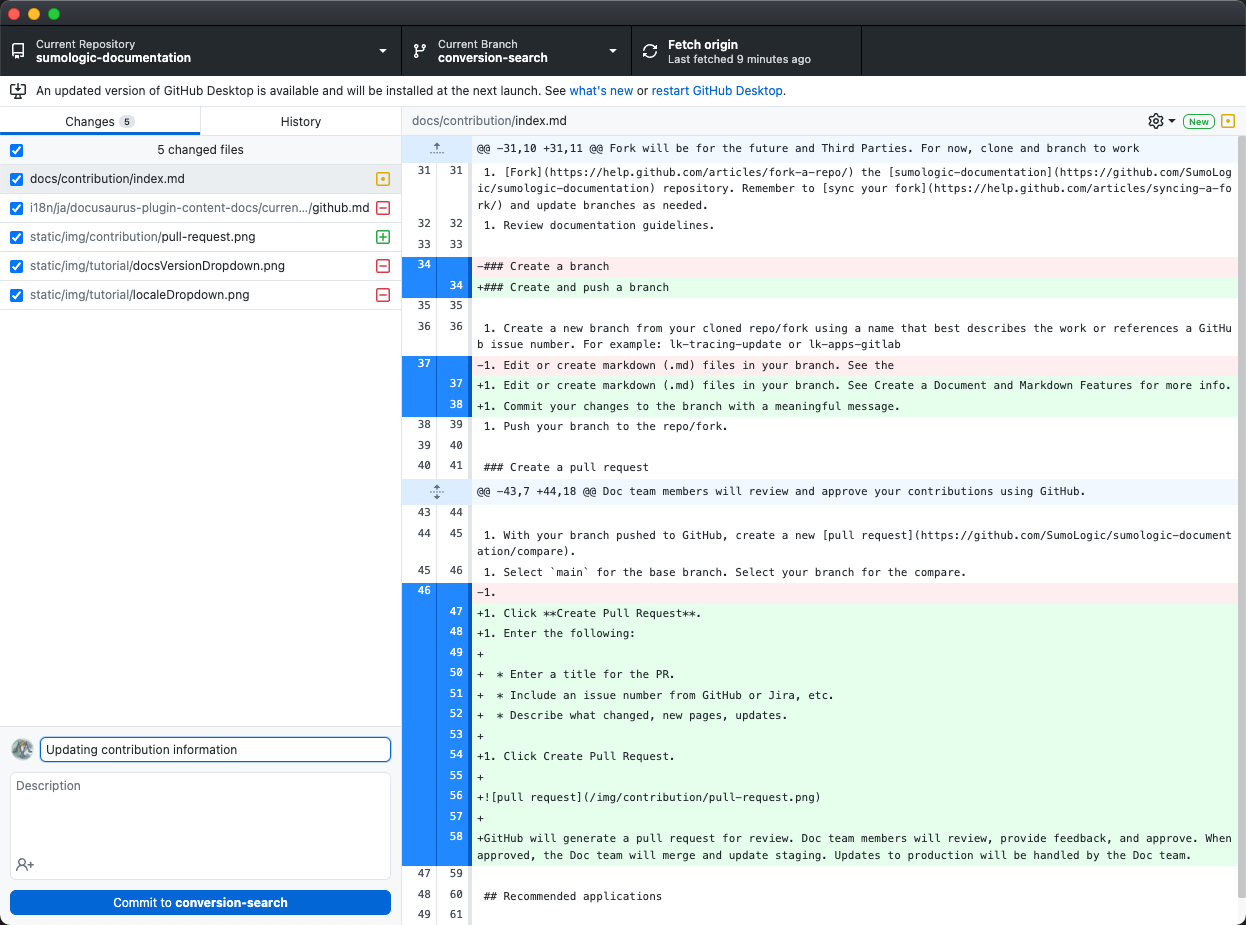
Use descriptive commit messages (and issue or ticket numbers, if applicable) that describe the changes you're making. One-line messages are fine for small changes, but bigger changes should look like this:$ git commit -m "A brief summary of the commit>> A paragraph describing what changed and its impact." - Set permissions to allow maintainers to edit and update the PR (learn more).
- Push your branch to the forked repo.
- Visit our repo after pushing your branch. If you see an option to Compare & pull request for your branch, click this.

- If you do not see it, create a new PR.
- Select
mainfor the base branch. This is the branch all staging and production content builds from. - Select your branch for the comparison.
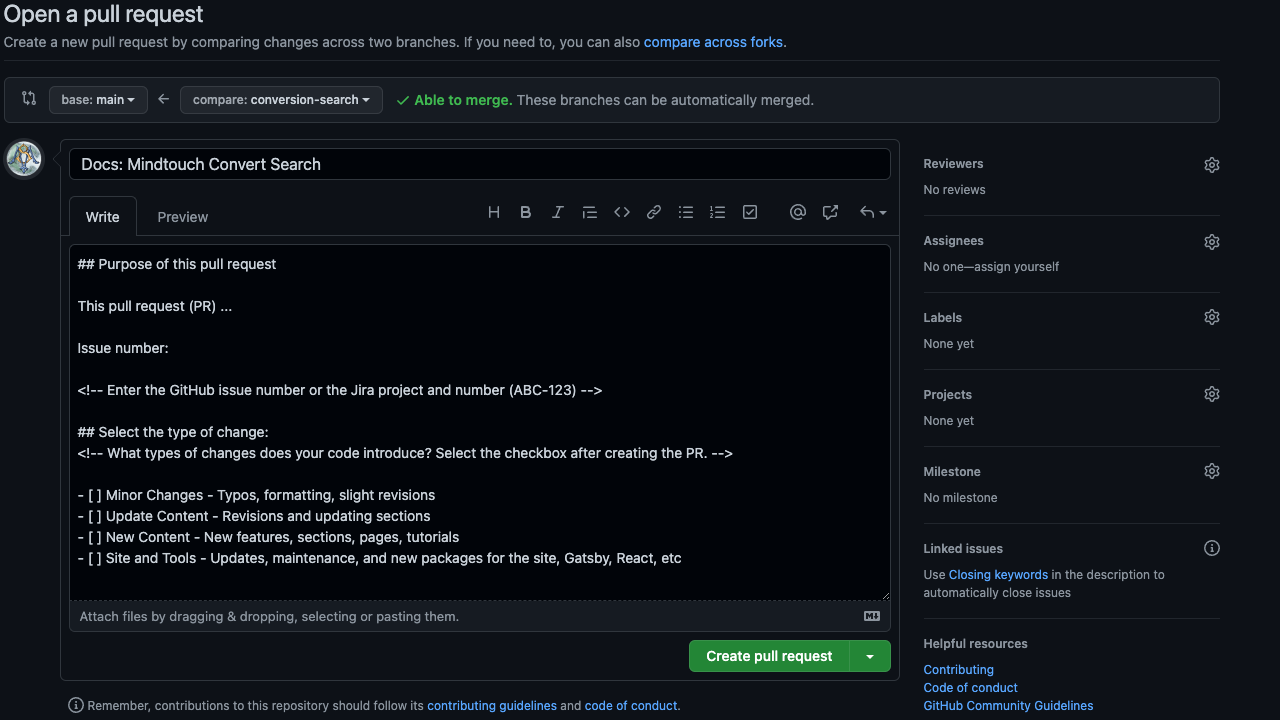
- Click Create pull request.
- Select
- If you do not see it, create a new PR.
- On the PR page, enter the following:
- Make sure base branch is
mainand compare branch is the one you pushed. - Enter a title for the PR.
- If applicable, include a GitHub issue number (or, for internal Sumos, the Jira ticket number).
- Describe the changes you made.
- Apply a label that best describes your contribution.
- Make sure base branch is
- (Optional). For urgent, high-priority PRs (for example, doc edits tied to a GA release happening within 24 hours):
- Add the GA release date to the title. For example,
AWS Integration release (GA: Jan 1, 2026). - From the labels list, select the
hot🔥label, signifying it's an urgent PR. - For internal Sumos only: after completion of all GitHub checks, send your PR link to the #dochub Slack channel for review.
- Add the GA release date to the title. For example,
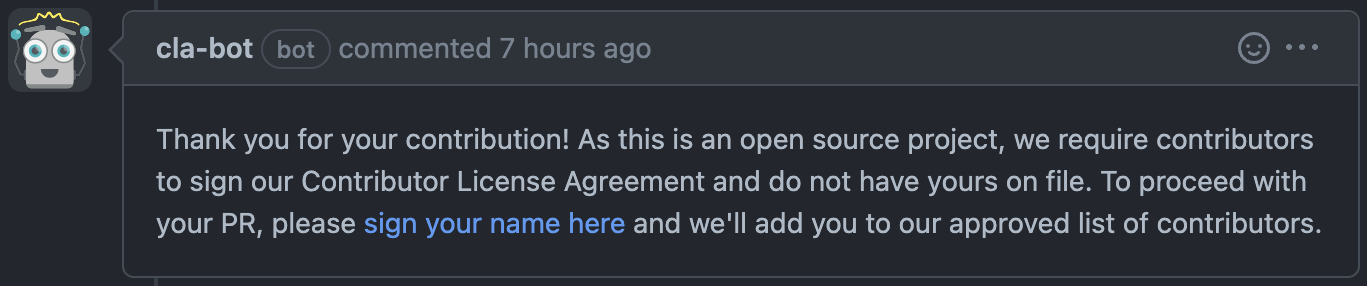
- First-time contributors will be prompted in a PR comment to sign our Contributor License Agreement. We allow individual contributions and contributions made on behalf of companies.
Create a new doc
To submit more extensive edits, such as creating a new doc, we recommend forking our repo, making changes in a new branch, and submitting a PR for review.
Feel free to reach out to the Sumo Logic Docs Team to discuss. We're happy to work with you on the project and talk through rewriting content, changing flow, adding a new topic or section, and deprecating content.
Step 1: Fork the Sumo Logic Docs repository
- Fork the Sumo Logic Docs repository locally.
- Review our README documentation guidelines.
- Create a new branch from your forked repo using a name that best describes the work or references a GitHub issue number. For example, if you wanted to submit a Pull Request (PR) to edit our Elasticsearch app doc, you'd write something like:
<your initials>-apps-elasticsearch.
Remember to sync your fork and update branches as needed.
Step 2: Create a doc file
Our docs are GitHub-flavored Markdown files containing content like bulleted instructions, screenshots, tables, interactive code samples, and more.
- Open your new branch in your IDE and go to the
/docsfolder. - Create a new Markdown file in the format
<your-file>.mdand save it to the appropriate subfolder. For example, if you're creating a new metrics doc, you'd save it to the/docs/metricsfolder. - At the top of your file, add your frontmatter, which is the doc metadata. Follow the instructions under Frontmatter, and see Metadata descriptions for description length and formatting rules.
Step 3: Write your doc
In your Integrated Development Environment (IDE), compose the body of your document in GitHub-flavored Markdown. Refer to our style guide for instructions on crafting and styling content, including adding code snippets, importing multimedia, and more.
Step 4: Add doc to the navigation menu
To add your new doc to the left-nav menu, you'll need to add its name and file path to the sidebars.ts file.
The Docs Team can help you add your doc to the sidebar and top navigation. If you have suggestions, include those in your PR description. If you add the documentation to the sidebar, the team will review the location and names for building and placement in navigation.
Step 5: Add doc to the hub page
Hub pages are section /index pages that display the docs in that section as a grid of cards. Some sections order cards alphabetically; others lead with the most important docs.
Open the section's index.md and add a card for your doc: copy an existing <div className="box smallbox card"> block inside the page's <div className="box-wrapper">, then update the link, icon, title, and description. Match the existing card order.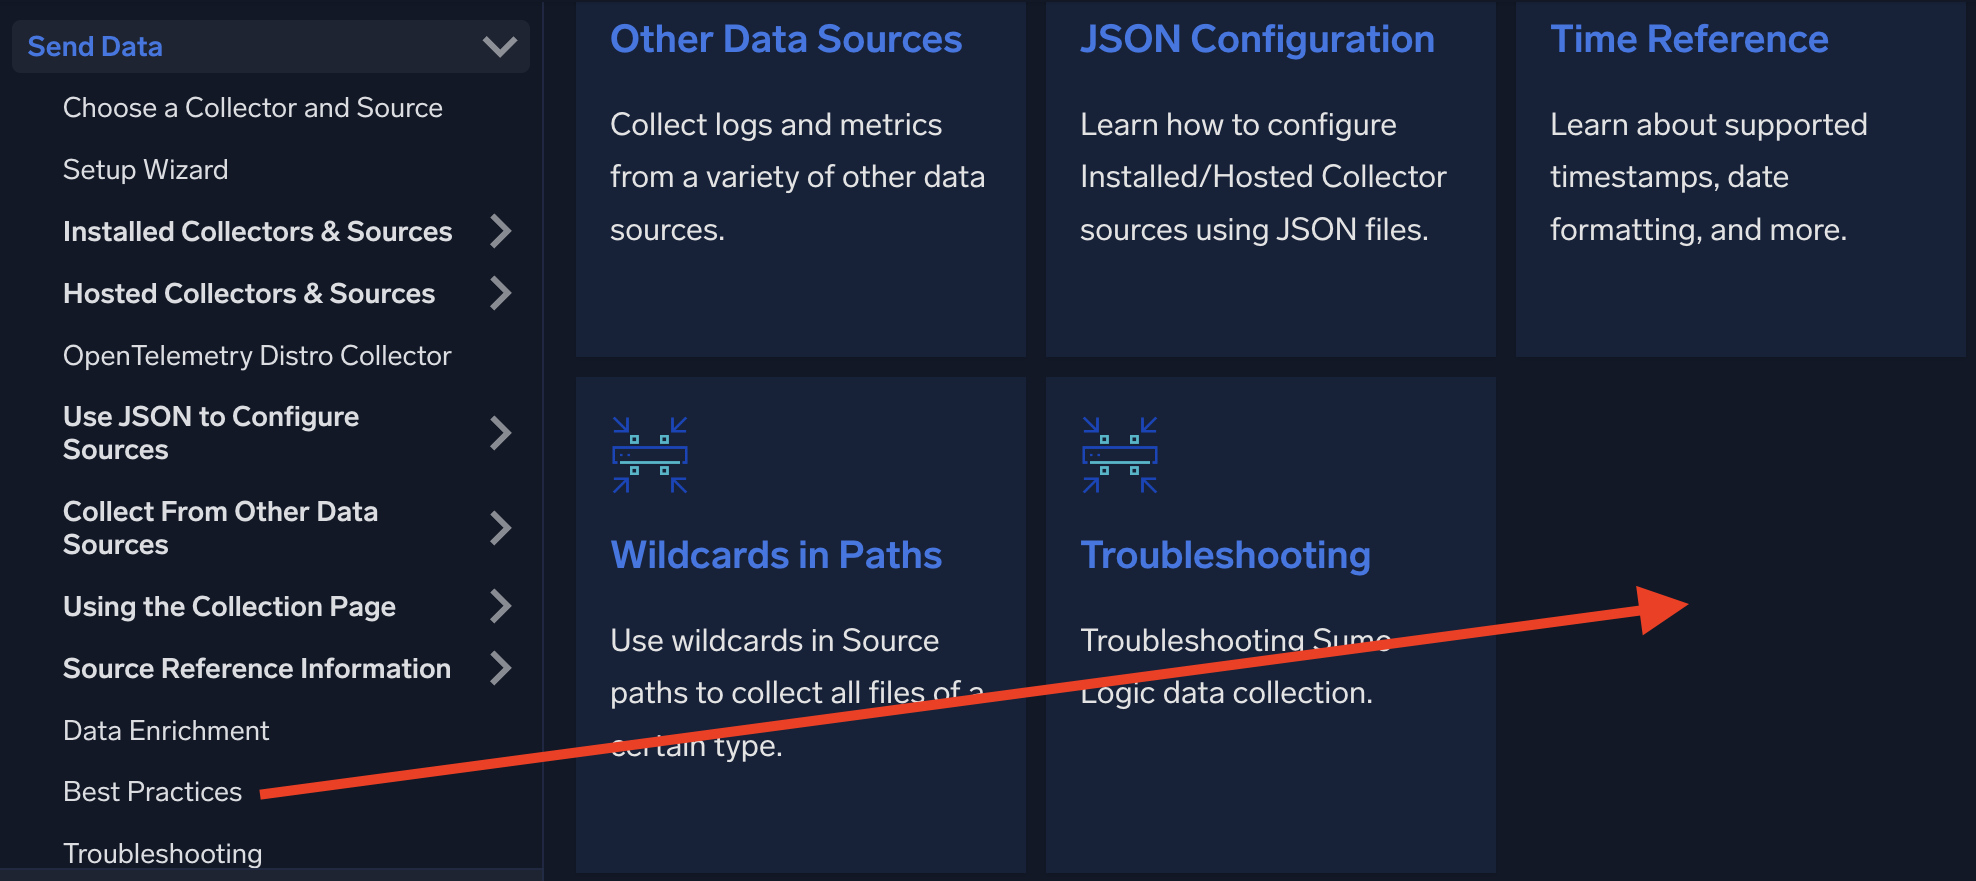
See Hub pages in the style guide for the full card markup.
Step 6: Create CID URL
We assign each document a permanent URL with a content ID (CID) number, which performs a 301 redirect to the canonical URL. This means future changes to the canonical URL, such as a product name change, will not break Learn More links or require code changes to the user interface.
This URL is then placed in the UI in the appropriate place. For example, cid=0071 links to a metrics page, which appears in the product in the Metrics section as a help link.
To create a CID:
- In a GitHub authoring tool like VS Code, open our cid-redirects.json file, which contains all 301 redirects.
- Scroll down to the CIDs section, where the line items start with
"/cid/". - Find an unused CID number, then associate that CID value to your doc's file path. For example, if
5122is unused, and your file path is/docs/metrics/chart:
"/cid/5120": "/docs/metrics",
"/cid/5121": "/docs/metrics/introduction",
"/cid/5122": "/docs/metrics/chart",
Step 7: Preview your changes
Before proceeding, you'll need to preview your changes. See the Build Locally section in our README for instructions.
This constructs and deploys a local version of the Sumo Logic Docusaurus site. Our site relies on Docusaurus, a static site generator. It creates your site as basic static HTML, JavaScript, and CSS files.
Step 8: Submit your request
- Commit your changes to the branch with a meaningful message.
Use descriptive commit messages (and issue or ticket numbers, if applicable) that describe the changes you're making. One-line messages are fine for small changes, but bigger changes should look like this:$ git commit -m "A brief summary of the commit>> A paragraph describing what changed and its impact." - Set permissions to allow maintainers to edit and update the PR (learn more).
- Push your branch to the forked repo.
- Visit our repo after pushing your branch. If you see an option to Compare & pull request for your branch, click this.
- If you do not see it, create a new PR.
- Select
mainfor the base branch. This is the branch all staging and production content builds from. - Select your branch for the comparison.
- Click Create pull request.
- Select
- If you do not see it, create a new PR.
- On the PR page, enter the following:
- Make sure base branch is
mainand compare branch is the one you pushed. - Enter a title for the PR.
- If applicable, include a GitHub issue number (or, for internal Sumos, the Jira ticket number).
- Describe the changes you made.
- Apply a label that best describes your contribution.
- Make sure base branch is
- (Optional). For urgent, high-priority PRs (for example, doc edits tied to a GA release happening within 24 hours):
- Add the GA release date to the title. For example,
AWS Integration release (GA: Jan 1, 2026). - From the labels list, select the
hot🔥label, signifying it's an urgent PR. - For internal Sumos only: after completion of all GitHub checks, send your PR link to the #dochub Slack channel for review.
- Add the GA release date to the title. For example,
- First-time contributors will be prompted in a PR comment to sign our Contributor License Agreement. We allow individual contributions and contributions made on behalf of companies.
What happens next?
The Docs Team will review contributions, provide feedback, and merge approved changes to staging. They'll handle production updates separately.
Contact us
Need to get in touch? You can find us at: