 Meet the new
 AWS API Gateway

AWS API Gateway service allows you to create RESTful APIs, HTTP APIs, and WebSocket APIs for real-time two-way communication applications in containerized and serverless environments, as well as web applications.
The Sumo Logic AWS API Gateway app provides insights into API Gateway tasks while accepting and processing concurrent API calls throughout your infrastructure, including traffic management, CORS support, authorization and access control, throttling, monitoring, and API version management.
Log and metric types
The Sumo Logic app for AWS API Gateway uses the following logs and metrics:
- Amazon API Gateway CloudTrail Logs

- Amazon API Gateway access logs:
- Amazon API Gateway Metrics:
Sample log messages
Sample CloudTrail Log Message
{
   "eventVersion":"1.05",
   "userIdentity":{
      "type":"IAMUser",
      "principalId":"A12445W32RZN24HABCD12",
      "arn":"arn:aws:iam::123408221234:user/bob",
      "accountId":"123408221234",
      "accessKeyId":"ASIAZ123456Y3IMWK7X5",
      "userName":"bob",
      "sessionContext":{
         "sessionIssuer":{

         },
         "webIdFederationData":{

         },
         "attributes":{
            "mfaAuthenticated":"true",
            "creationDate":"2020-02-17T08:08:01Z"
         }
      },
      "invokedBy":"signin.amazonaws.com"
   },
   "eventTime":"2020-02-17T08:08:01Z",
   "eventSource":"apigateway.amazonaws.com",
   "eventName":"GetRestApi",
   "awsRegion":"us-east-1",
   "sourceIPAddress":"149.236.17.11",
   "userAgent":"signin.amazonaws.com",
   "requestParameters":{
      "restApiId":"w1234nsgjxf",
      "template":false
   },
   "responseElements":null,
   "requestID":"1234169e-e70a-44a1-a691-3cd3f857092a",
   "eventID":"051572b0-83ef-49a3-82f6-bbef1ac8c488",
   "readOnly":true,
   "eventType":"AwsApiCall",
   "recipientAccountId":"123408221234"
}
Sample Access Log Message
{
  "requestId": "bf04adbf-eacc-4601-8c14-94605f242e1a",
  "extendedRequestId": "Sca3bFUQgi0EYeA=",
  "identitySourceIp": "103.108.207.58",
  "identityCaller": "-",
  "identityUser": "-",
  "requestTime": "01/Feb/2024:06:47:49 +0000",
  "status": "500",
  "authorizerProperty": "-",
  "routeKey": "-",
  "apiId": "9iljix61i7",
  "authorizeError": "-",
  "authorizeLatency": "-",
  "authorizeStatus": "-",
  "authorizerError": "-",
  "authorizerIntegrationStatus": "-",
  "authorizerIntegrationLatency": "-",
  "authorizerLatency": "-",
  "authorizerPrincipalId": "-",
  "authorizerRequestId": "-",
  "authorizerStatus": "-",
  "authenticateError": "-",
  "authenticateLatency": "-",
  "authenticateStatus": "-",
  "connectedAt": "-",
  "connectionId": "-",
  "domainName": "9iljix61i7.execute-api.eu-north-1.amazonaws.com",
  "errorMessage": "Internal server error",
  "errorResponseType": "DEFAULT_5XX",
  "errorValidationErrorString": "-",
  "eventType": "-",
  "identityAccountId": "-",
  "identityCognitoAuthenticationProvider": "-",
  "identityCognitoAuthenticationType": "-",
  "identityCognitoIdentityId": "-",
  "identityCognitoIdentityPoolId": "-",
  "identityPrincipalOrgId": "-",
  "identityUserAgent": "Mozilla/5.0 (Macintosh; Intel Mac OS X 10_15_7) AppleWebKit/537.36 (KHTML, like Gecko) Chrome/121.0.0.0 Safari/537.36",
  "identityUserArn": "-",
  "identityApiKey": "-",
  "identityApiKeyId": "-",
  "integrationError": "Execution failed due to configuration error: PKIX path building failed: sun.security.provider.certpath.SunCertPathBuilderException: unable to find valid certification path to requested target",
  "integrationIntegrationStatus": "-",
  "integrationLatency": "258",
  "integrationRequestId": "-",
  "integrationStatus": "-",
  "contextIntegrationLatency": "258",
  "requestTimeEpoch": "1706770069673",
  "stage": "test",
  "messageId": "-",
  "wafError": "-",
  "wafLatency": "10",
  "wafStatus": "200"
}
Sample queries
Namespace=aws/apigateway metric=Latency statistic=Average account=* region=* apiname=* | avg by apiname, namespace, region, account
"\"eventSource\":\"apigateway.amazonaws.com\"" errorCode account=dev Namespace=aws/apigateway region=us-east-1
| json "eventName", "eventSource", "awsRegion", "userAgent", "recipientAccountId", "userIdentity", "requestParameters", "responseElements", "sourceIPAddress", "errorCode", "errorMessage", "requestID" as event_name, event_source, Region, user_agent, accountId1, userIdentity, requestParameters, responseElements, src_ip, errorCode, errorMessage, requestID nodrop
| where event_source = "apigateway.amazonaws.com" and !isEmpty(errorCode)
| json field=userIdentity "accountId", "arn", "userName", "type" as accountId2, arn, username, type nodrop | parse field=arn ":assumed-role/*" as user nodrop | parse field=arn "arn:aws:iam::*:*" as accountId, user nodrop
| json field=requestParameters "basePath", "domainName" as basePath, domainName nodrop | json field=responseElements "name" as ApiName nodrop // CreateRestApi, CreateApiKey, CreateUsagePlan, CreateUsagePlanKey, CreateUsagePlanKey, ImportApi, ImportRestApi, UpdateRestApi, UpdateUsagePlan provides ApiName
| where (tolowercase(ApiName) matches tolowercase("*")) or isBlank(apiname)
| if (isEmpty(errorCode), "Success", "Failure") as eventStatus
| if (!isEmpty(accountId1), accountId1, accountId2) as accountId
| if (isEmpty(userName), user, userName) as user
| count as eventCount by errorCode
| top 10 errorCode by eventCount, errorCode asc
account=dev region=us-east-1 namespace=aws/apigateway apiname=* apiid stage domainname requestId identityUserAgent
| json "requestId", "apiId", "authorizerError", "errorMessage", "errorResponseType", "status", "integrationLatency", "domainName", "identitySourceIp", "identityUserAgent", "stage", "integrationStatus" as requestId, apiId, authorizerError, errorMessage, errorResponseType, status, integrationLatency, domainName, identitySourceIp, identityUserAgent, stage, integrationStatus
| json "wafLatency", "responseLatency", "responseLength", "path", "httpMethod", "protocol" as wafLatency, responseLatency, responseLength, path, httpMethod, protocol nodrop
| parse field=domainName "*.execute-api.*.amazonaws.com" as  apiid, region
| where account matches "dev" and region matches "us-east-1" and apiid matches "*" and apiname matches "*"
| where !(identityUserAgent=="-")
| count as Frequency by identityUserAgent
| sort by Frequency, identityUserAgent asc
Collecting logs and metrics for AWS API Gateway
Configure Hosted Collector
When you create an AWS Source, you'll need to identify the Hosted Collector you want to use or create a new Hosted Collector. Once you create an AWS Source, associate it with a Hosted Collector. For instructions, see Configure a Hosted Collector and Source.
Collect AWS API Gateway CloudWatch metrics
Sumo Logic supports collecting metrics using one of the following source types:
-
Configure an AWS Kinesis Firehose for Metrics Source (recommended)
-
Configure an Amazon CloudWatch Source for Metrics
noteNamespace for AWS API Gateway service is AWS/ApiGateway.
Follow the steps below to add custom metadata fields with your metrics:
- Click +Add Field under Metadata. Each field consists of a name (key) and a corresponding value.
- Create a field named
accountand assign it a value that represents a friendly name or alias to your AWS account from which metrics are collected. This value will appear in the AWS Observability view, and metrics can be queried using theaccountfield.
- After adding fields, check their status indicators:
 A green check mark indicates the field exists and is enabled in the Fields table schema.
 An orange exclamation icon indicates the field does not exist or is disabled in the schema.
- You will have the option to automatically add or enable the field.
- If a field is sent but not present or enabled in the schema, it is ignored and marked as Dropped.
Enable cache metrics
To collect CacheHitCount and CacheMissCount metrics, make sure you enable caching for a specific stage.
Enable enhanced metrics
API Gateway will not send these metrics unless you have explicitly enabled detailed CloudWatch metrics. Enabling such metrics will incur additional charges to your account. For pricing information, see Amazon CloudWatch Pricing. Follow the below instructions for your respective API types.
Enable enhanced metrics for REST APIs
-
Open the Amazon API Gateway console, then click on your REST API.
-
Select
stagessection, then select your stage.. -
Navigate to the Logs and tracing section, then click Edit.
-
Select the Detailed metrics checkbox.
-
Click Save changes.
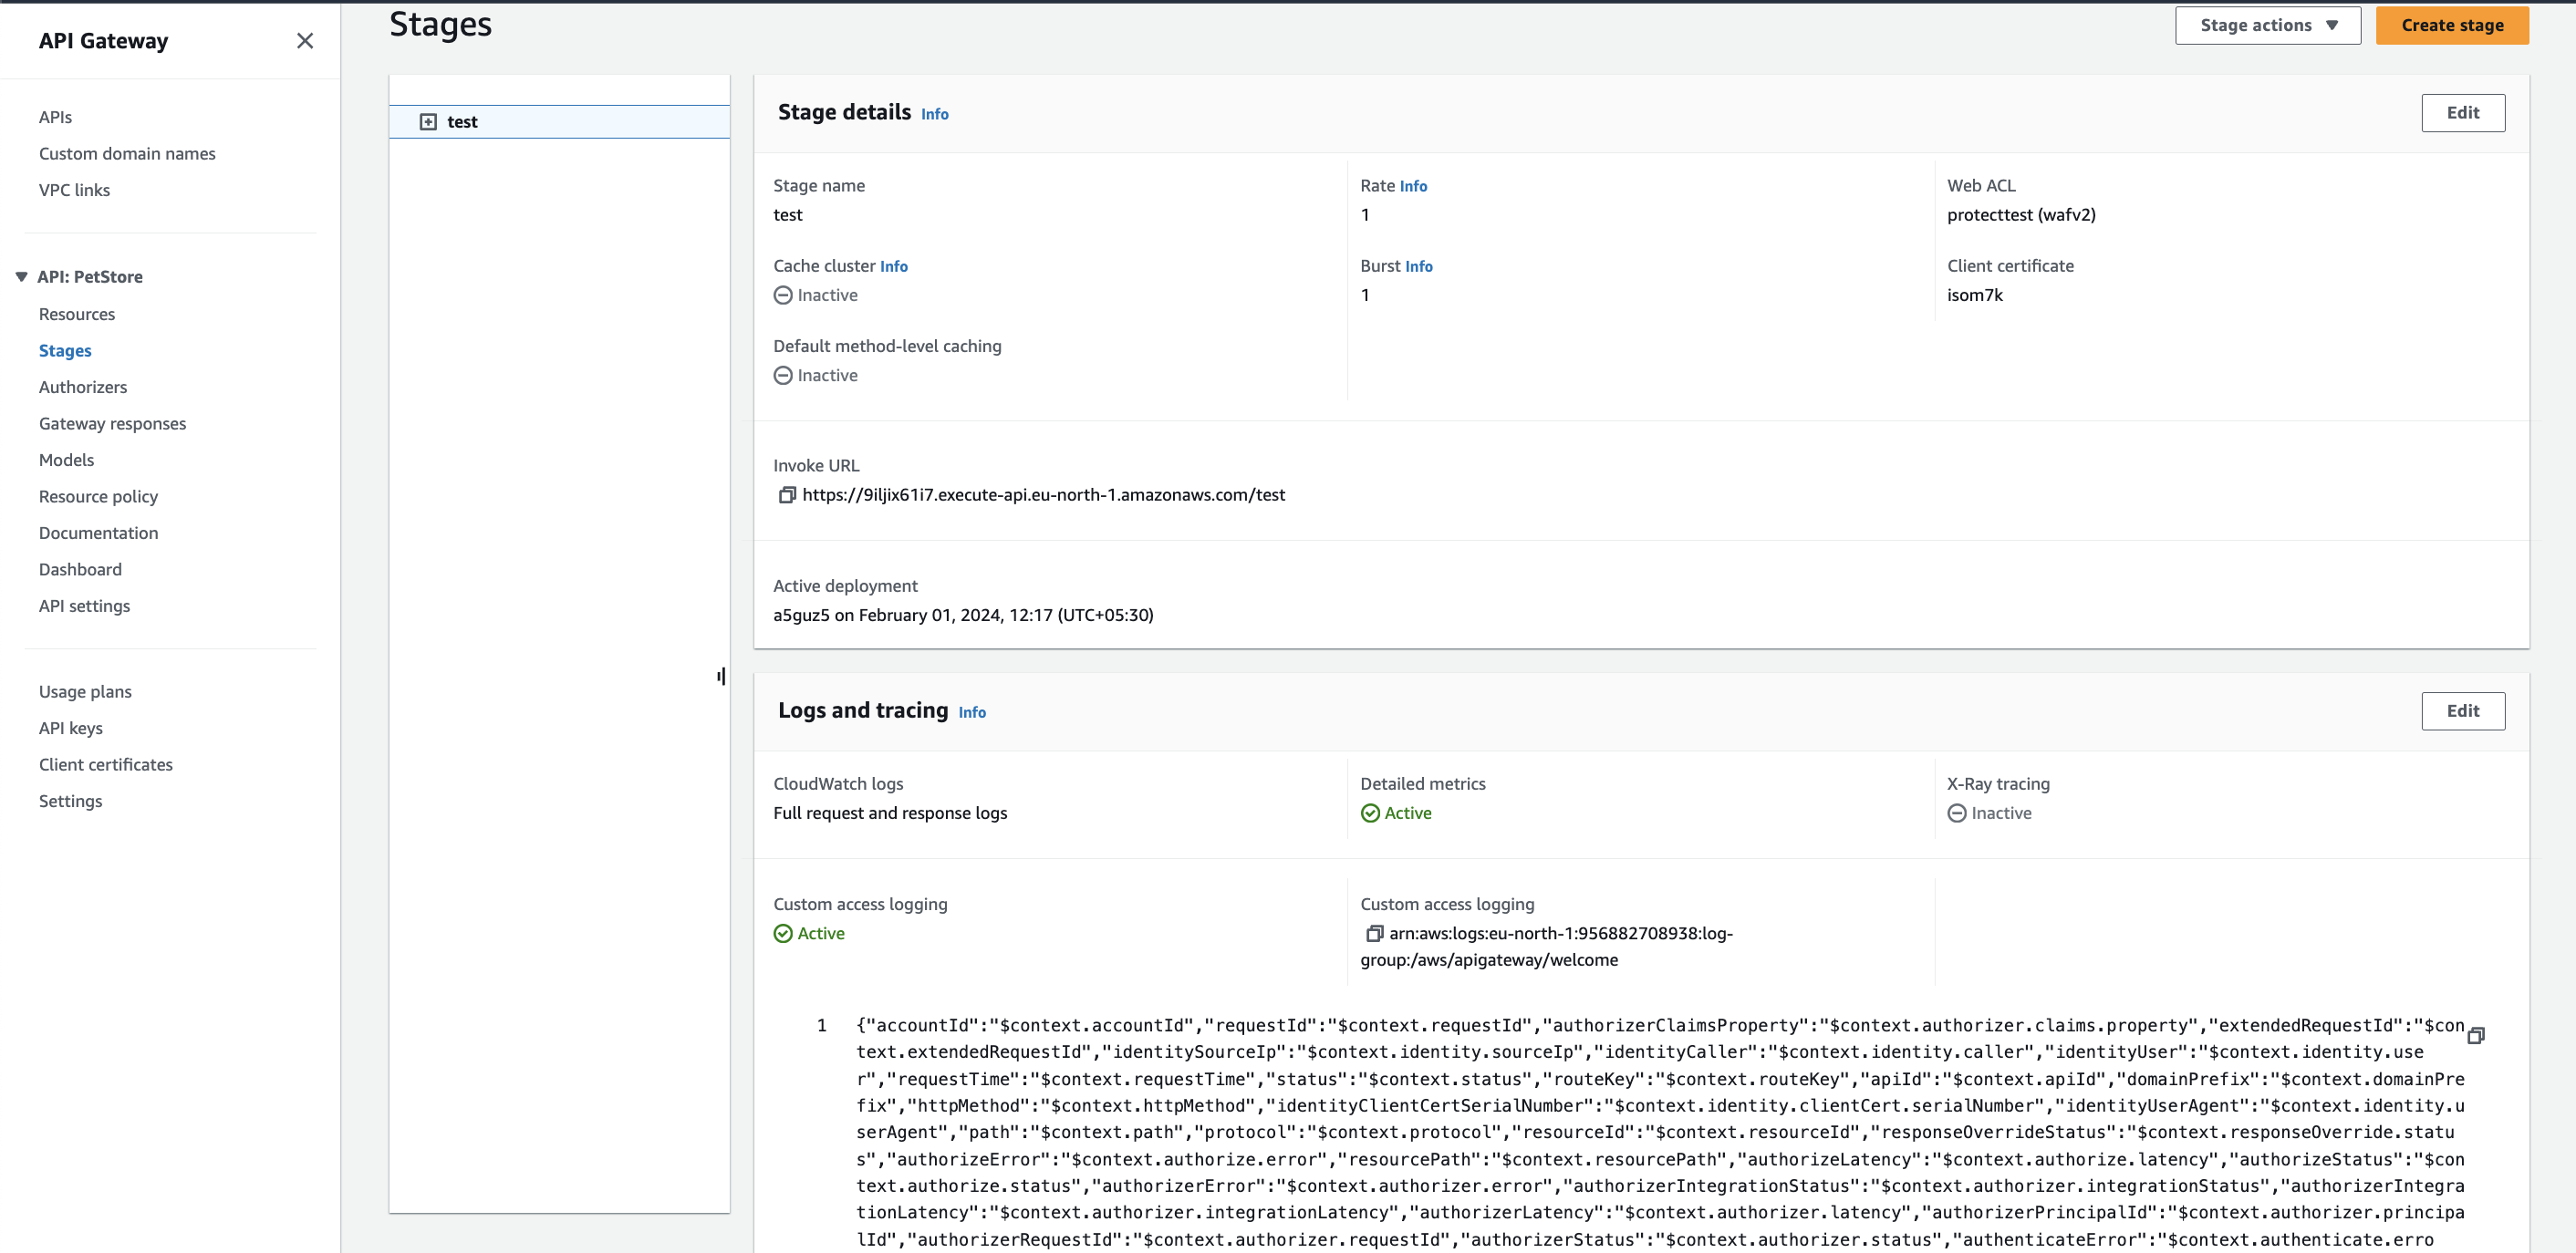
By default, methods inherit stage-level settings. You can customize settings for a method, by configuring
Method overrides.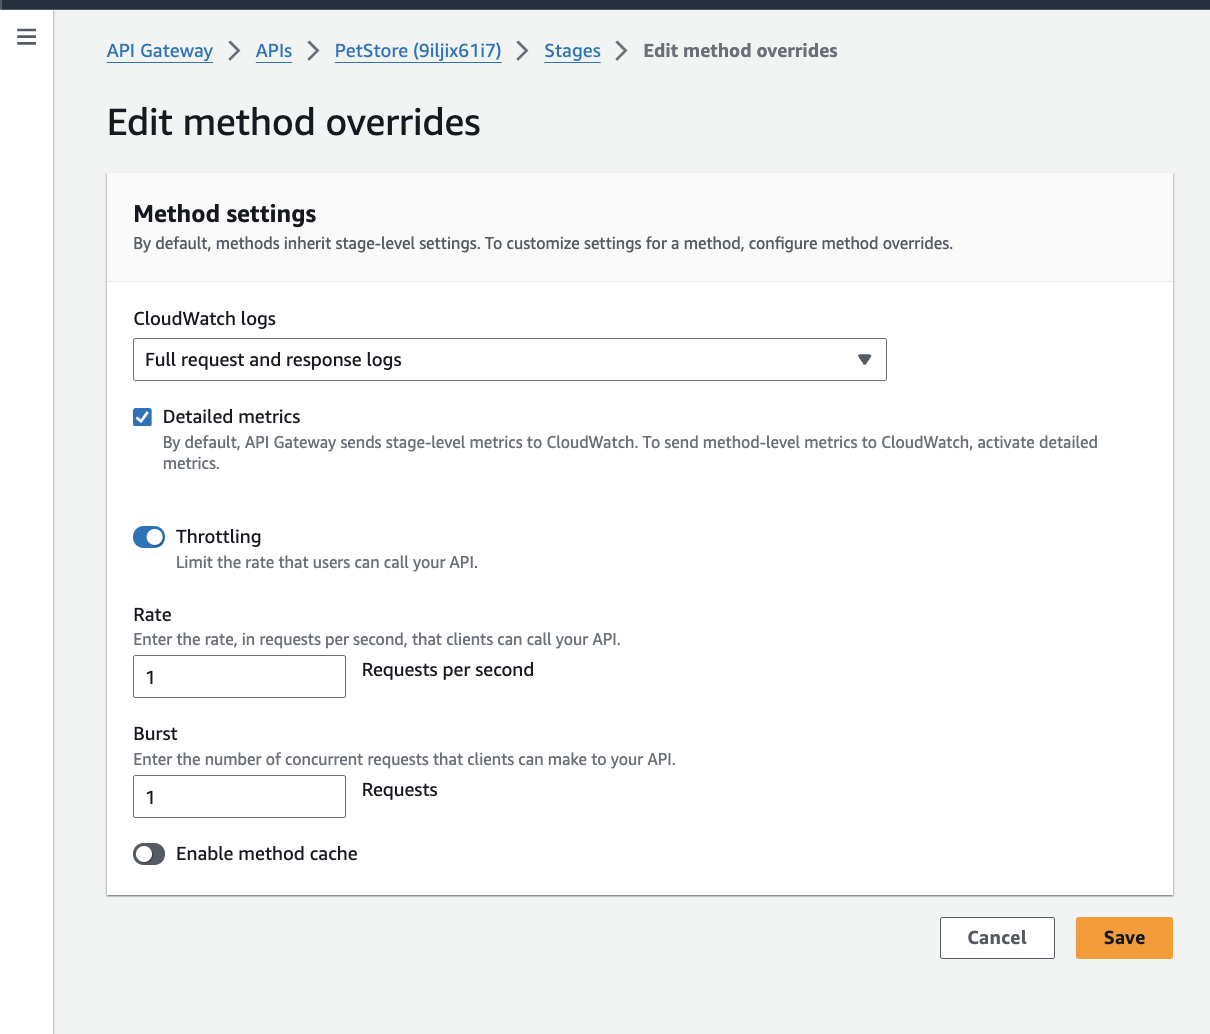
Enable enhanced metrics for HTTP APIs
-
Open the Amazon API Gateway console, and click on your HTTP API.
-
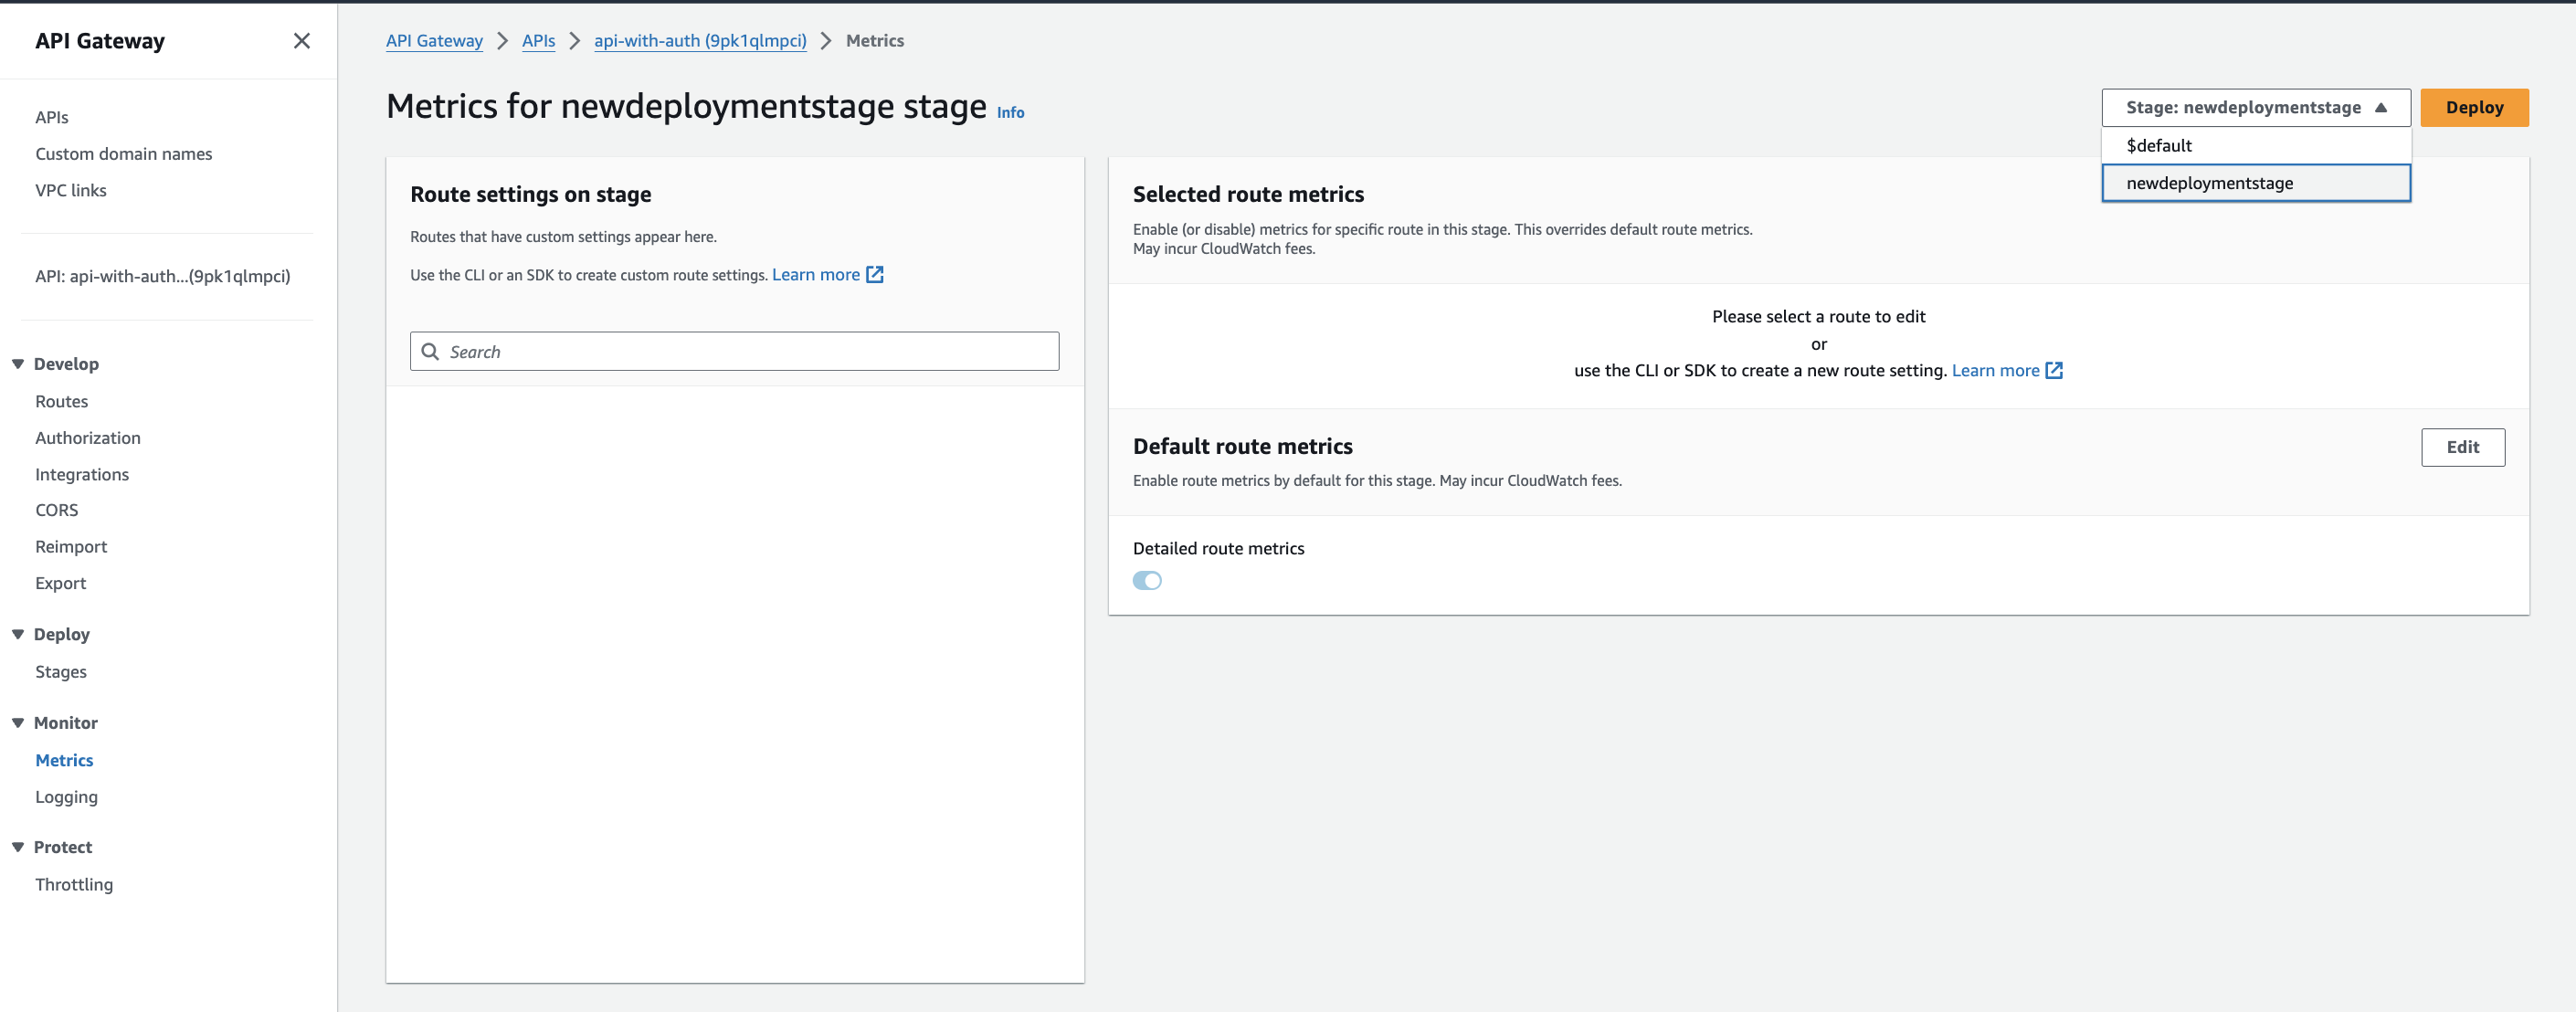
Under the Monitor section, click Metrics.
-
Select the stage, and click Edit.
-
Toggle the enabled button to enable the Detailed route metrics.
-
Click Save.
-
Click Deploy.
Enable enhanced metrics for WebSocket APIs
The below steps require AWS CLI, refer install and configure documentation, if you do not have it installed and configured in your local machine.
Call the UpdateStage action of the API Gateway V2 REST API to update the detailedMetricsEnabled property to true. Alternatively, you can call the update-stage AWS CLI command to update the DetailedMetricsEnabled property to true as shown below:
aws apigatewayv2 update-stage --api-id <API_ID> --stage-name <STAGE_NAME> --default-route-settings <YOUR_ROUTE_SETTINGS> --output <OUTPUT_FORMAT> --region <REGION>
aws apigatewayv2 update-stage --api-id 9pk1qlmpci --stage-name $default --default-route-settings "{\"DetailedMetricsEnabled\":true}" --output json --region eu-north-1
Collect AWS API Gateway Access logs
-
Configure the AWS Kinesis Firehose for Logs Source.
- Name. Enter a name to display the new Source.
- Description. Enter an optional description.
- Enable S3 Replay. Do not check this option.
- Source Category. Enter
aws/apigateway/accesslogs. - Fields. Add below fields in it:
- Add an account field and assign it a value that is a friendly name/alias to your AWS account from which you are collecting logs. This name will appear in the AWS Observability view. Logs can be queried via the
accountfield. - Add region and accountid fields and assign their respective values.
- Add an account field and assign it a value that is a friendly name/alias to your AWS account from which you are collecting logs. This name will appear in the AWS Observability view. Logs can be queried via the
- Enable Timestamp Parsing. Select the Extract timestamp information from log file entries check box.
- Time Zone. Select Use time zone from log file. If none is detected use, and select Use Collector Default from the dropdown.
- Timestamp Format. Select Automatically detect the format.
- Enable Multiline Processing. Select the Detect messages spanning multiple lines check box, and select Infer Boundaries.
- Click Save.
- Save the given URL of the source for next step.
-
Create Stack in AWS console with given CloudFormation Template.
-
Create a log group in CloudWatch Logs by referring to the AWS documentation. Make sure to set your log group name convention as
/aws/apigateway/<apiid>/<stagename>. -
Follow the steps below to enable access logs for each respective API type:
noteEnsure to remove
:*from the end while adding Access log destination ARN.-
Enable Access logs for REST APIs by referring to the AWS documentation. When you specify the
Log formatfield, use the below JSON.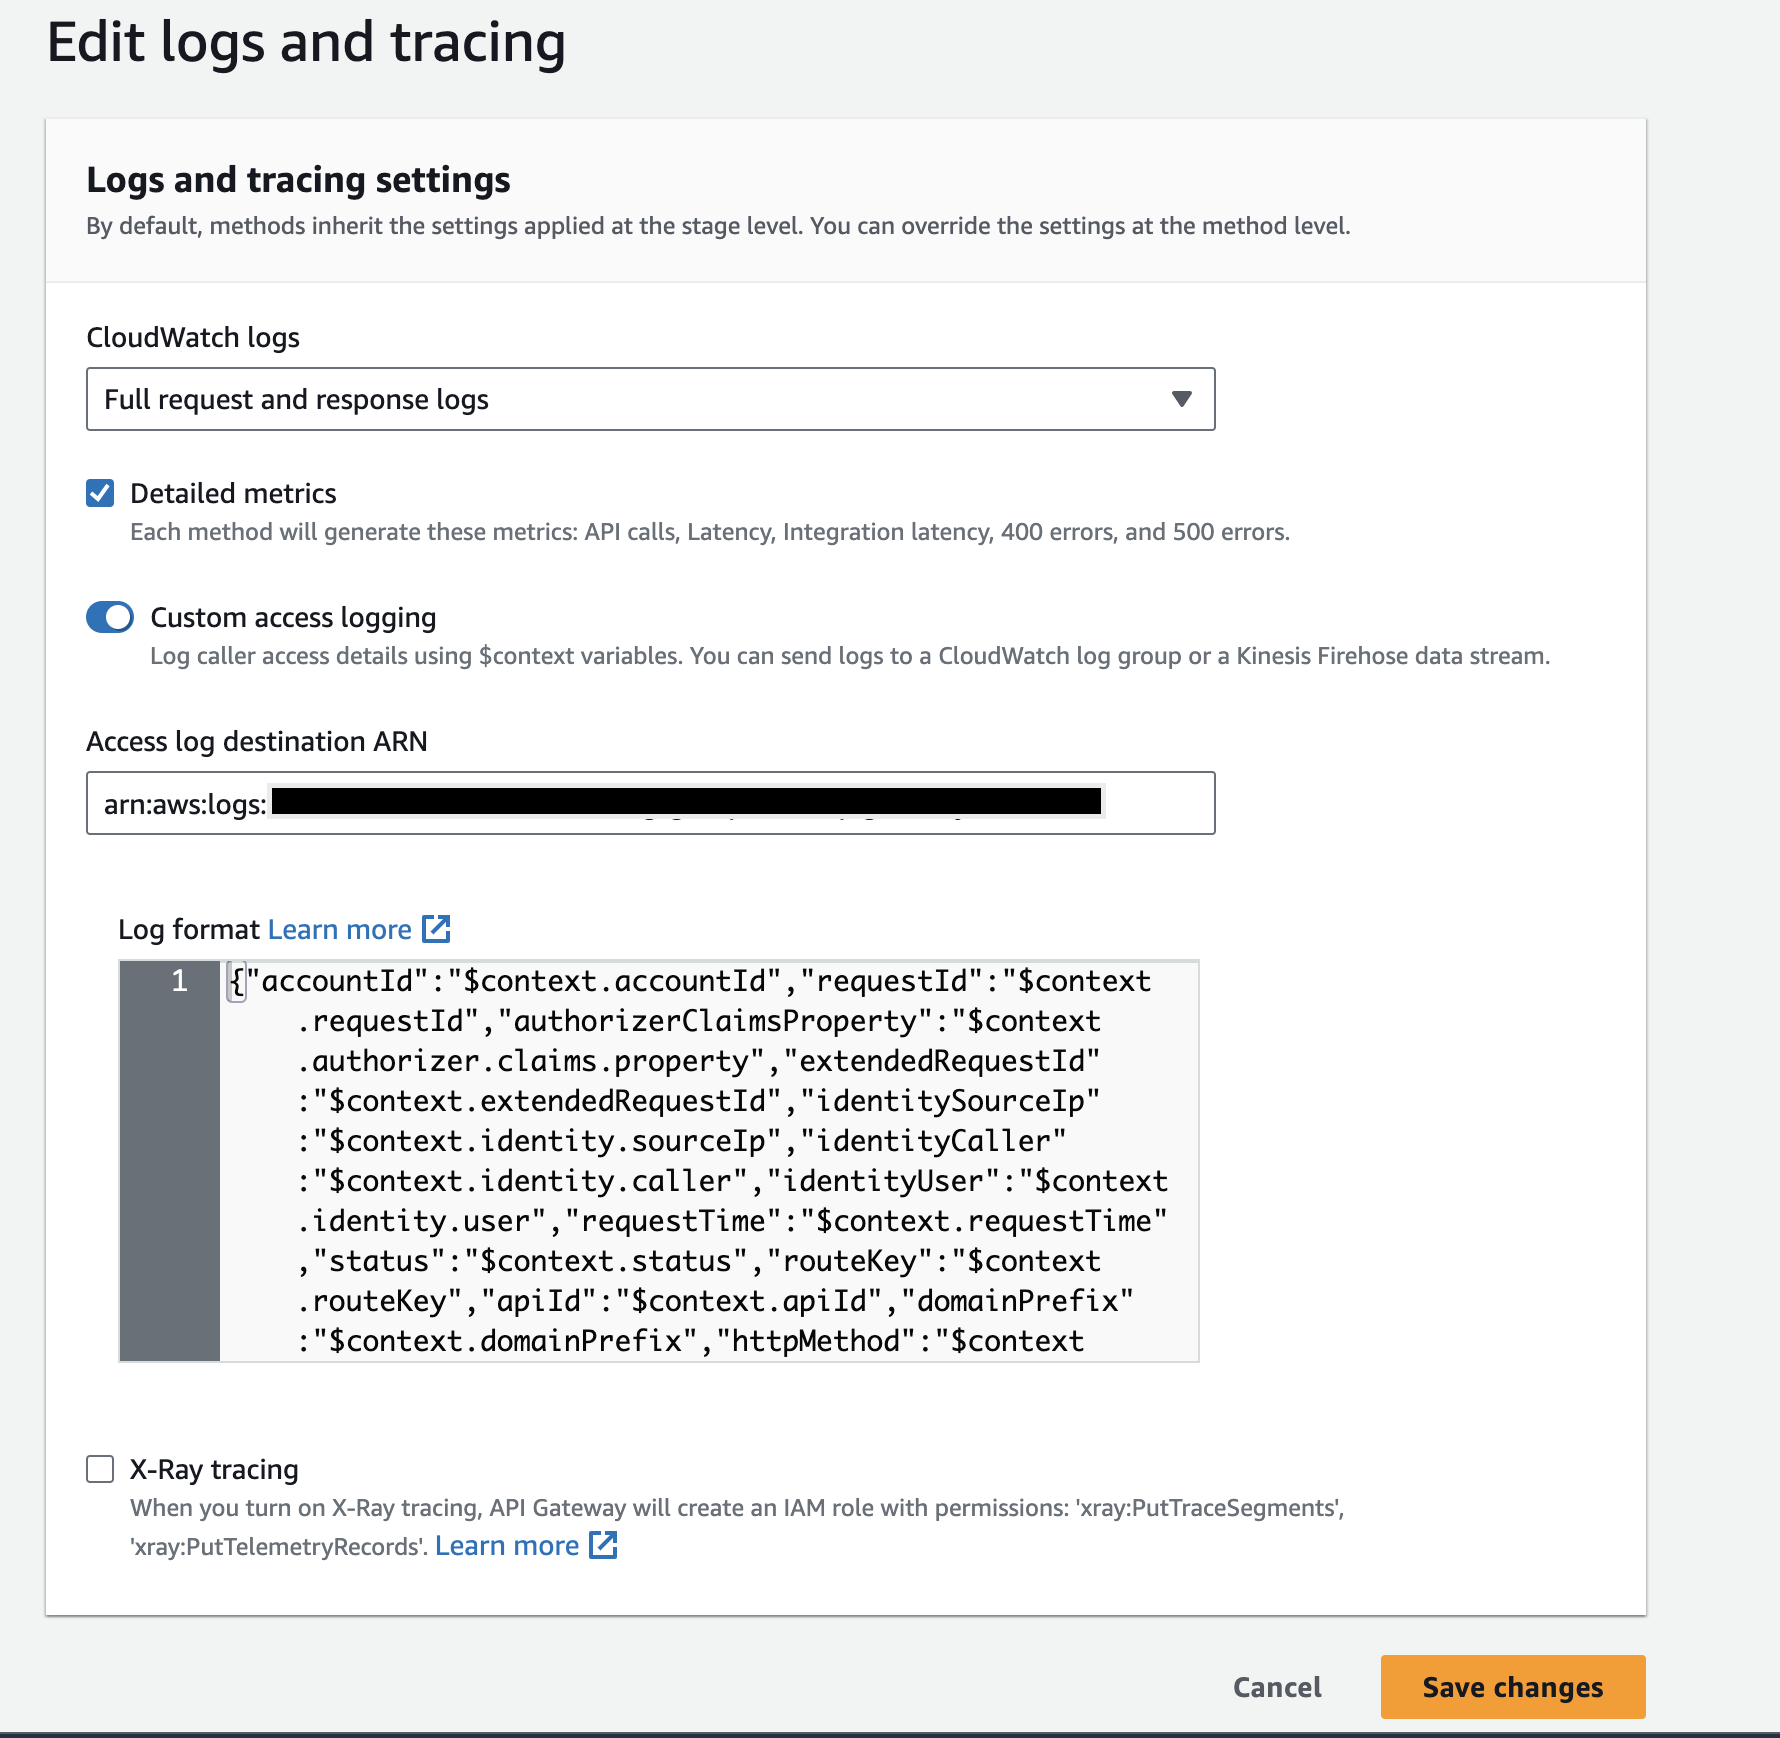
JSON Log Format for REST API
{"accountId": "$context.accountId","requestId": "$context.requestId","authorizerClaimsProperty": "$context.authorizer.claims.property","extendedRequestId": "$context.extendedRequestId","identitySourceIp": "$context.identity.sourceIp","identityCaller": "$context.identity.caller","identityUser": "$context.identity.user","requestTime": "$context.requestTime","status": "$context.status","routeKey": "$context.routeKey","apiId": "$context.apiId","domainPrefix": "$context.domainPrefix","httpMethod": "$context.httpMethod","identityClientCertSerialNumber": "$context.identity.clientCert.serialNumber","identityUserAgent": "$context.identity.userAgent","path": "$context.path","protocol": "$context.protocol","resourceId": "$context.resourceId","responseOverrideStatus": "$context.responseOverride.status","authorizeError": "$context.authorize.error","resourcePath": "$context.resourcePath","authorizeLatency": "$context.authorize.latency","authorizeStatus": "$context.authorize.status","authorizerError": "$context.authorizer.error","authorizerIntegrationStatus": "$context.authorizer.integrationStatus","authorizerIntegrationLatency": "$context.authorizer.integrationLatency","authorizerLatency": "$context.authorizer.latency","authorizerPrincipalId": "$context.authorizer.principalId","authorizerRequestId": "$context.authorizer.requestId","authorizerStatus": "$context.authorizer.status","authenticateError": "$context.authenticate.error","authenticateLatency": "$context.authenticate.latency","authenticateStatus": "$context.authenticate.status","connectedAt": "$context.connectedAt","connectionId": "$context.connectionId","domainName": "$context.domainName","errorMessage": "$context.error.message","errorResponseType": "$context.error.responseType","errorValidationErrorString": "$context.error.validationErrorString","eventType": "$context.eventType","identityAccountId": "$context.identity.accountId","identityPrincipalOrgId": "$context.identity.principalOrgId","identityUserArn": "$context.identity.userArn","identityApiKey": "$context.identity.apiKey","identityApiKeyId": "$context.identity.apiKeyId","integrationError": "$context.integration.error","integrationIntegrationStatus": "$context.integration.integrationStatus","integrationLatency": "$context.integration.latency","integrationRequestId": "$context.integration.requestId","integrationStatus": "$context.integration.status","contextIntegrationLatency": "$context.integrationLatency","responseLatency": "$context.responseLatency","responseLength": "$context.responseLength","xrayTraceId": "$context.xrayTraceId","requestTimeEpoch": "$context.requestTimeEpoch","stage": "$context.stage","messageId": "$context.messageId","wafResponseCode": "$context.wafResponseCode","wafError": "$context.waf.error","wafLatency": "$context.waf.latency","wafStatus": "$context.waf.status","webaclArn": "$context.webaclArn"}-
Enable Access logs for HTTP APIs by referring to AWS documentation and when you specify the
Log formatfield use the below JSON.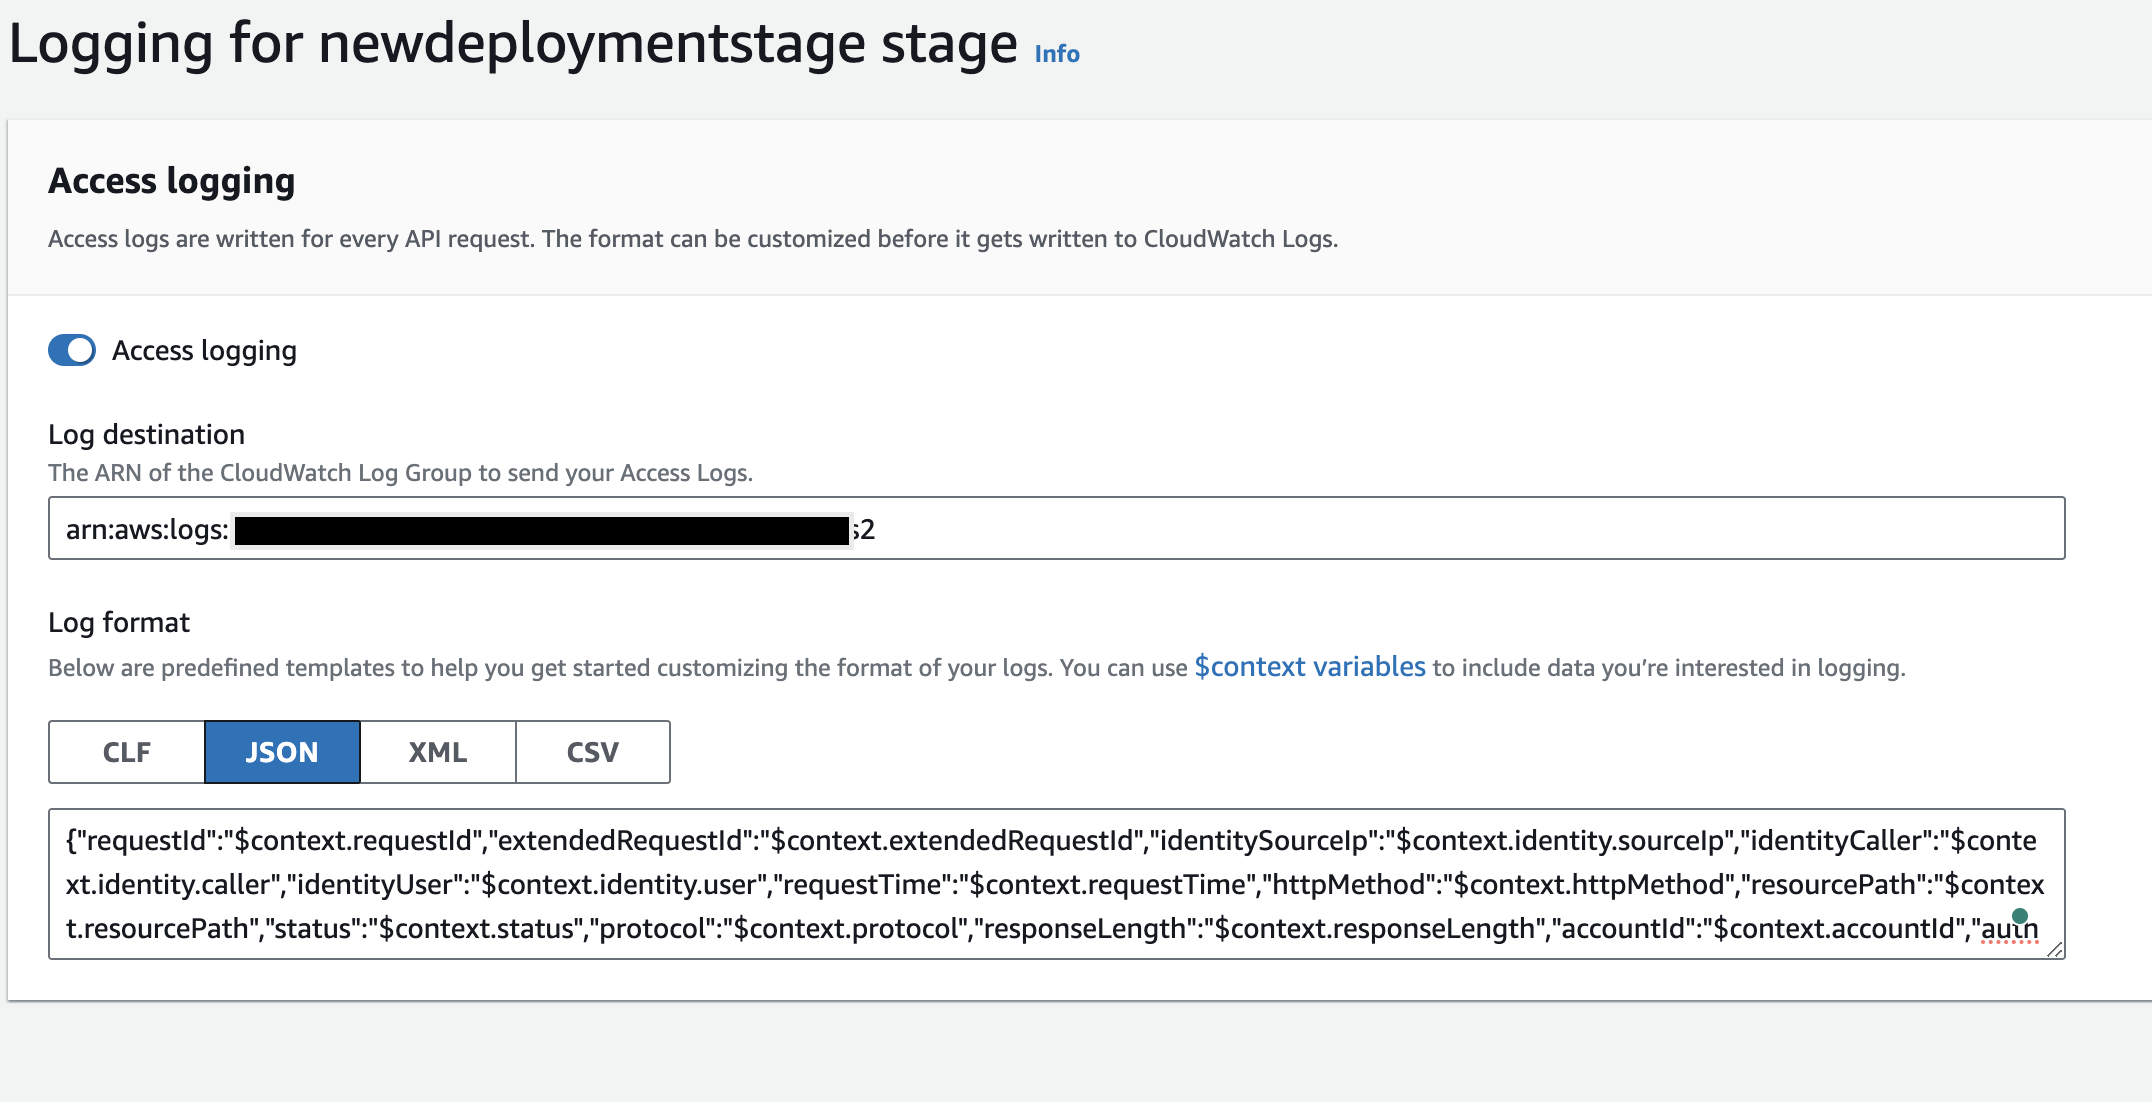
JSON Log Format for HTTP API
{"requestId": "$context.requestId","extendedRequestId": "$context.extendedRequestId","identitySourceIp": "$context.identity.sourceIp","identityCaller": "$context.identity.caller","identityUser": "$context.identity.user","requestTime": "$context.requestTime","httpMethod": "$context.httpMethod","resourcePath": "$context.resourcePath","status": "$context.status","protocol": "$context.protocol","responseLength": "$context.responseLength","accountId": "$context.accountId","authorizerProperty": "$context.authorizer.property","routeKey": "$context.routeKey","responseLatency": "$context.responseLatency","integrationErrorMessage": "$context.integrationErrorMessage","apiId": "$context.apiId","authorizerClaimsProperty": "$context.authorizer.claims.property","authorizerError": "$context.authorizer.error","authorizerPrincipalId": "$context.authorizer.principalId","awsEndpointRequestId": "$context.awsEndpointRequestId","awsEndpointRequestId2": "$context.awsEndpointRequestId2","customDomainBasePathMatched": "$context.customDomain.basePathMatched","dataProcessed": "$context.dataProcessed","domainName": "$context.domainName","domainPrefix": "$context.domainPrefix","errorMessage": "$context.error.message","errorResponseType": "$context.error.responseType","identityAccountId": "$context.identity.accountId","identityCognitoAuthenticationProvider": "$context.identity.cognitoAuthenticationProvider","identityCognitoAuthenticationType": "$context.identity.cognitoAuthenticationType","identityCognitoIdentityId": "$context.identity.cognitoIdentityId","identityCognitoIdentityPoolId": "$context.identity.cognitoIdentityPoolId","identityPrincipalOrgId": "$context.identity.principalOrgId","identityClientCertClientCertPem": "$context.identity.clientCert.clientCertPem","identityClientCertSubjectDN": "$context.identity.clientCert.subjectDN","identityClientCertIssuerDN": "$context.identity.clientCert.issuerDN","identityClientCertSerialNumber": "$context.identity.clientCert.serialNumber","identityClientCertValidityNotBefore": "$context.identity.clientCert.validity.notBefore","identityClientCertValidityNotAfter": "$context.identity.clientCert.validity.notAfter","identityUserAgent": "$context.identity.userAgent","identityUserArn": "$context.identity.userArn","integrationError": "$context.integration.error","integrationIntegrationStatus": "$context.integration.integrationStatus","integrationLatency": "$context.integration.latency","integrationRequestId": "$context.integration.requestId","integrationStatus": "$context.integration.status","contextIntegrationLatency": "$context.integrationLatency","contextIntegrationStatus": "$context.integrationStatus","path": "$context.path","requestTimeEpoch": "$context.requestTimeEpoch","stage": "$context.stage"}-
Enable Access logs for WebSocket APIs by referring to AWS documentation and when you specify the
Log formatfield use the below JSON.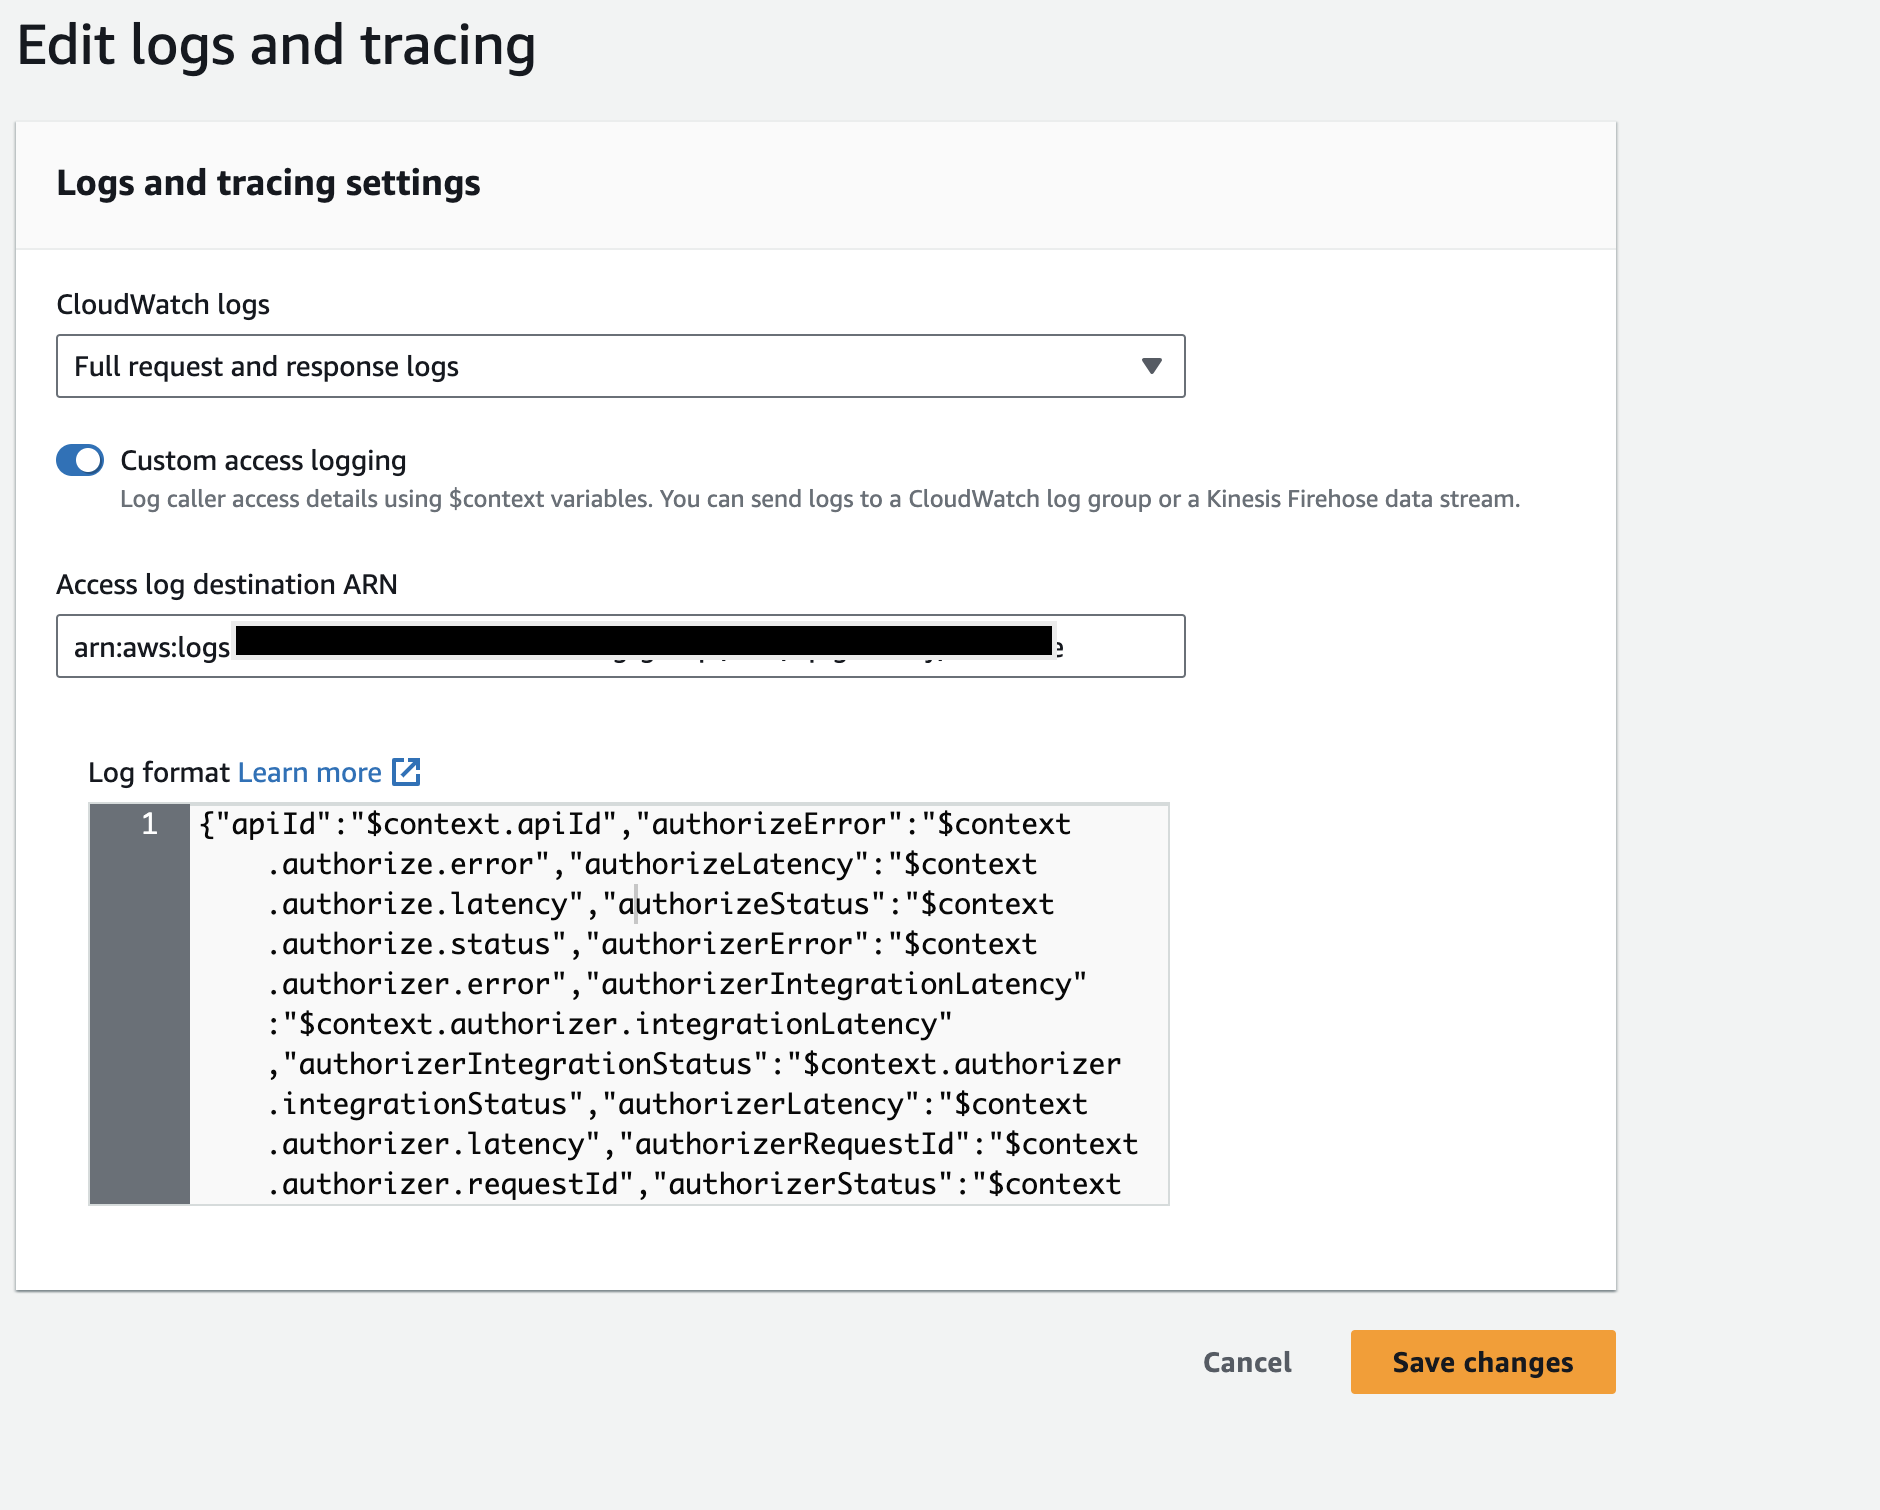
JSON Log Format for WebSocket API
{"apiId": "$context.apiId","authorizeError": "$context.authorize.error","authorizeLatency": "$context.authorize.latency","authorizeStatus": "$context.authorize.status","authorizerError": "$context.authorizer.error","authorizerIntegrationLatency": "$context.authorizer.integrationLatency","authorizerIntegrationStatus": "$context.authorizer.integrationStatus","authorizerLatency": "$context.authorizer.latency","authorizerRequestId": "$context.authorizer.requestId","authorizerStatus": "$context.authorizer.status","authorizerPrincipalId": "$context.authorizer.principalId","authorizerProperty": "$context.authorizer.property","authenticateError": "$context.authenticate.error","authenticateLatency": "$context.authenticate.latency","authenticateStatus": "$context.authenticate.status","connectedAt": "$context.connectedAt","connectionId": "$context.connectionId","domainName": "$context.domainName","errorMessage": "$context.error.message","errorResponseType": "$context.error.responseType","errorValidationErrorString": "$context.error.validationErrorString","eventType": "$context.eventType","extendedRequestId": "$context.extendedRequestId","identityAccountId": "$context.identity.accountId","identityApiKey": "$context.identity.apiKey","identityApiKeyId": "$context.identity.apiKeyId","identityCaller": "$context.identity.caller","identityCognitoAuthenticationProvider": "$context.identity.cognitoAuthenticationProvider","identityCognitoAuthenticationType": "$context.identity.cognitoAuthenticationType","identityCognitoIdentityId": "$context.identity.cognitoIdentityId","identityCognitoIdentityPoolId": "$context.identity.cognitoIdentityPoolId","identityPrincipalOrgId": "$context.identity.principalOrgId","identitySourceIp": "$context.identity.sourceIp","identityUser": "$context.identity.user","identityUserAgent": "$context.identity.userAgent","identityUserArn": "$context.identity.userArn","integrationError": "$context.integration.error","integrationIntegrationStatus": "$context.integration.integrationStatus","integrationLatency": "$context.integrationLatency","integrationRequestId": "$context.integration.requestId","integrationStatus": "$context.integration.status","messageId": "$context.messageId","requestId": "$context.requestId","requestTime": "$context.requestTime","requestTimeEpoch": "$context.requestTimeEpoch","routeKey": "$context.routeKey","stage": "$context.stage","status": "$context.status","wafError": "$context.waf.error","wafLatency": "$context.waf.latency","wafStatus": "$context.waf.status"} -
-
To Export logs, refer to Manually subscribe AWS Kinesis Firehose stream to an existing CloudWatch Log Group.
Collect AWS API Gateway CloudTrail logs
CloudTrail data events will be collected under this source.
Prerequisites
- Grant Sumo Logic access to an Amazon S3 bucket.
- Create a trail for your AWS account. For more information on what events are logged, refer to the API Gateway API calls documentation.
- Confirm that logs are being delivered to the Amazon S3 bucket.
Namespace for AWS API Gateway service is AWS/ApiGateway.
Follow the steps below to collect logs for AWS API Gateway:
- Configure a CloudTrail Logs Source.
- Add custom metadata fields with your logs:
- Click +Add Field under Metadata. Each field consists of a name (key) and a corresponding value.
- Create a field named
accountand assign it a value that represents a friendly name or alias to your AWS account from which logs are collected. This value will appear in the AWS Observability view, and logs can be queried using theaccountfield. - After adding fields, check their status indicators:
- A green check mark indicates the field exists and is enabled in the Fields table schema.
- An orange exclamation icon indicates the field does not exist or is disabled in the schema.
- You will have the option to automatically add or enable the field.
- If a field is sent but not present or enabled in the schema, it is ignored and marked as Dropped.
Centralized AWS CloudTrail log collection
In case you have a centralized collection of CloudTrail logs and are ingesting them from all accounts into a single Sumo Logic CloudTrail log source, create the following field extraction rule to map proper AWS account(s) friendly name/alias. You'll need to create it if not already present or update it as required.
Rule Name: AWS Accounts
Applied at: Ingest Time
Scope (Specific Data):
=aws/observability/cloudtrail/logs
Parse Expression
Enter a parse expression to create an account field that maps to the alias you set for each sub account. For example, if you used the dev alias for an AWS account with ID 528560886094 and the prod alias for an AWS account with ID 567680881046, your parse expression would look like this:
| json "recipientAccountId"
// Manually map your aws account id with the AWS account alias you setup earlier for individual child account
| "" as account
| if (recipientAccountId = "528560886094",  "dev", account) as account
| if (recipientAccountId = "567680881046",  "prod", account) as account
| fields account
Installing the AWS API Gateway app
Now that you have set up a collection for the AWS API gateway, install the Sumo Logic app to use the pre-configured dashboards that provide visibility into your environment for real-time analysis of overall usage.
To install the app, do the following:
Next-Gen App: To install or update the app, you must be an account administrator or a user with Manage Apps, Manage Monitors, Manage Fields, Manage Metric Rules, and Manage Collectors capabilities depending upon the different content types part of the app.
- Select App Catalog.
- In the 🔎 Search Apps field, run a search for your desired app, then select it.
- Click Install App.
note
Sometimes this button says Add Integration.
- Click Next in the Setup Data section.
- In the Configure section of your respective app, complete the following fields.
- Field Name. If you already have collectors and sources set up, select the configured metadata field name (eg _sourcecategory) or specify other custom metadata (eg: _collector) along with its metadata Field Value.
- Click Next. You will be redirected to the Preview & Done section.
Post-installation
Once your app is installed, it will appear in your Installed Apps folder, and dashboard panels will start to fill automatically.
Each panel slowly fills with data matching the time range query received since the panel was created. Results will not immediately be available but will be updated with full graphs and charts over time.
As part of the app installation process, the following content will be created by default along with dashboards and monitor template:
Fields
accountName / alias to the AWS account.accountidAWS account id.regionThe region to which the resource name belongs to.namespaceNamespace for AWS API Gateway Service is AWS/ApiGateway.apinameAPI Gateway API name.apiidAPI Gateway API id.
Field Extraction Rule(s)
The FER AwsObservabilityAPIGatewayCloudTrailLogsFER to extract fields accountid, namespace, region, and apiname from CloudTrail logs will be created as a part of app installation.
The FER AwsObservabilityAPIGatewayAccessLogsFER to extract fields namespace, apiid, and apiname from access logs will be created as a part of app installation.
The FER AwsObservabilityAPIGatewayCloudWatchLogsFER to extract fields namespace, apiid, and apiname from CloudWatch logs will be created as a part of app installation.
Metric Rule(s)
The Metric Rule AwsObservabilityAPIGatewayMetricsRule for the AWS/ApiGateway namespace will be created as a part of app installation.
As a best practice, do not delete or modify any fields, Field Extraction Rules (FERs), or Metric Rules created during the app installation. If you need to make updates, contact the Sumo Logic Support team.
Viewing AWS API Gateway dashboards
All dashboards have a set of filters that you can apply to the entire dashboard. Use these filters to drill down and examine the data to a granular level.
- You can change the time range for a dashboard or panel by selecting a predefined interval from a drop-down list, choosing a recently used time range, or specifying custom dates and times. Learn more.
- If required, configure the refresh interval rate for a dashboard or panel by clicking the drop-down arrow next to the refresh icon.
- Click the funnel icon in the dashboard top menu bar to filter the dashboard with template variables.
Overview
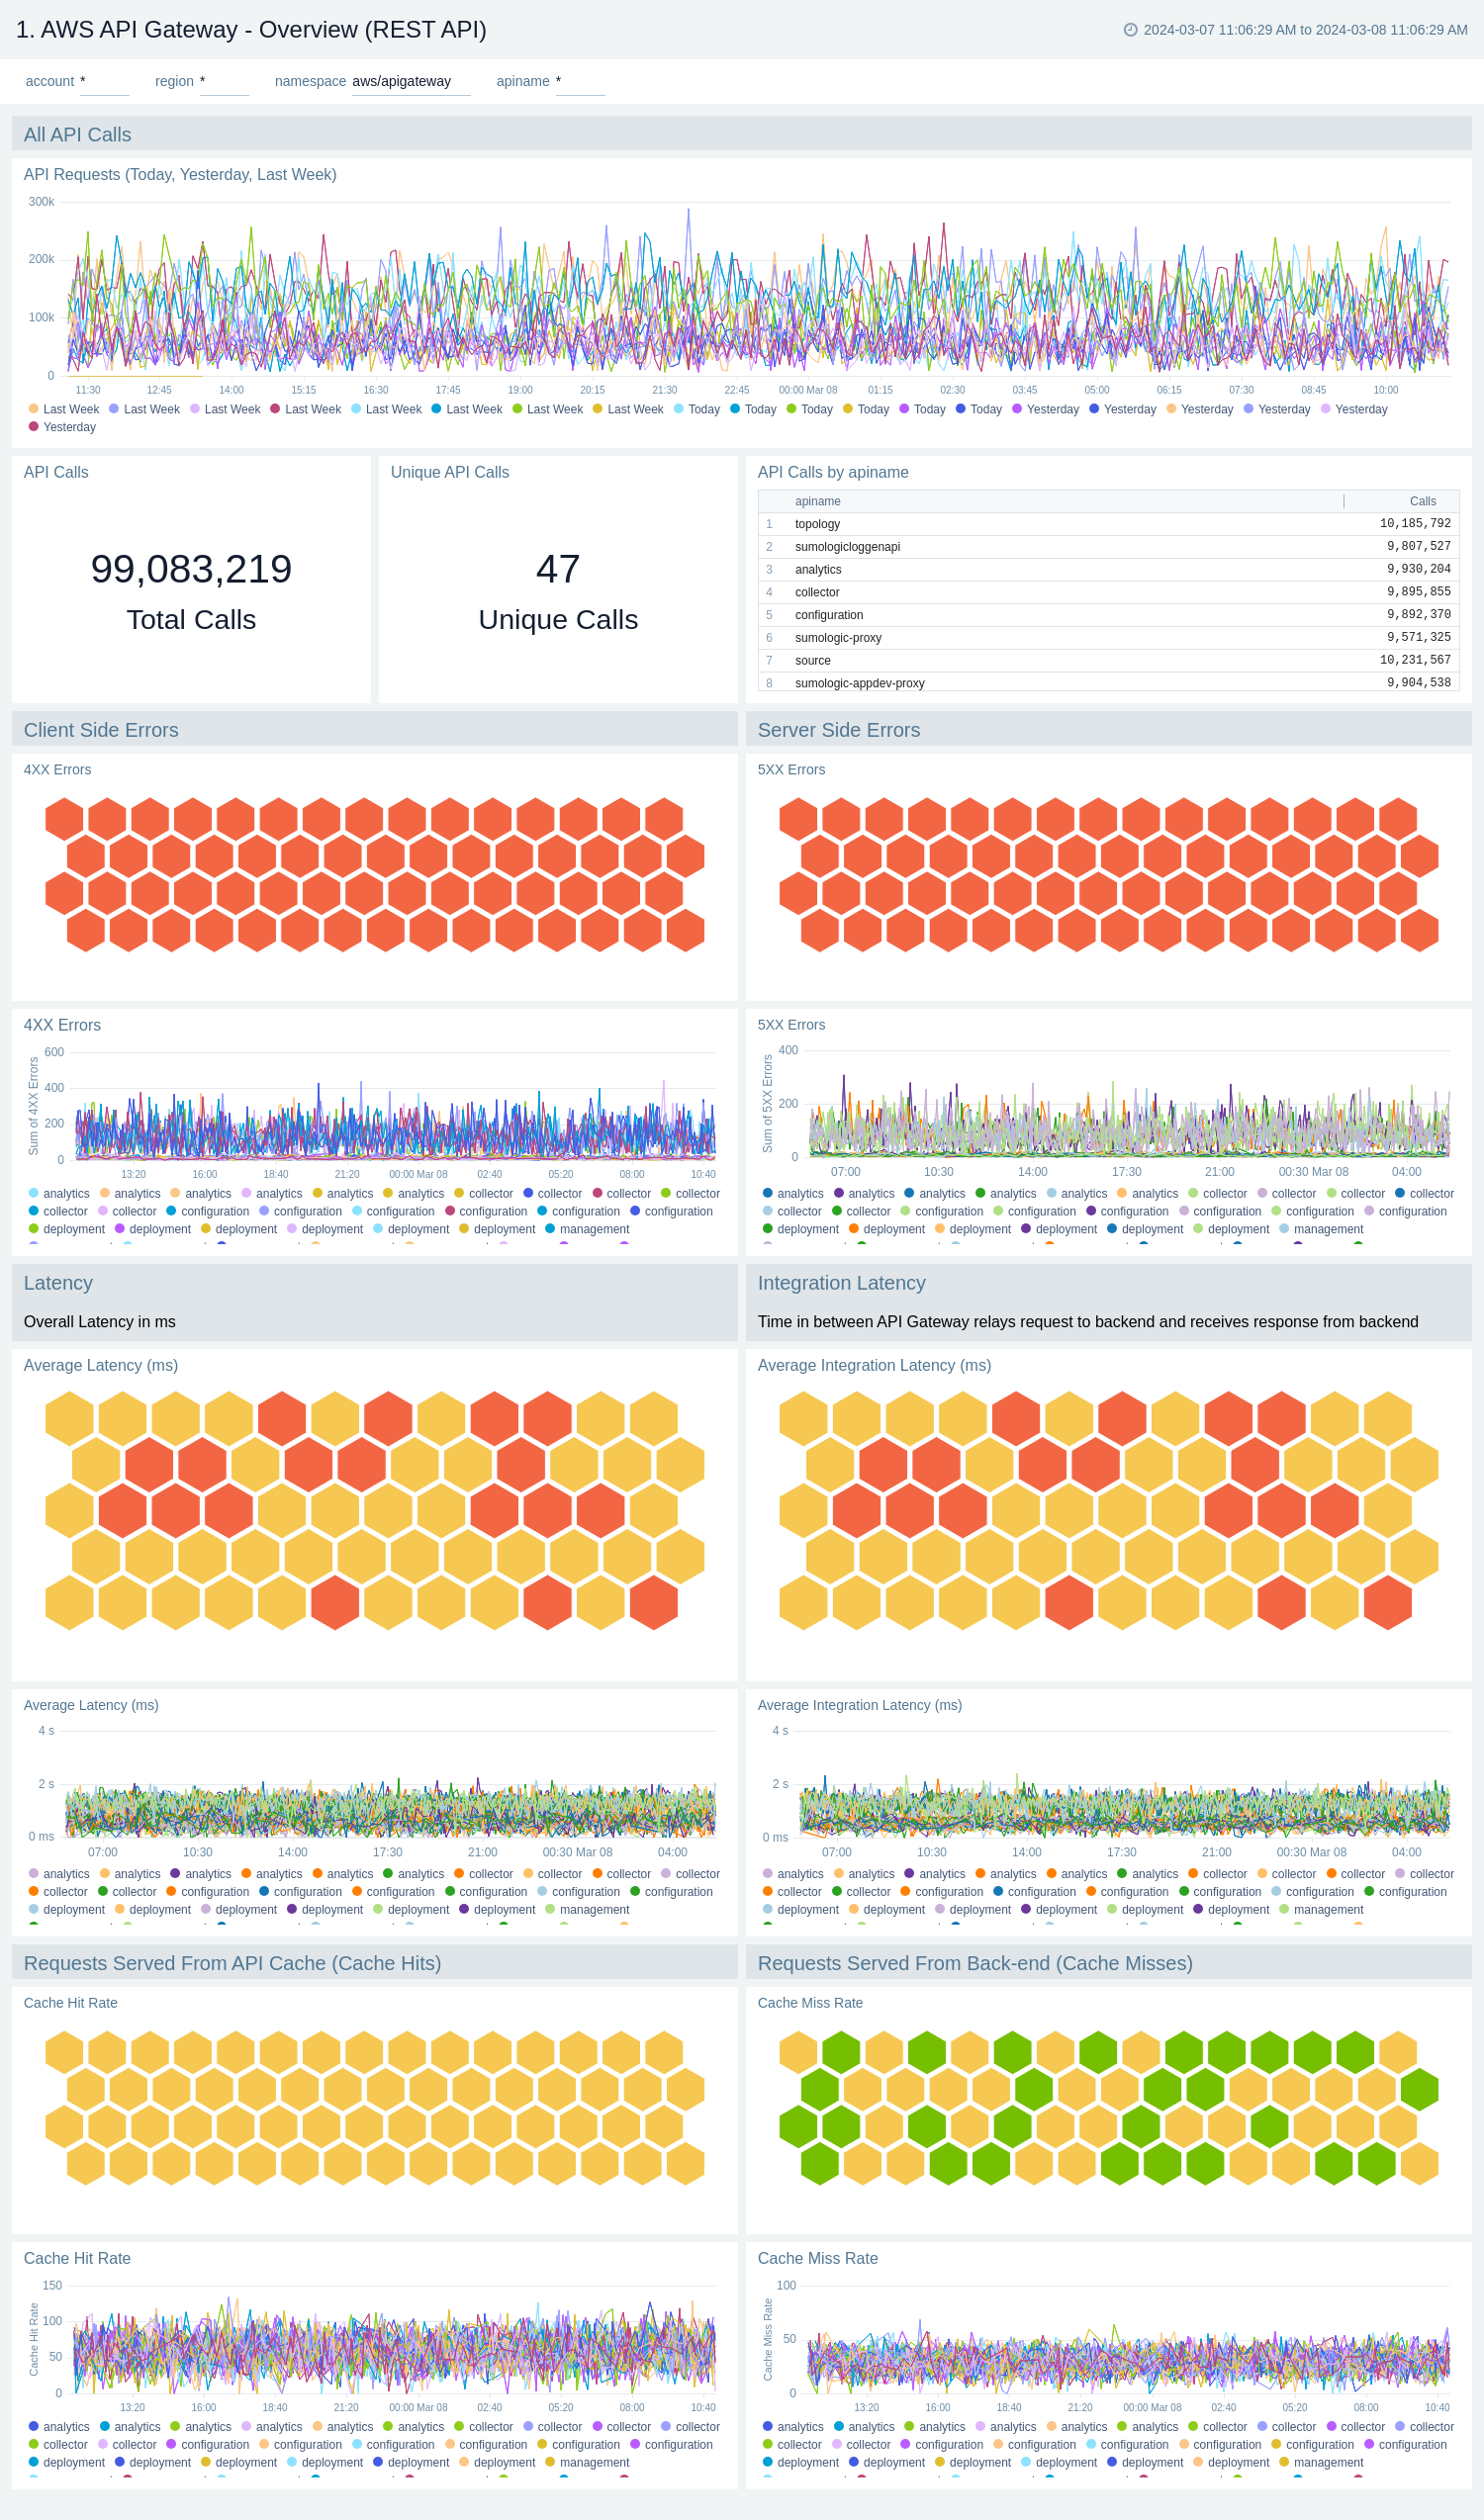
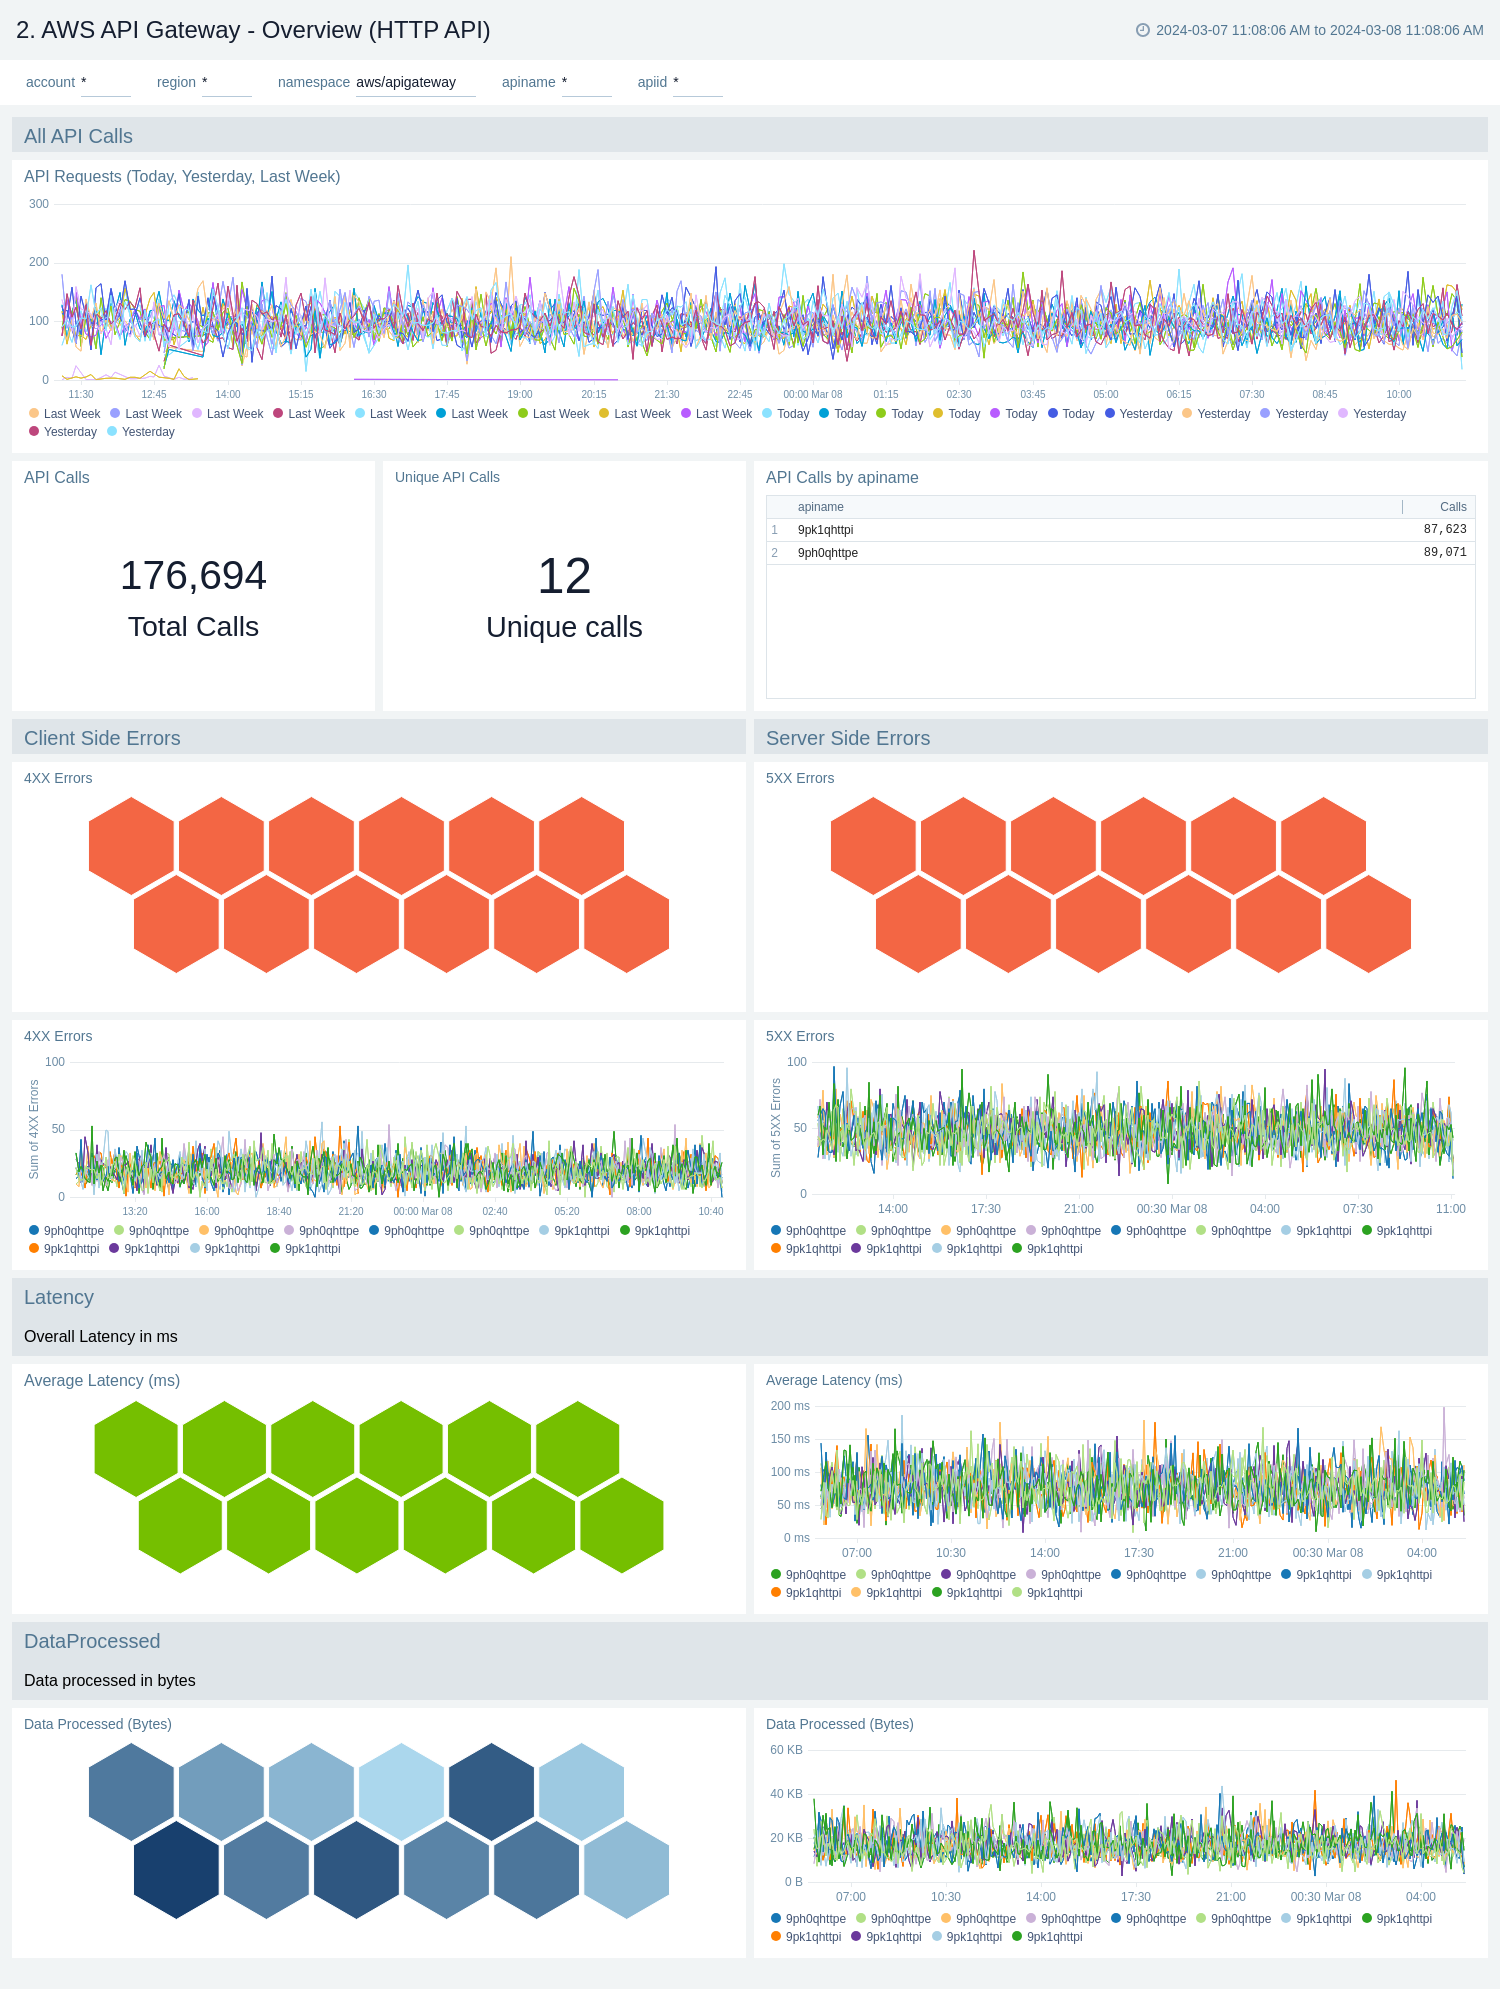
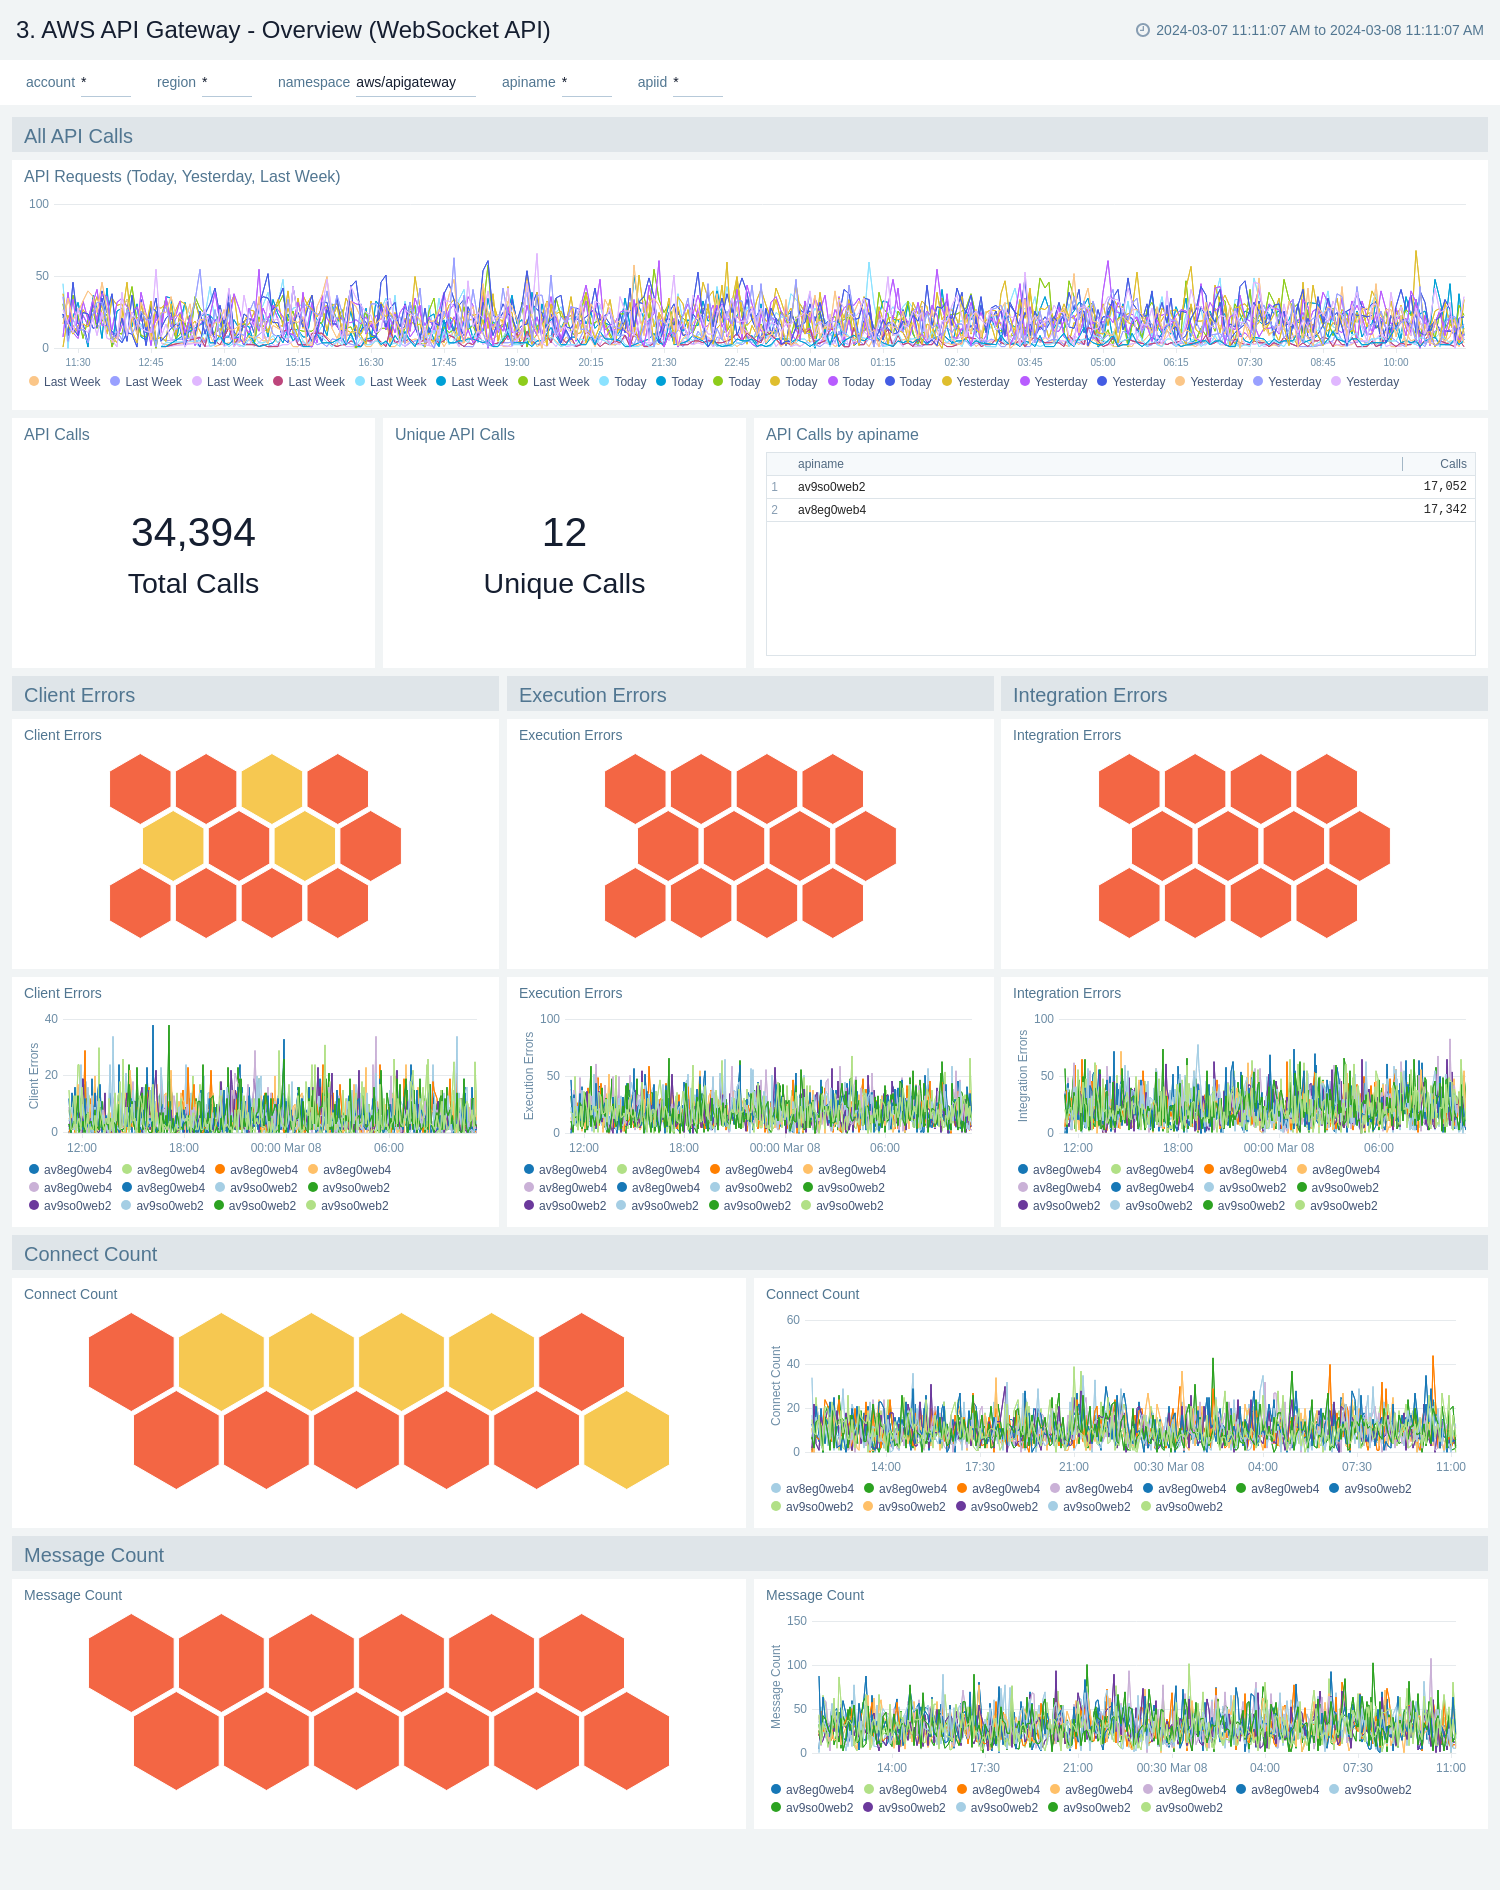
The AWS API Gateway - Overview dashboards provides insights into API Gateway performance throughout your infrastructure, including API calls, latency, client and server-side errors, connect and message count, data processed, API cache hits, and back-end cache misses.
There are three overview dashboards: AWS API Gateway - Overview (REST API), AWS API Gateway - Overview (HTTP API), and AWS API Gateway - Overview (WebSocket API).
Use these dashboards to:
- Get a high-level overview of your API Gateway infrastructure.
- Compare API requests made today, yesterday, and last week to identify any abnormal deviations in load
- Get quick statistics on the number of requests and frequently used APIs.
- Monitor the number of client-side and server-side errors processed by API Gateway instances.
- Monitor relative, backend, and overall API responsiveness
- Monitor API cache hits and misses by API Gateway across your infrastructure to optimize cache capacities and achieve desired performance.
AWS API Gateway - Overview (REST API)
AWS API Gateway - Overview (HTTP API)
AWS API Gateway - Overview (WebSocket API)
Access Logs
Access logs contains information about who has accessed your API and how the caller accessed the API. To populate the dashboards, you must explicitly enable access logs.
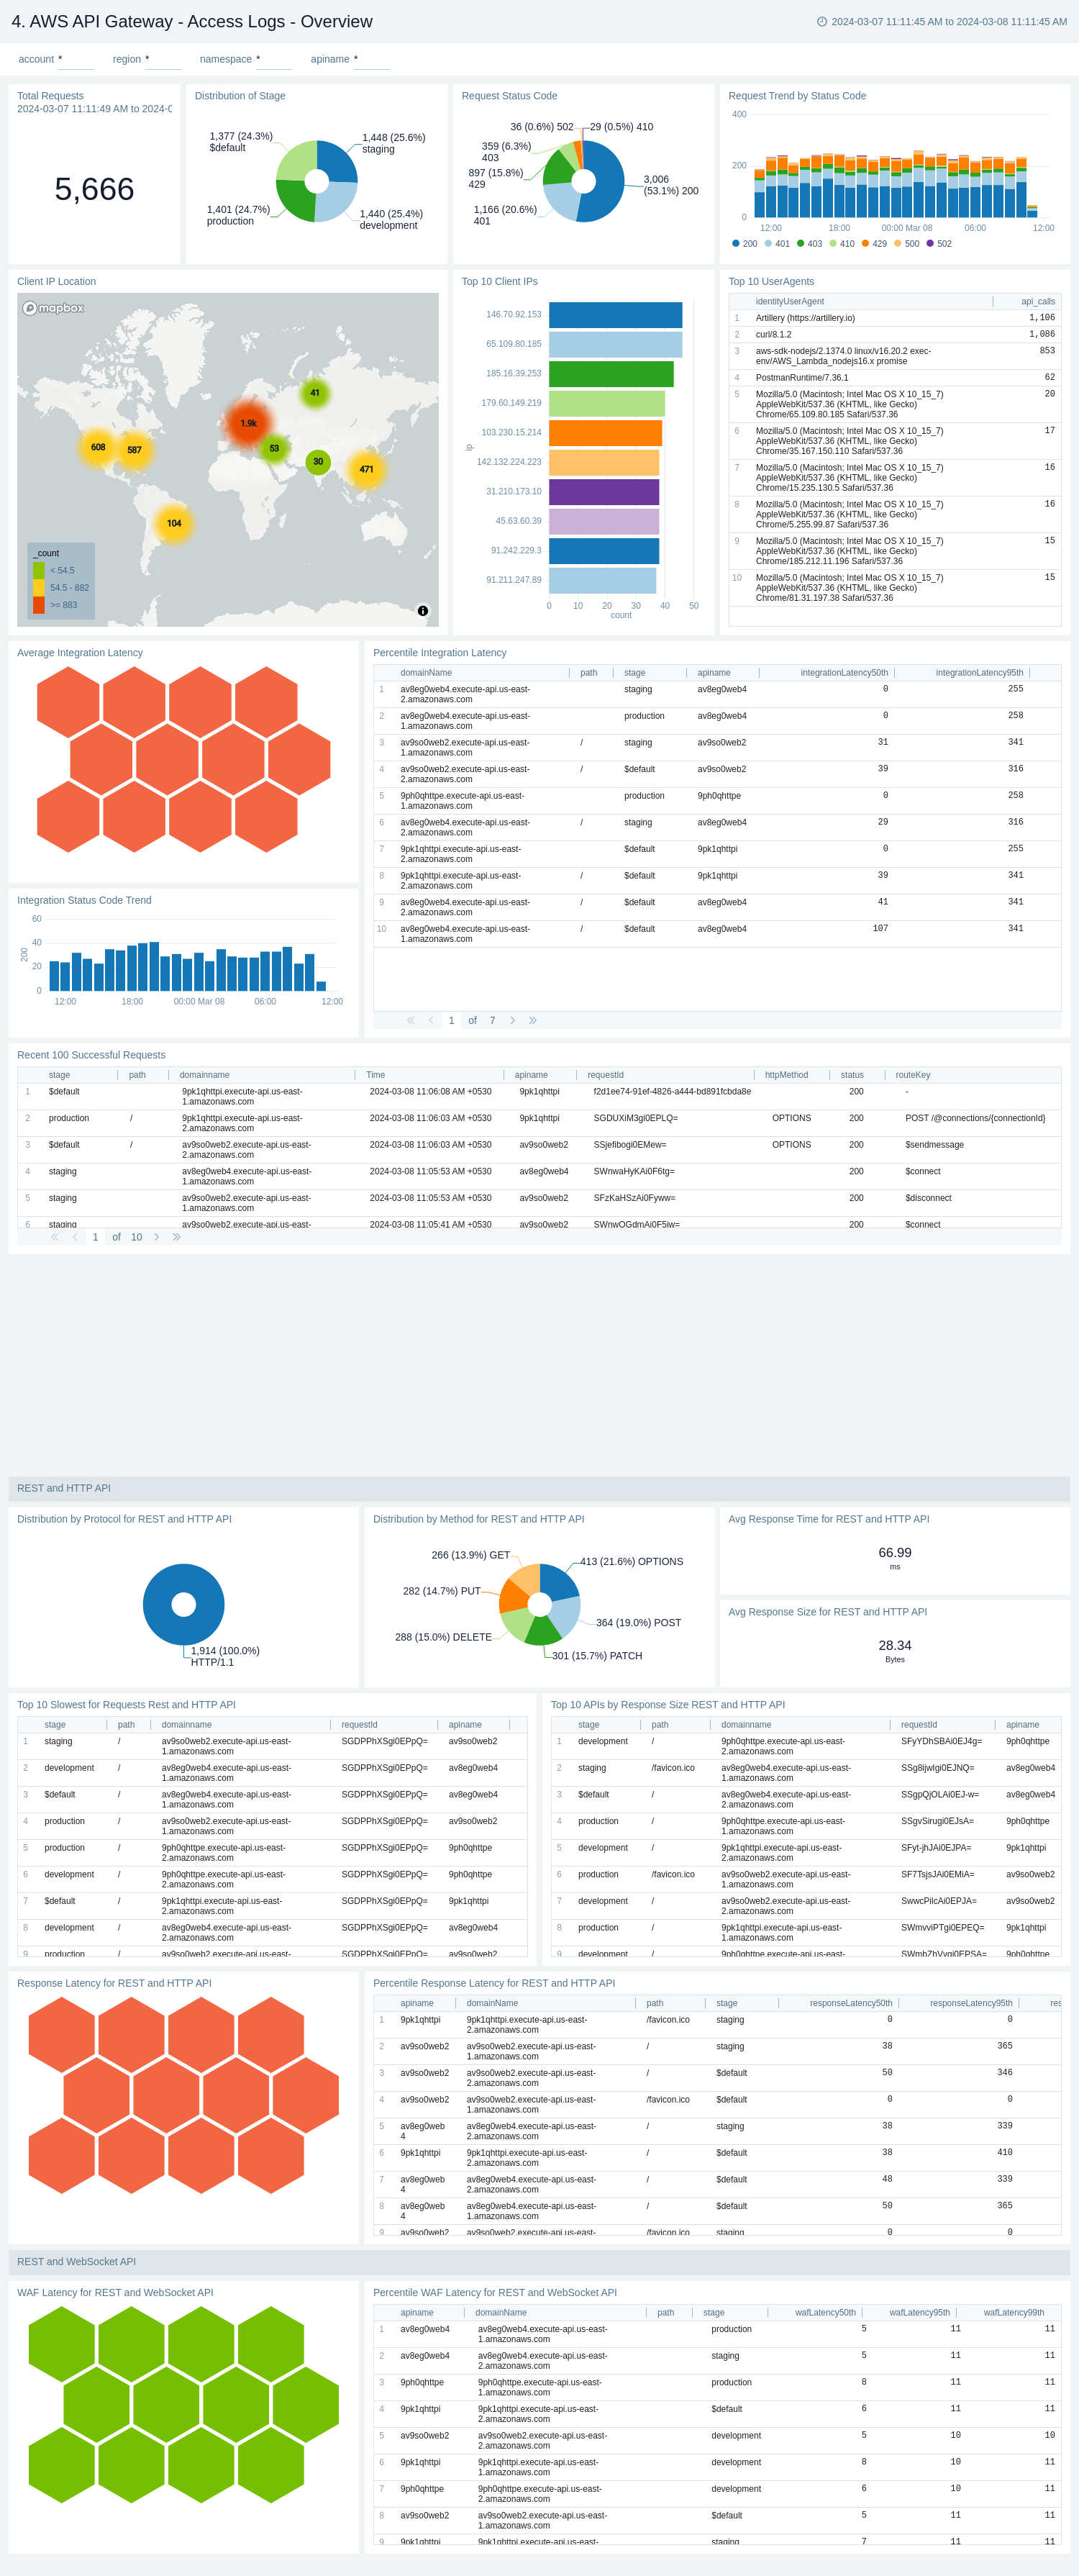
AWS API Gateway - Access Logs - Overview
The AWS API Gateway - Access Logs - Overview dashboard provides insights on Request's latency, Request trend, Distribution of requests by Method, Stage, and Protocol, Client's location, Request status code trend, and slowest requests.
Use this dashboard to:
- Monitor Latency across your infrastructure for all kind of APIs.
- Monitor total API call, average response size, and length and request trend.
- Monitor API requests trend by stage, HTTP method, user agent and protocol.
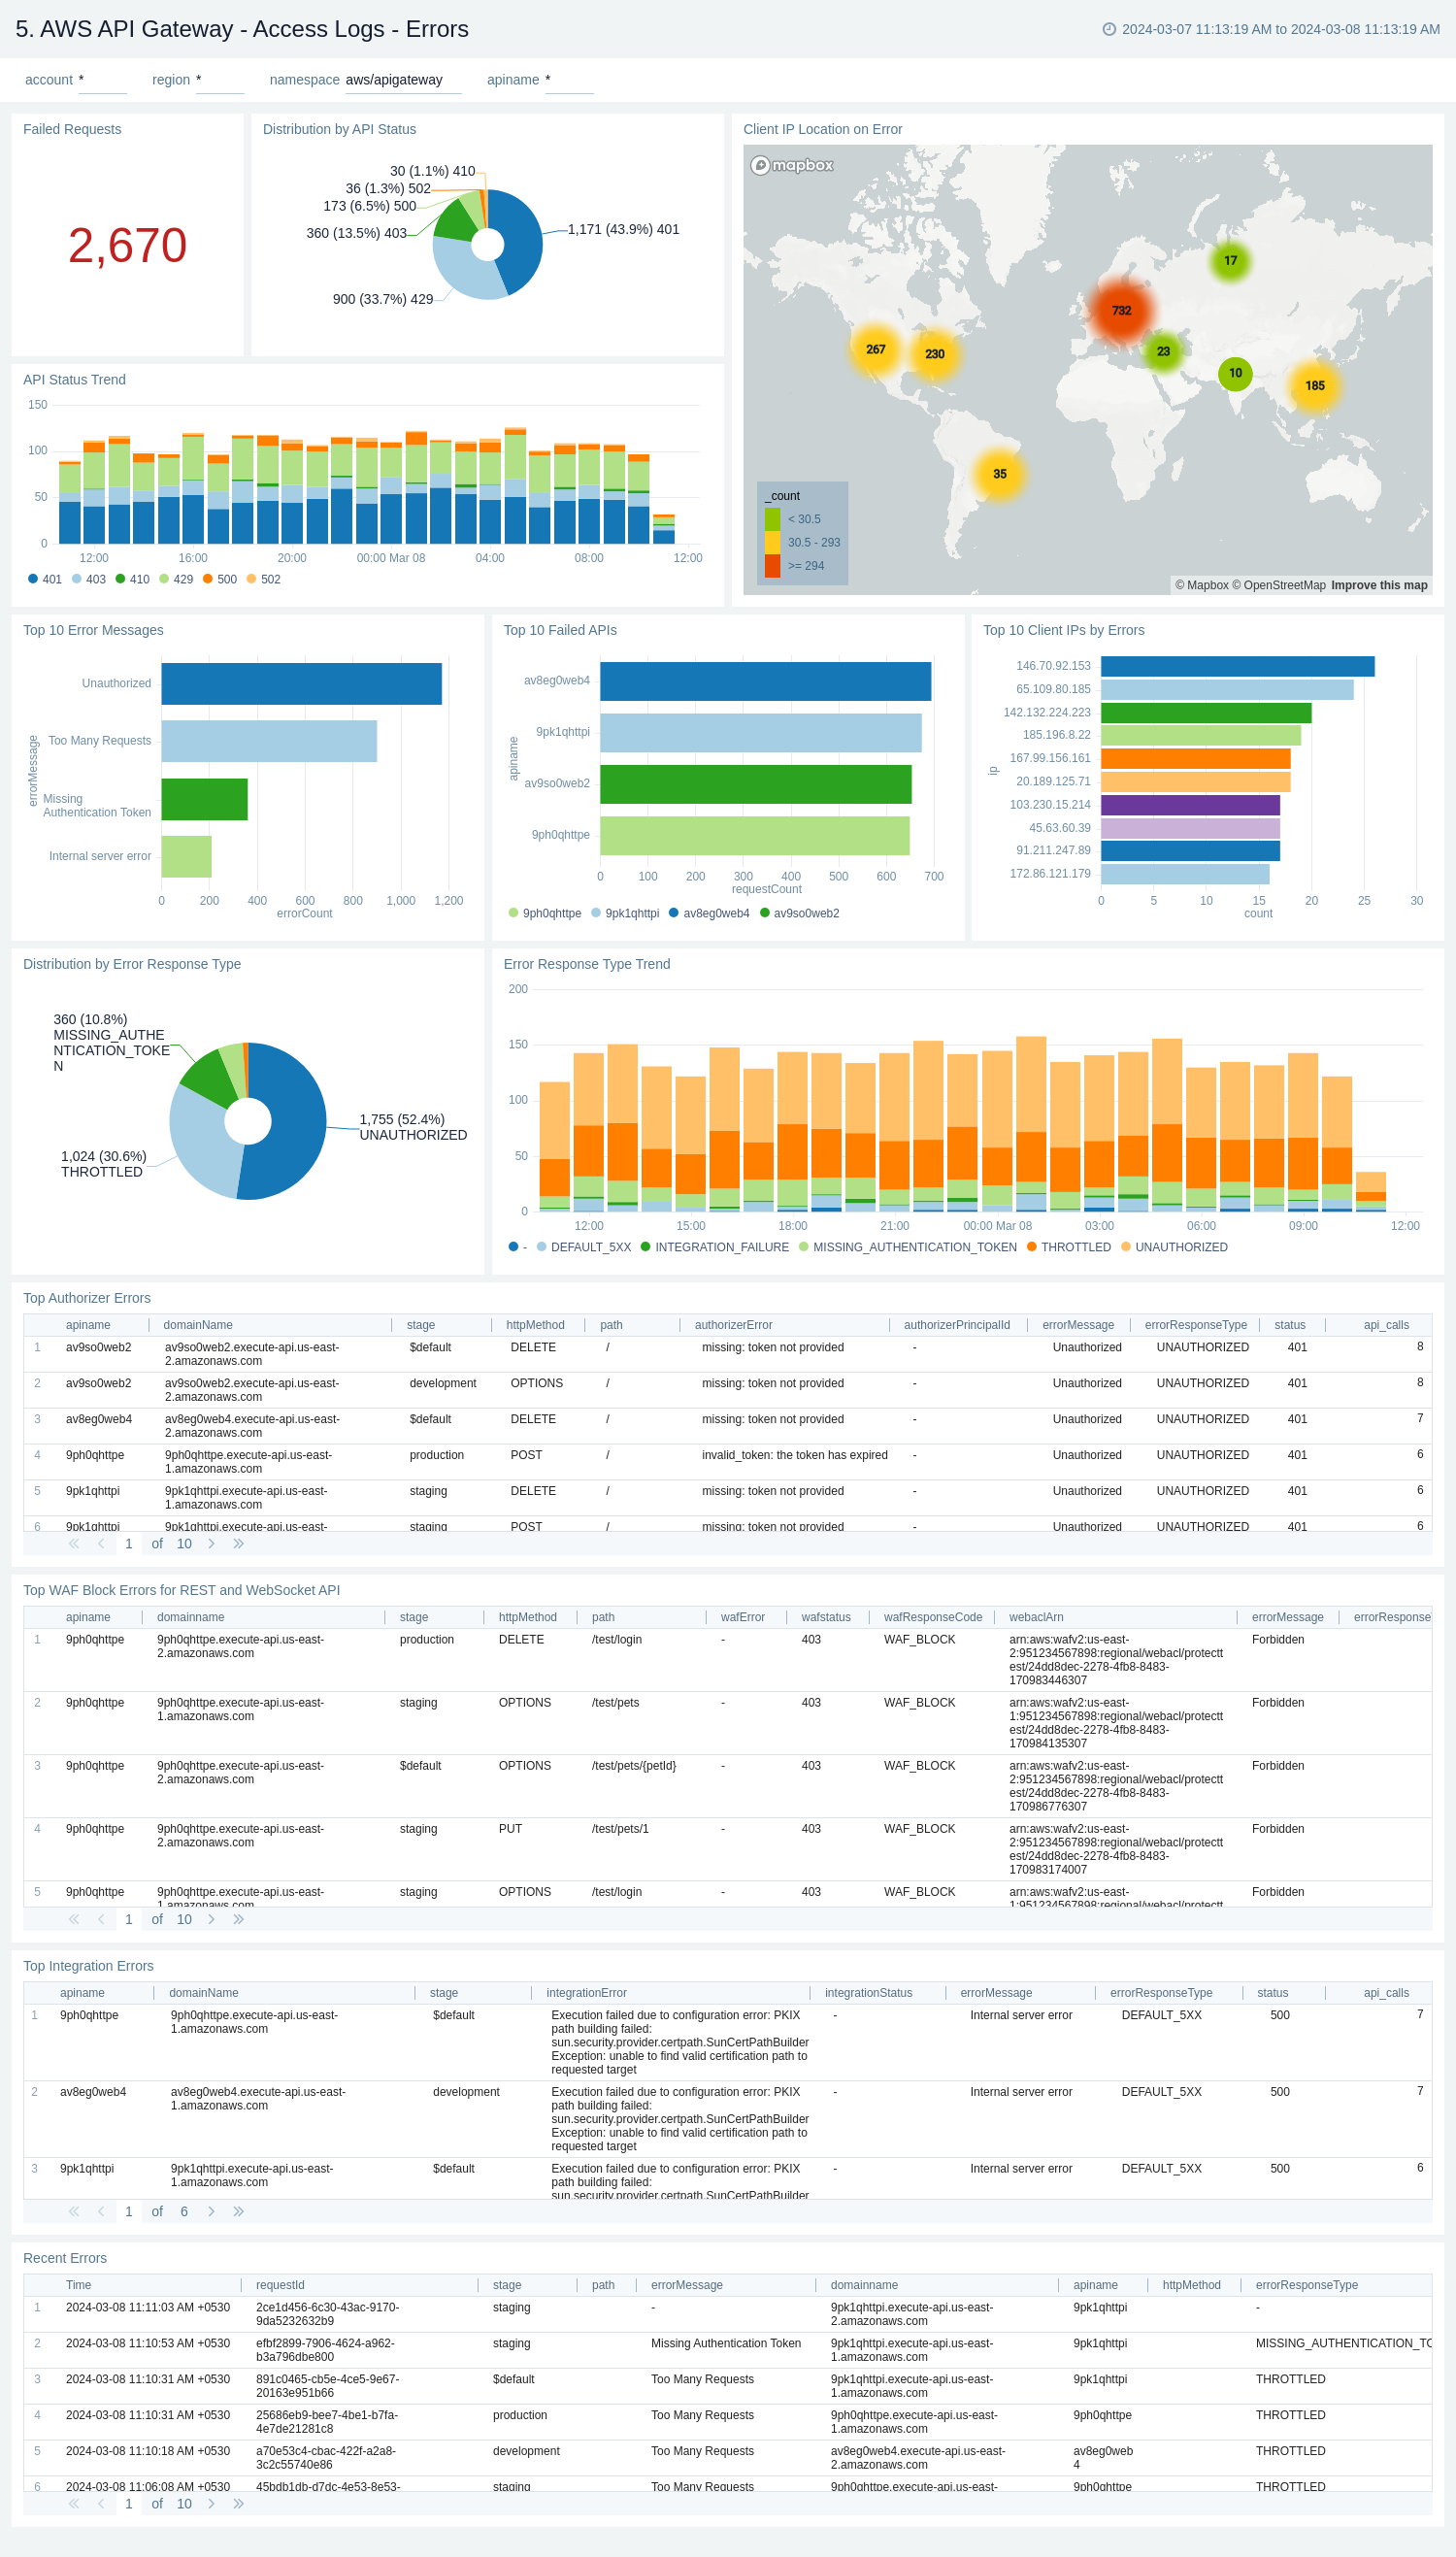
AWS API Gateway - Access logs - Errors
The AWS API Gateway - Access logs - Errors dashboard provides insights on statistics of the top 20 failed requests, error messages trends, client's location, errors by response type, recent authorizer errors, missing authentication token errors, and WAF errors.
Use this dashboard to:
- Monitor all the failed requests, error messages, and their trends.
- Monitor failed requests with their distribution by response type and client IP.
- Monitor recent authorizer and missing authentication token errors.
Audit Events
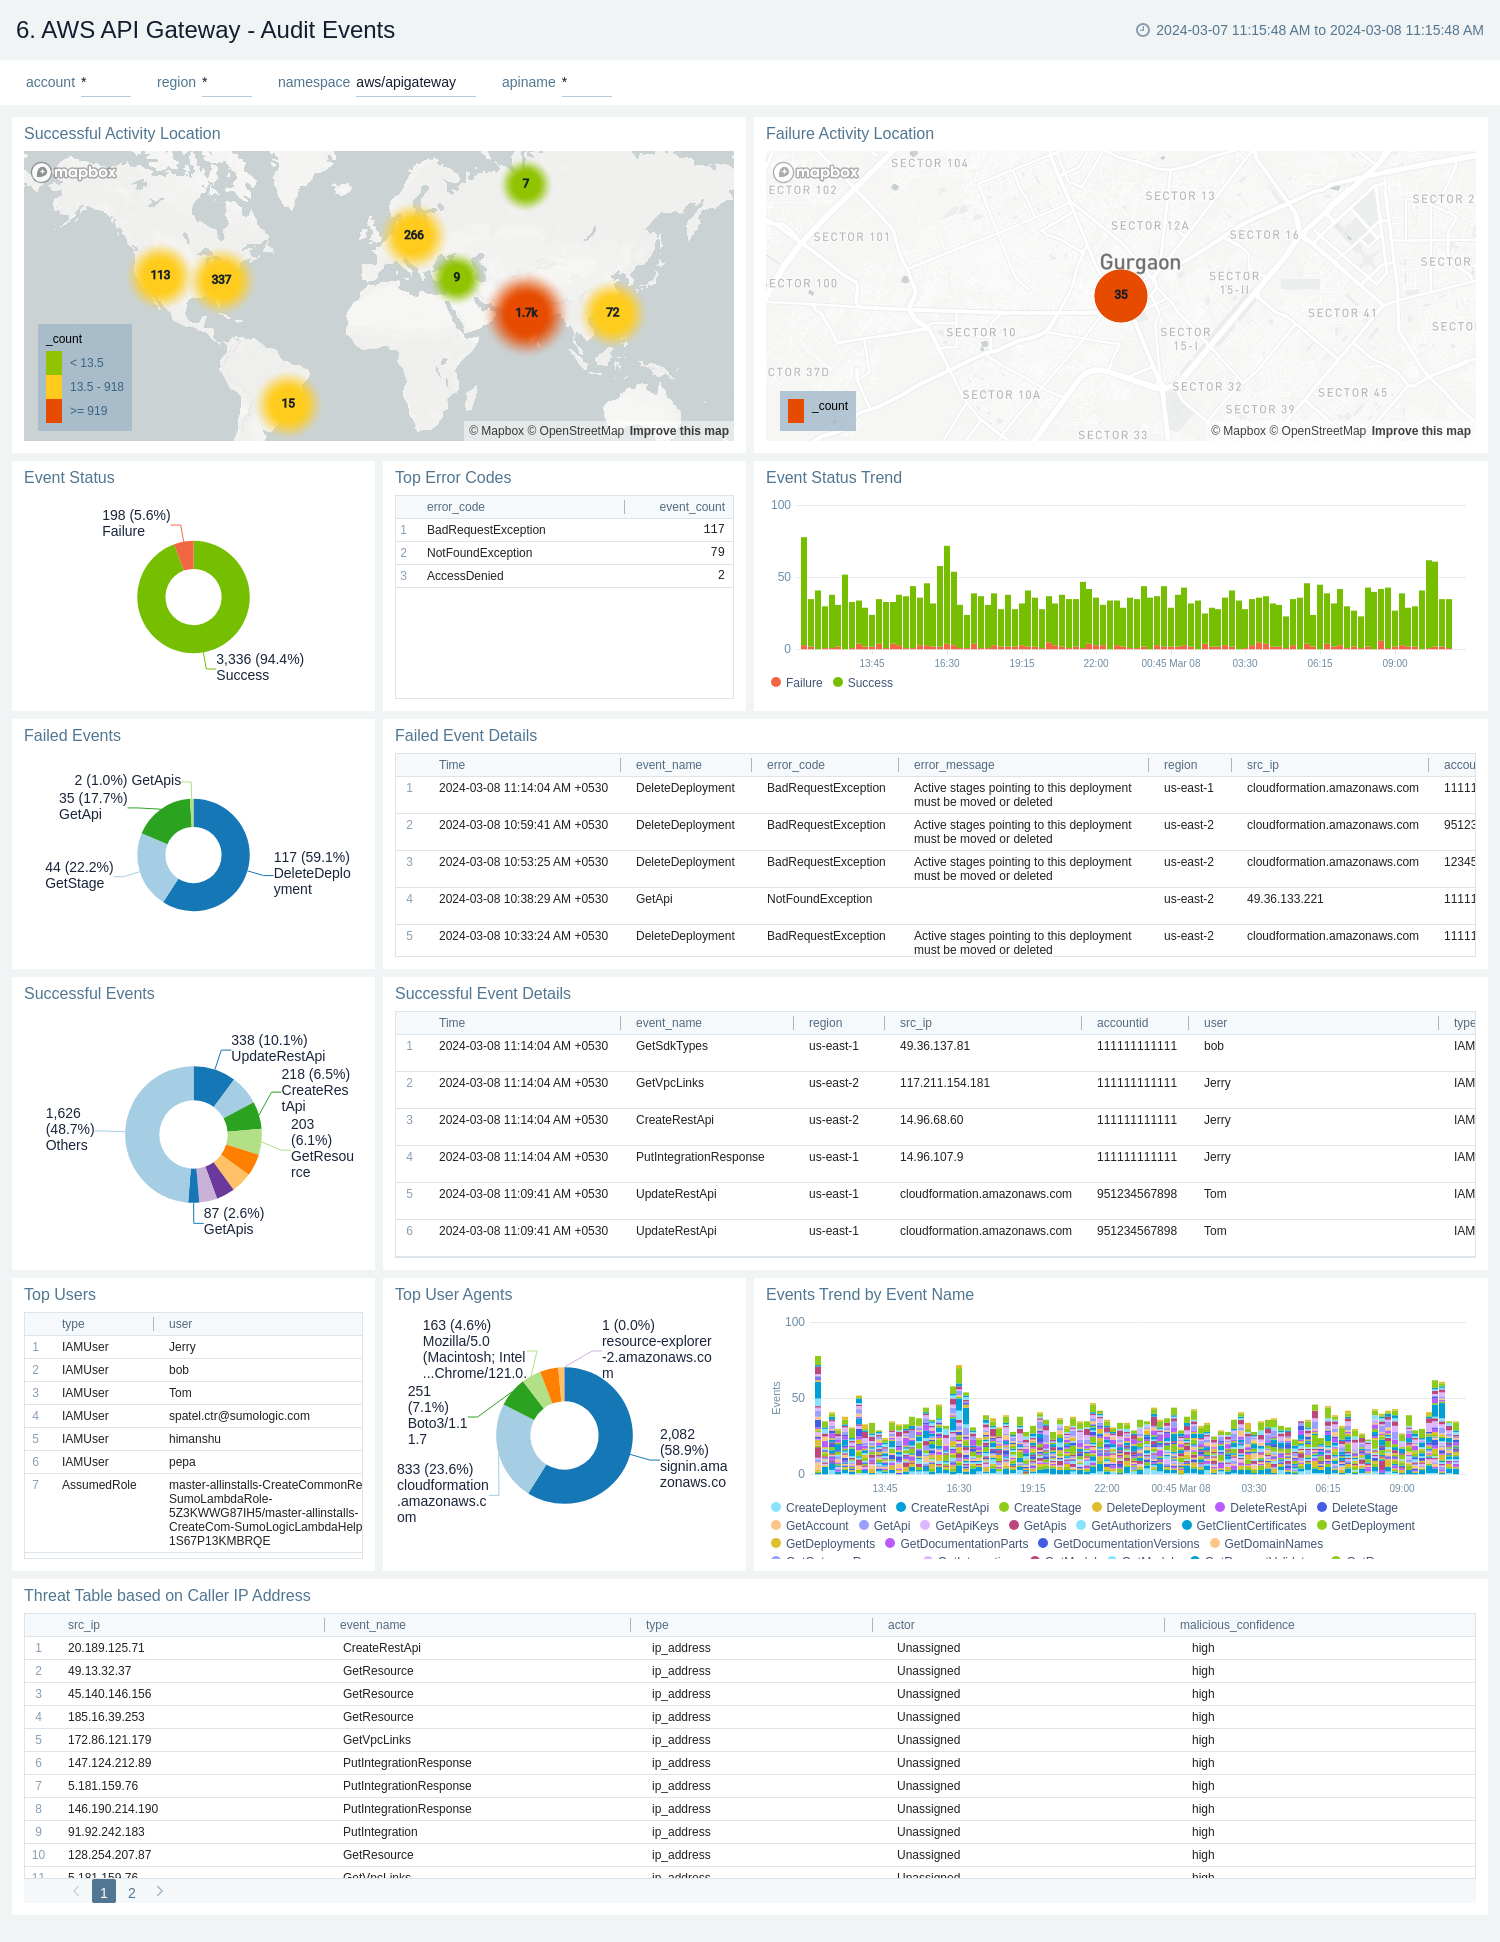
The AWS API Gateway - Audit Events dashboard provides detailed audit insights into API Gateway events by various dimensions including event names, trends, regions, user agents, and recipient account IDs.
Use these dashboards to:
- Monitor all API Gateway-related audit logs available via CloudTrail events
- Monitor incoming user activity locations for both successful and failed events to ensure the activity matches with expectations
- Monitor successful and failed API Gateway events, users and user agents / fail activities, and failure reasons
- Monitor requests coming in from known malicious IP addresses detected via Sumo Logic threat intelligence
Latency and Cache
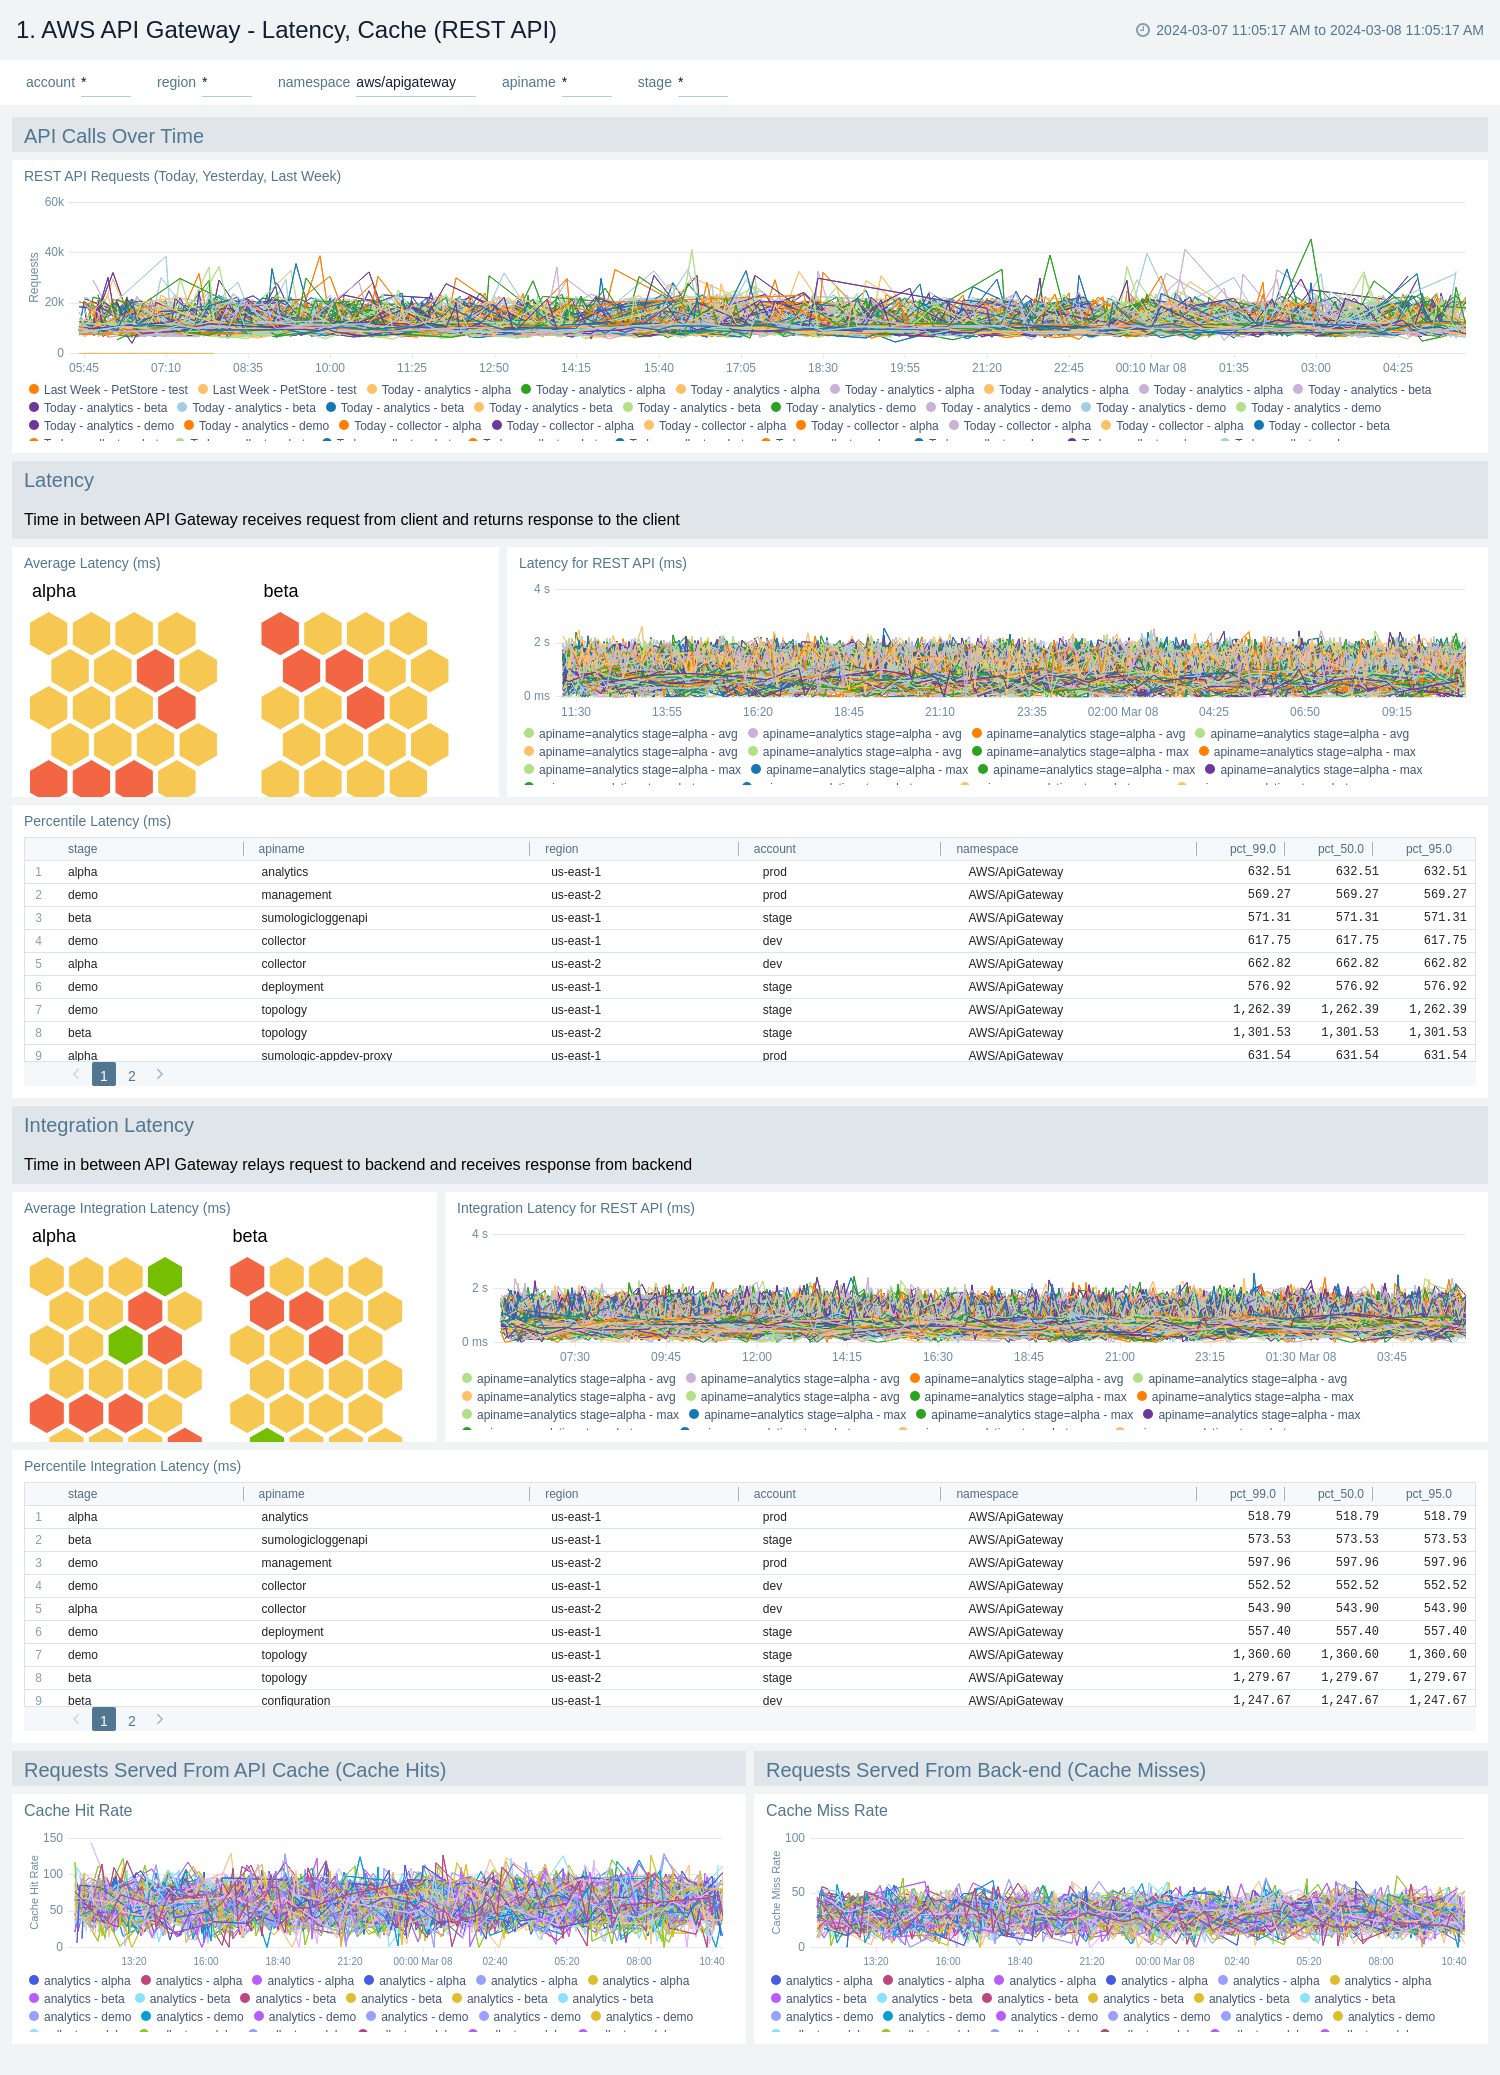
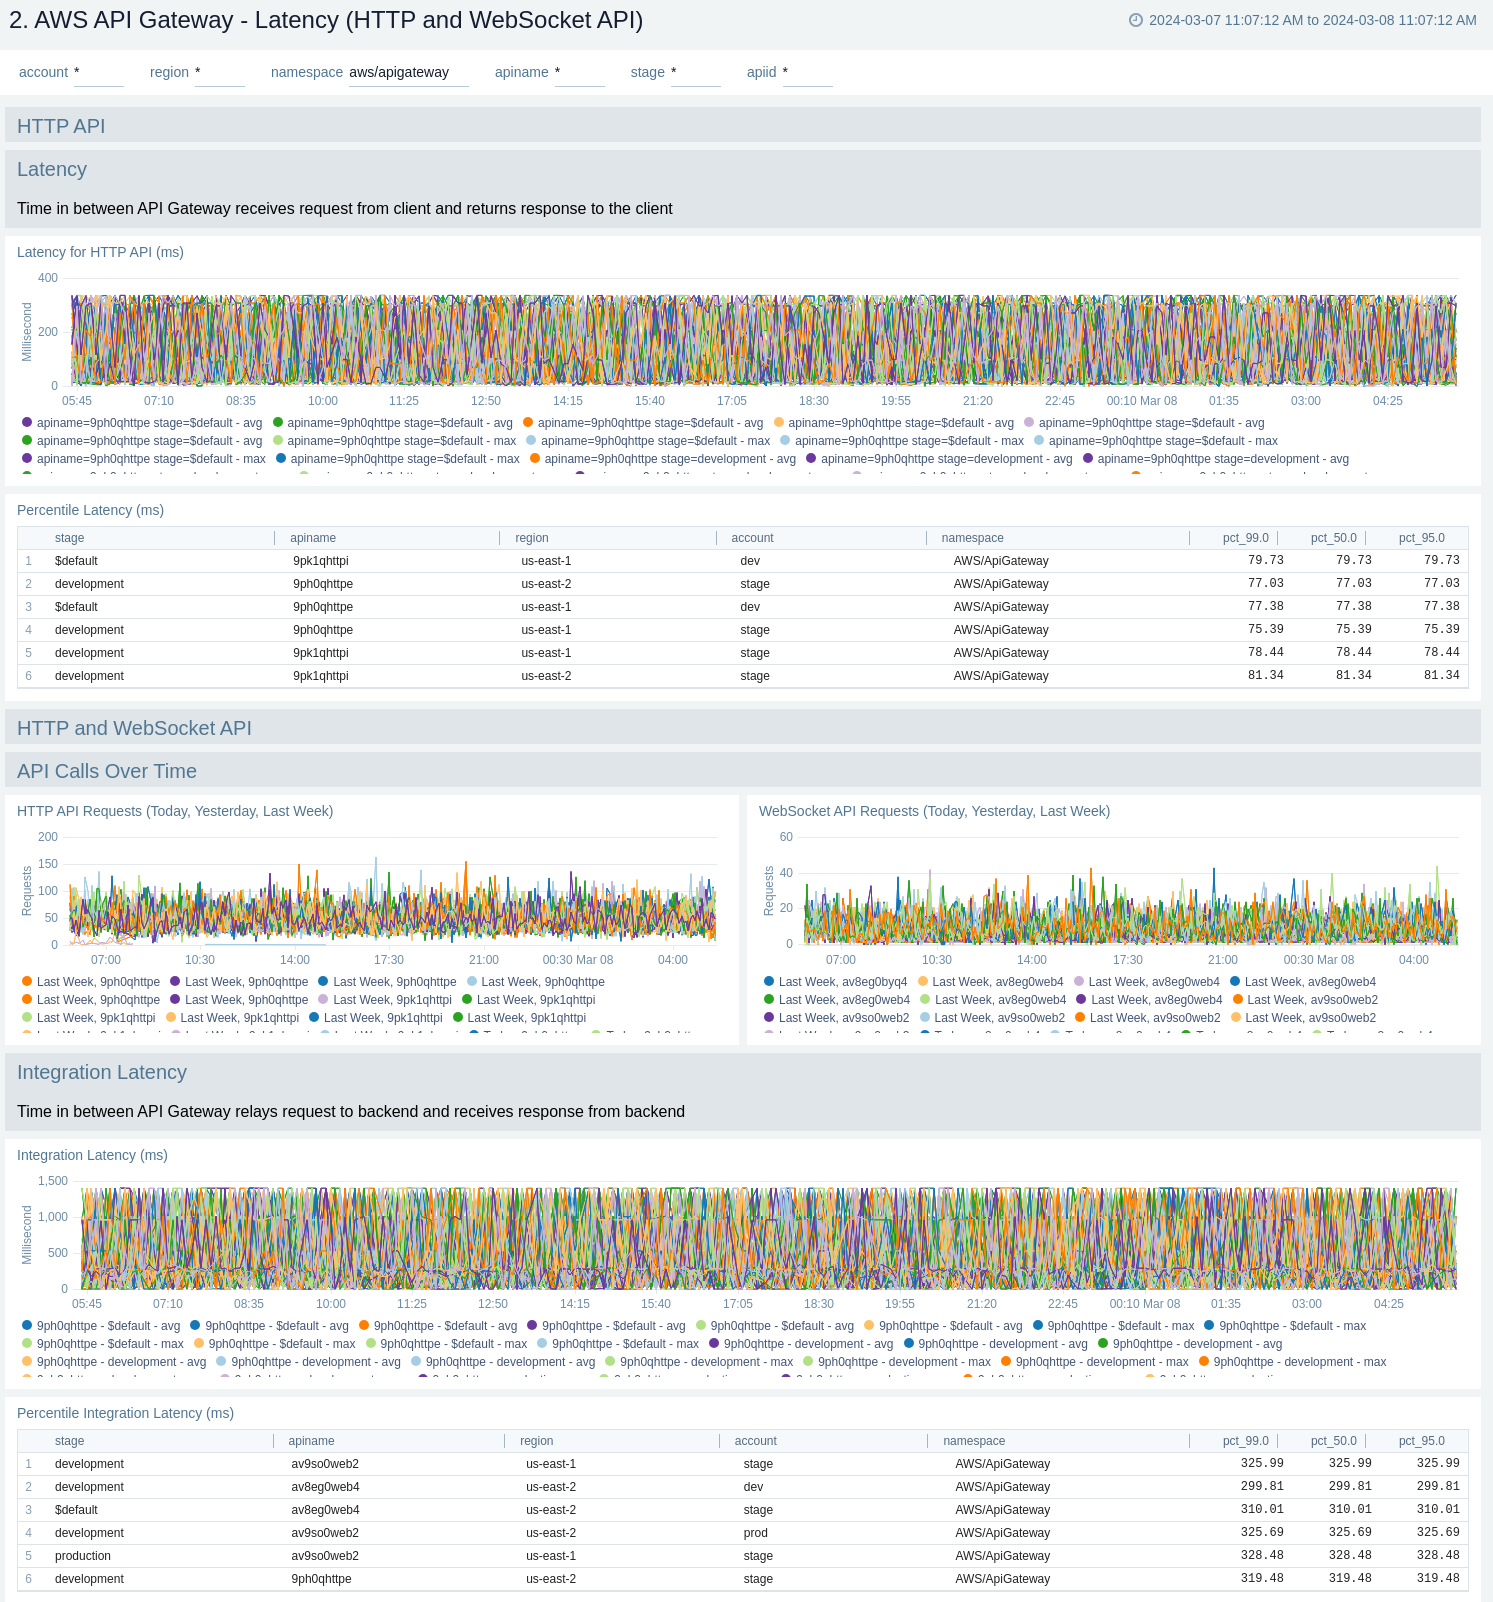
The AWS API Gateway - Latency, Cache dashboards provides insights into API Gateway performance including API requests, latency, integration latency, and its statistics, API cache hits, and back-end cache misses.
Cache related panels will populate for apis which have cache enabled.
There are two dashboards related to latency and cache: AWS API Gateway - Latency, Cache (REST API) and AWS API Gateway - Latency (HTTP and WebSocket API).
Use these dashboards to:
- Monitor the overall responsiveness of API calls (latency), comparing times (in milliseconds) between receiving a request from and returning a response to a client.
- Monitor the responsiveness of the backend (integration latency), comparing times (in milliseconds) between API Gateway relay requests to and receiving a response back from the backend.
- Monitor API cache hits and misses to optimize cache capacities across your infrastructure and achieve desired performance.
- Compare API requests made today, yesterday, and last week to identify any abnormal deviations.
AWS API Gateway - Latency, Cache (REST API)
AWS API Gateway - Latency (HTTP and WebSocket API)
Errors
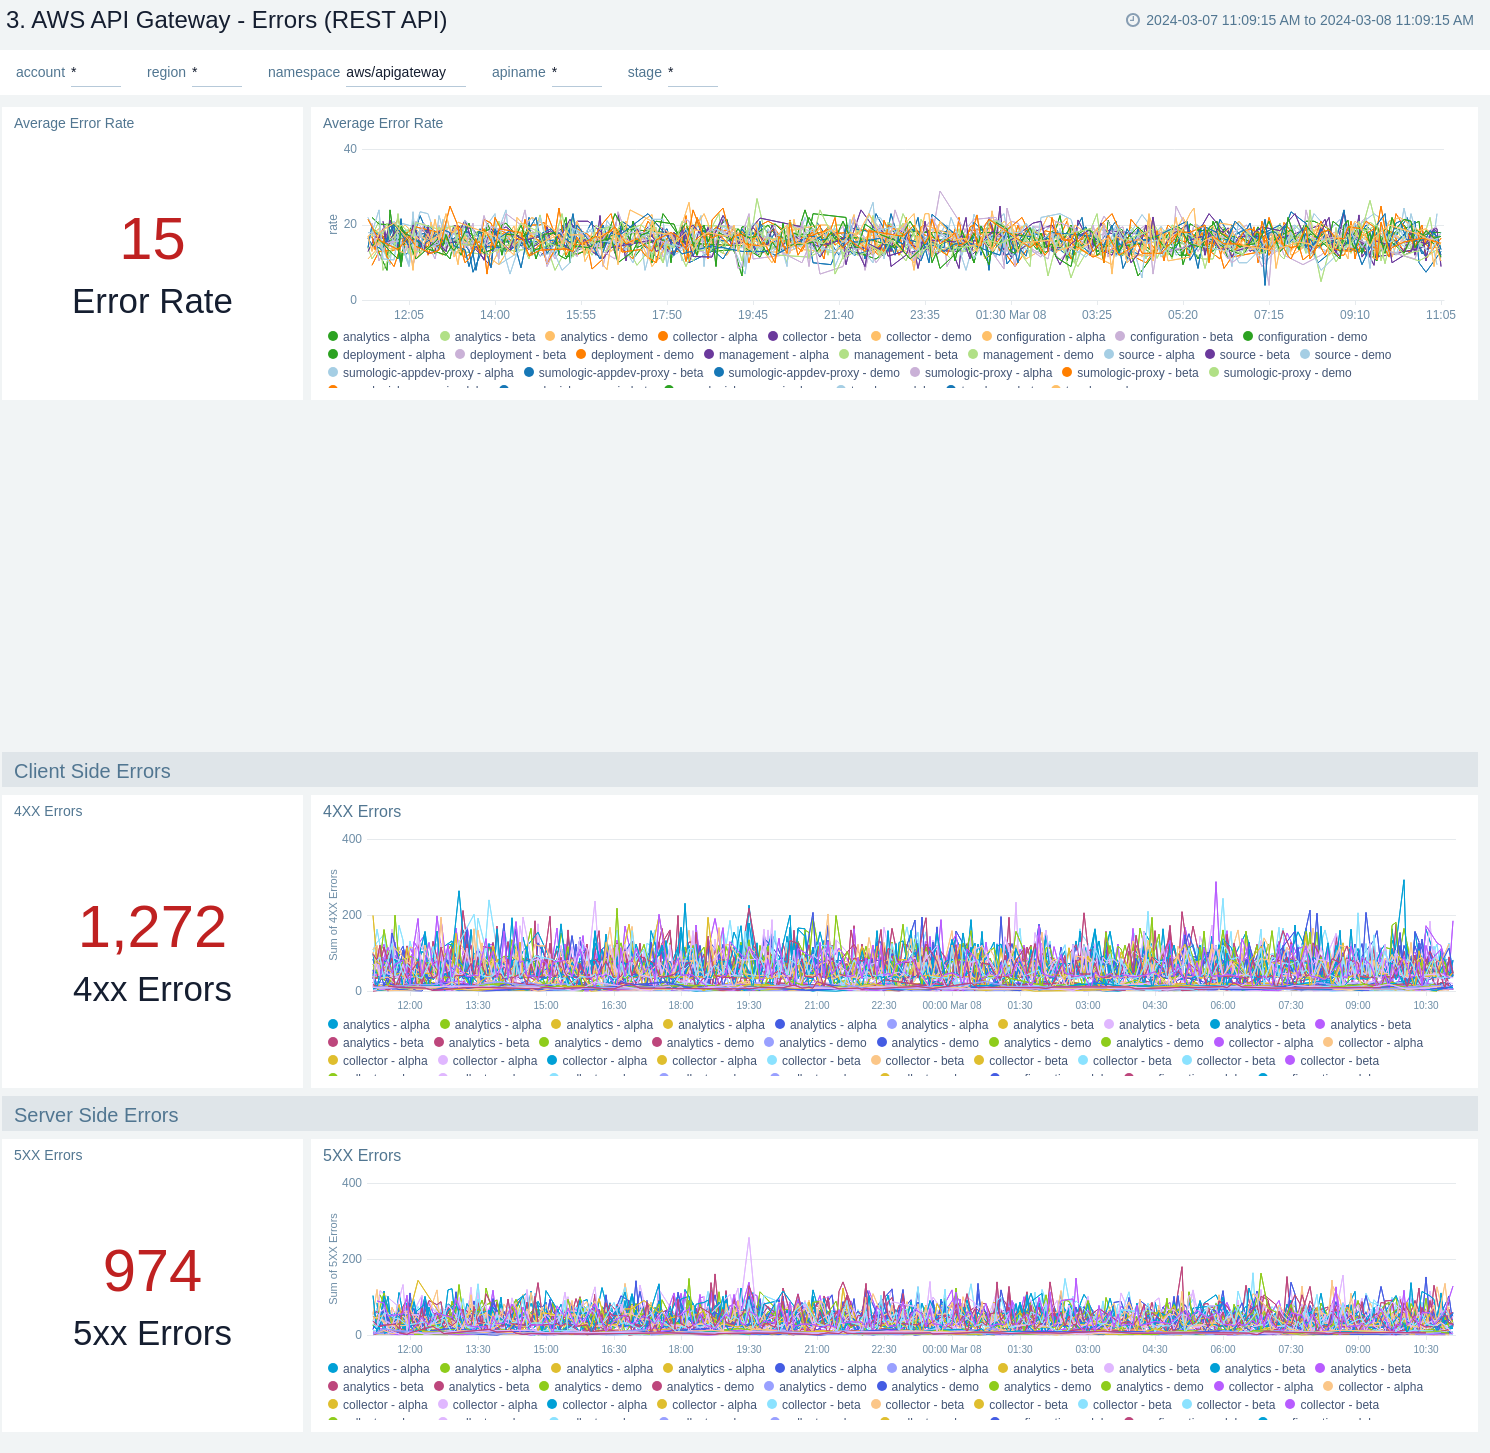
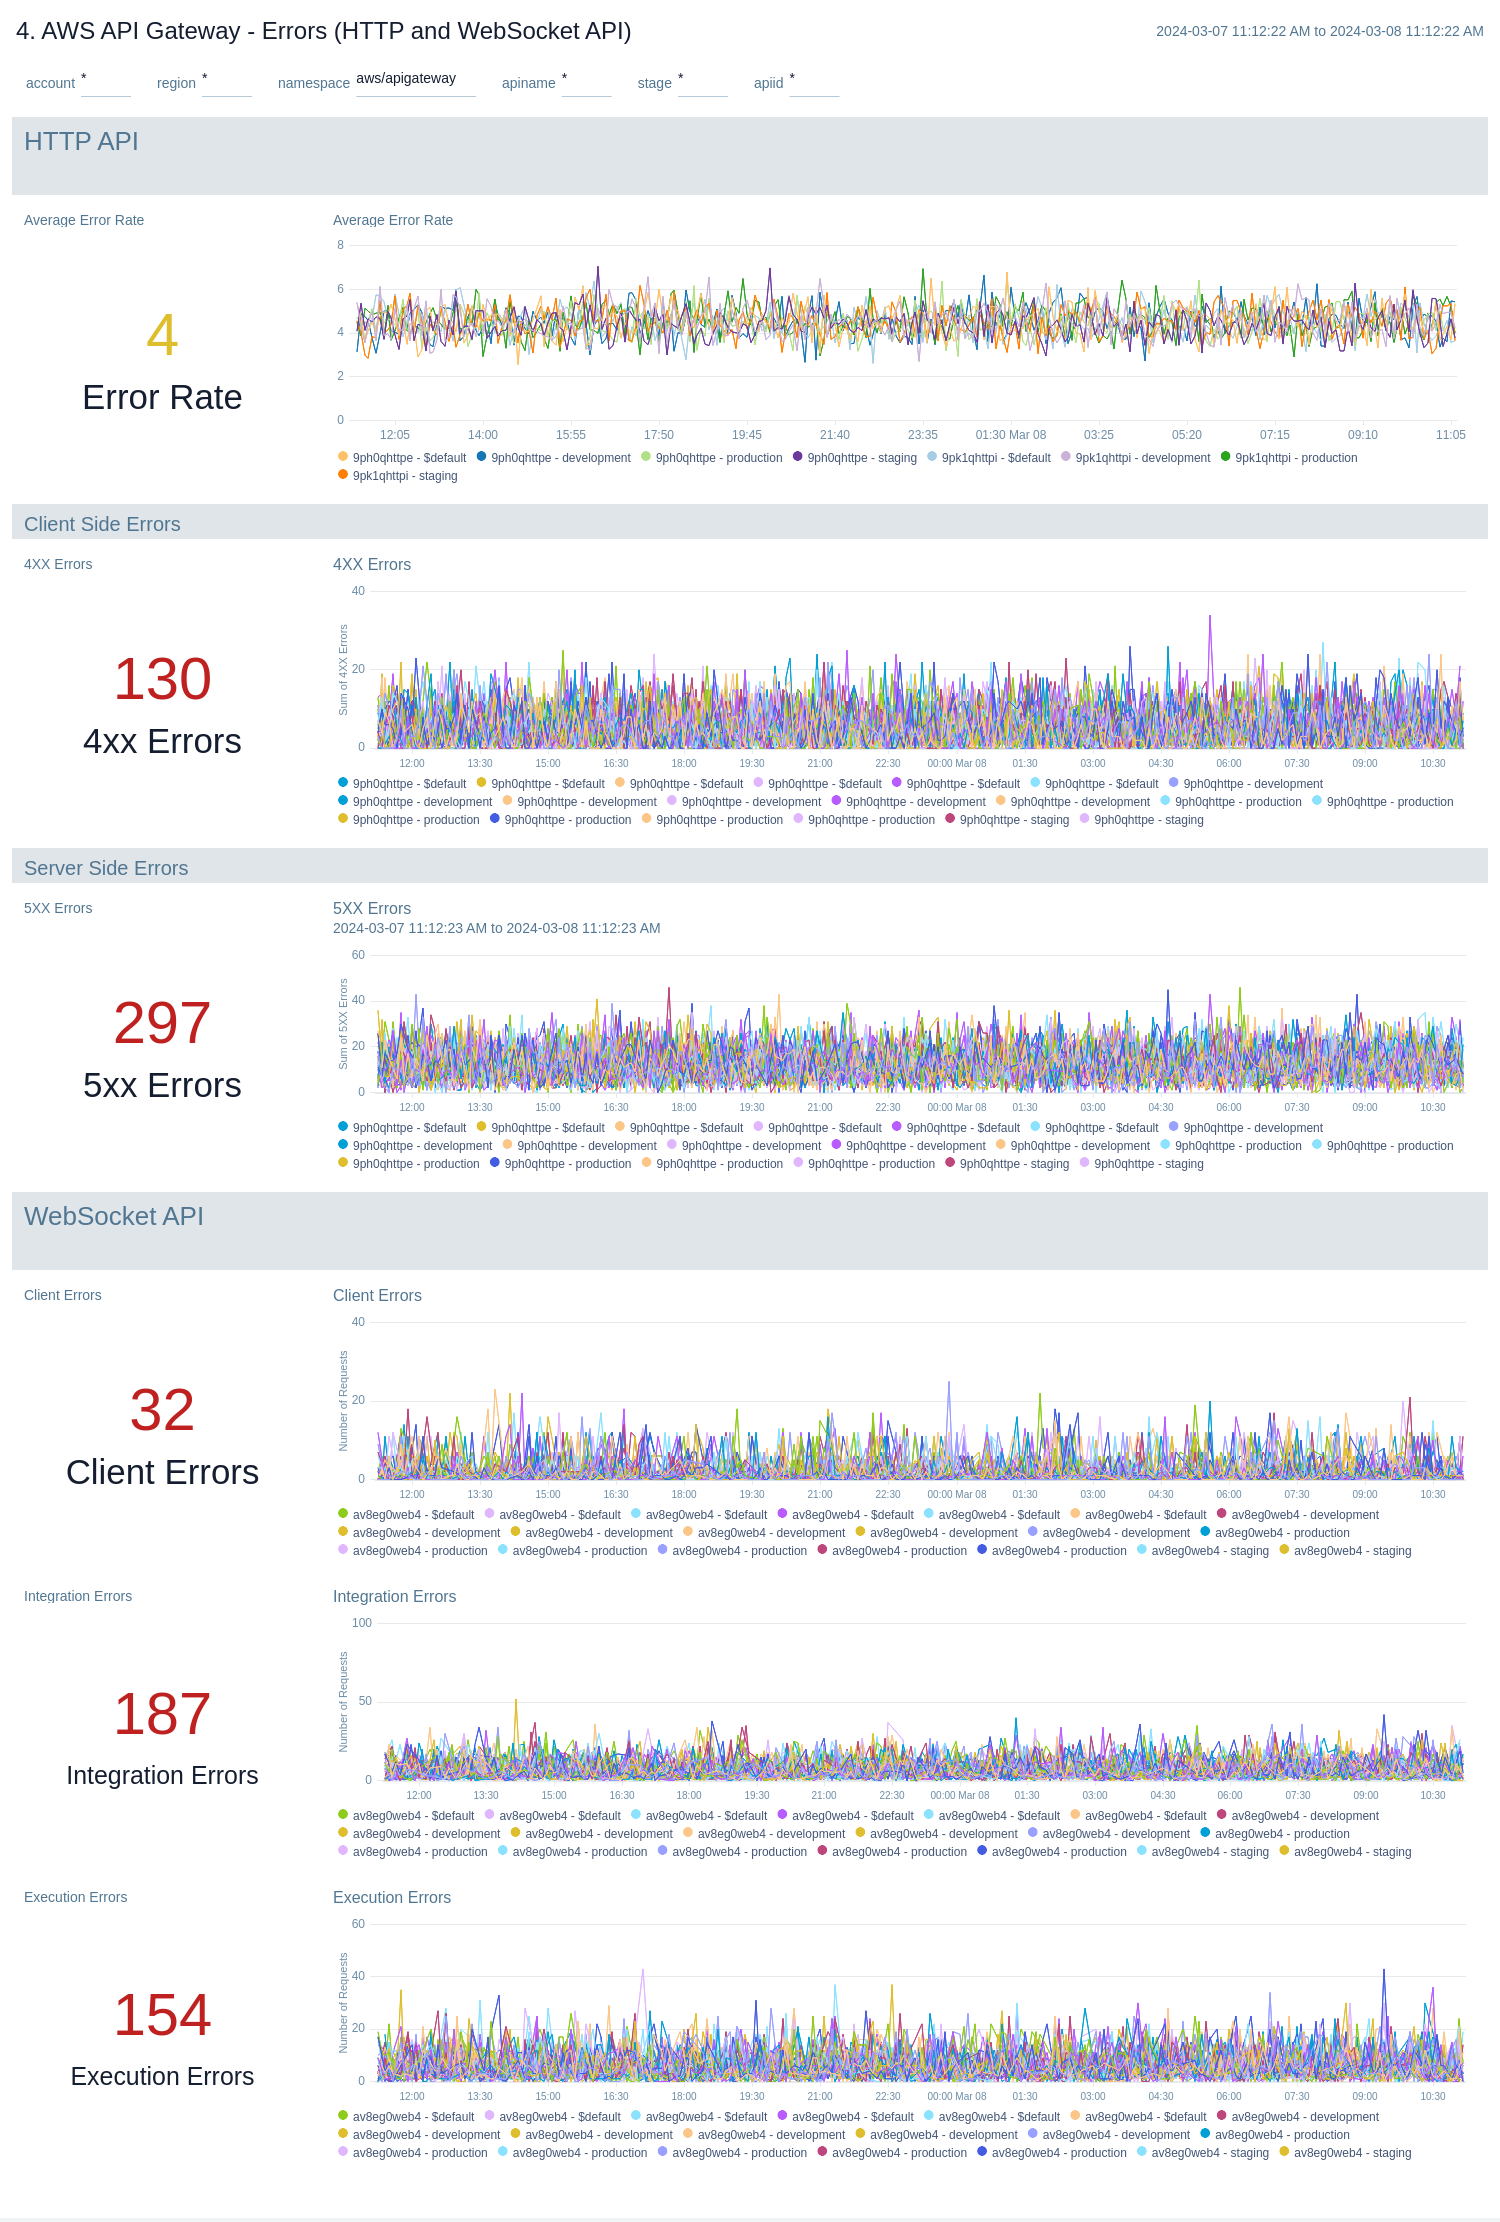
The AWS API Gateway - Errors dashboards provides insights into API Gateway HTTP 4xx and 5xx code errors throughout your infrastructure, including API requests, client errors, integration errors, execution errors, client-side errors, and server-side errors.
There are two dashboards related to errors: AWS API Gateway - Errors (REST API) and AWS API Gateway - Errors (HTTP and WebSocket API).
Use these dashboards to:
- Monitor the total number of client-side errors based on API name and region across your infrastructure.
- Monitor the total number of server-side errors based on API name and region across your infrastructure.
- Monitor the total number of client, integration and execution errors based on API name and region across your infrastructure.
- Compare API requests made today, yesterday, and last week to identify any abnormal deviations.
AWS API Gateway - Errors (REST API)
AWS API Gateway - Errors (HTTP and WebSocket API)
Enhanced Monitoring
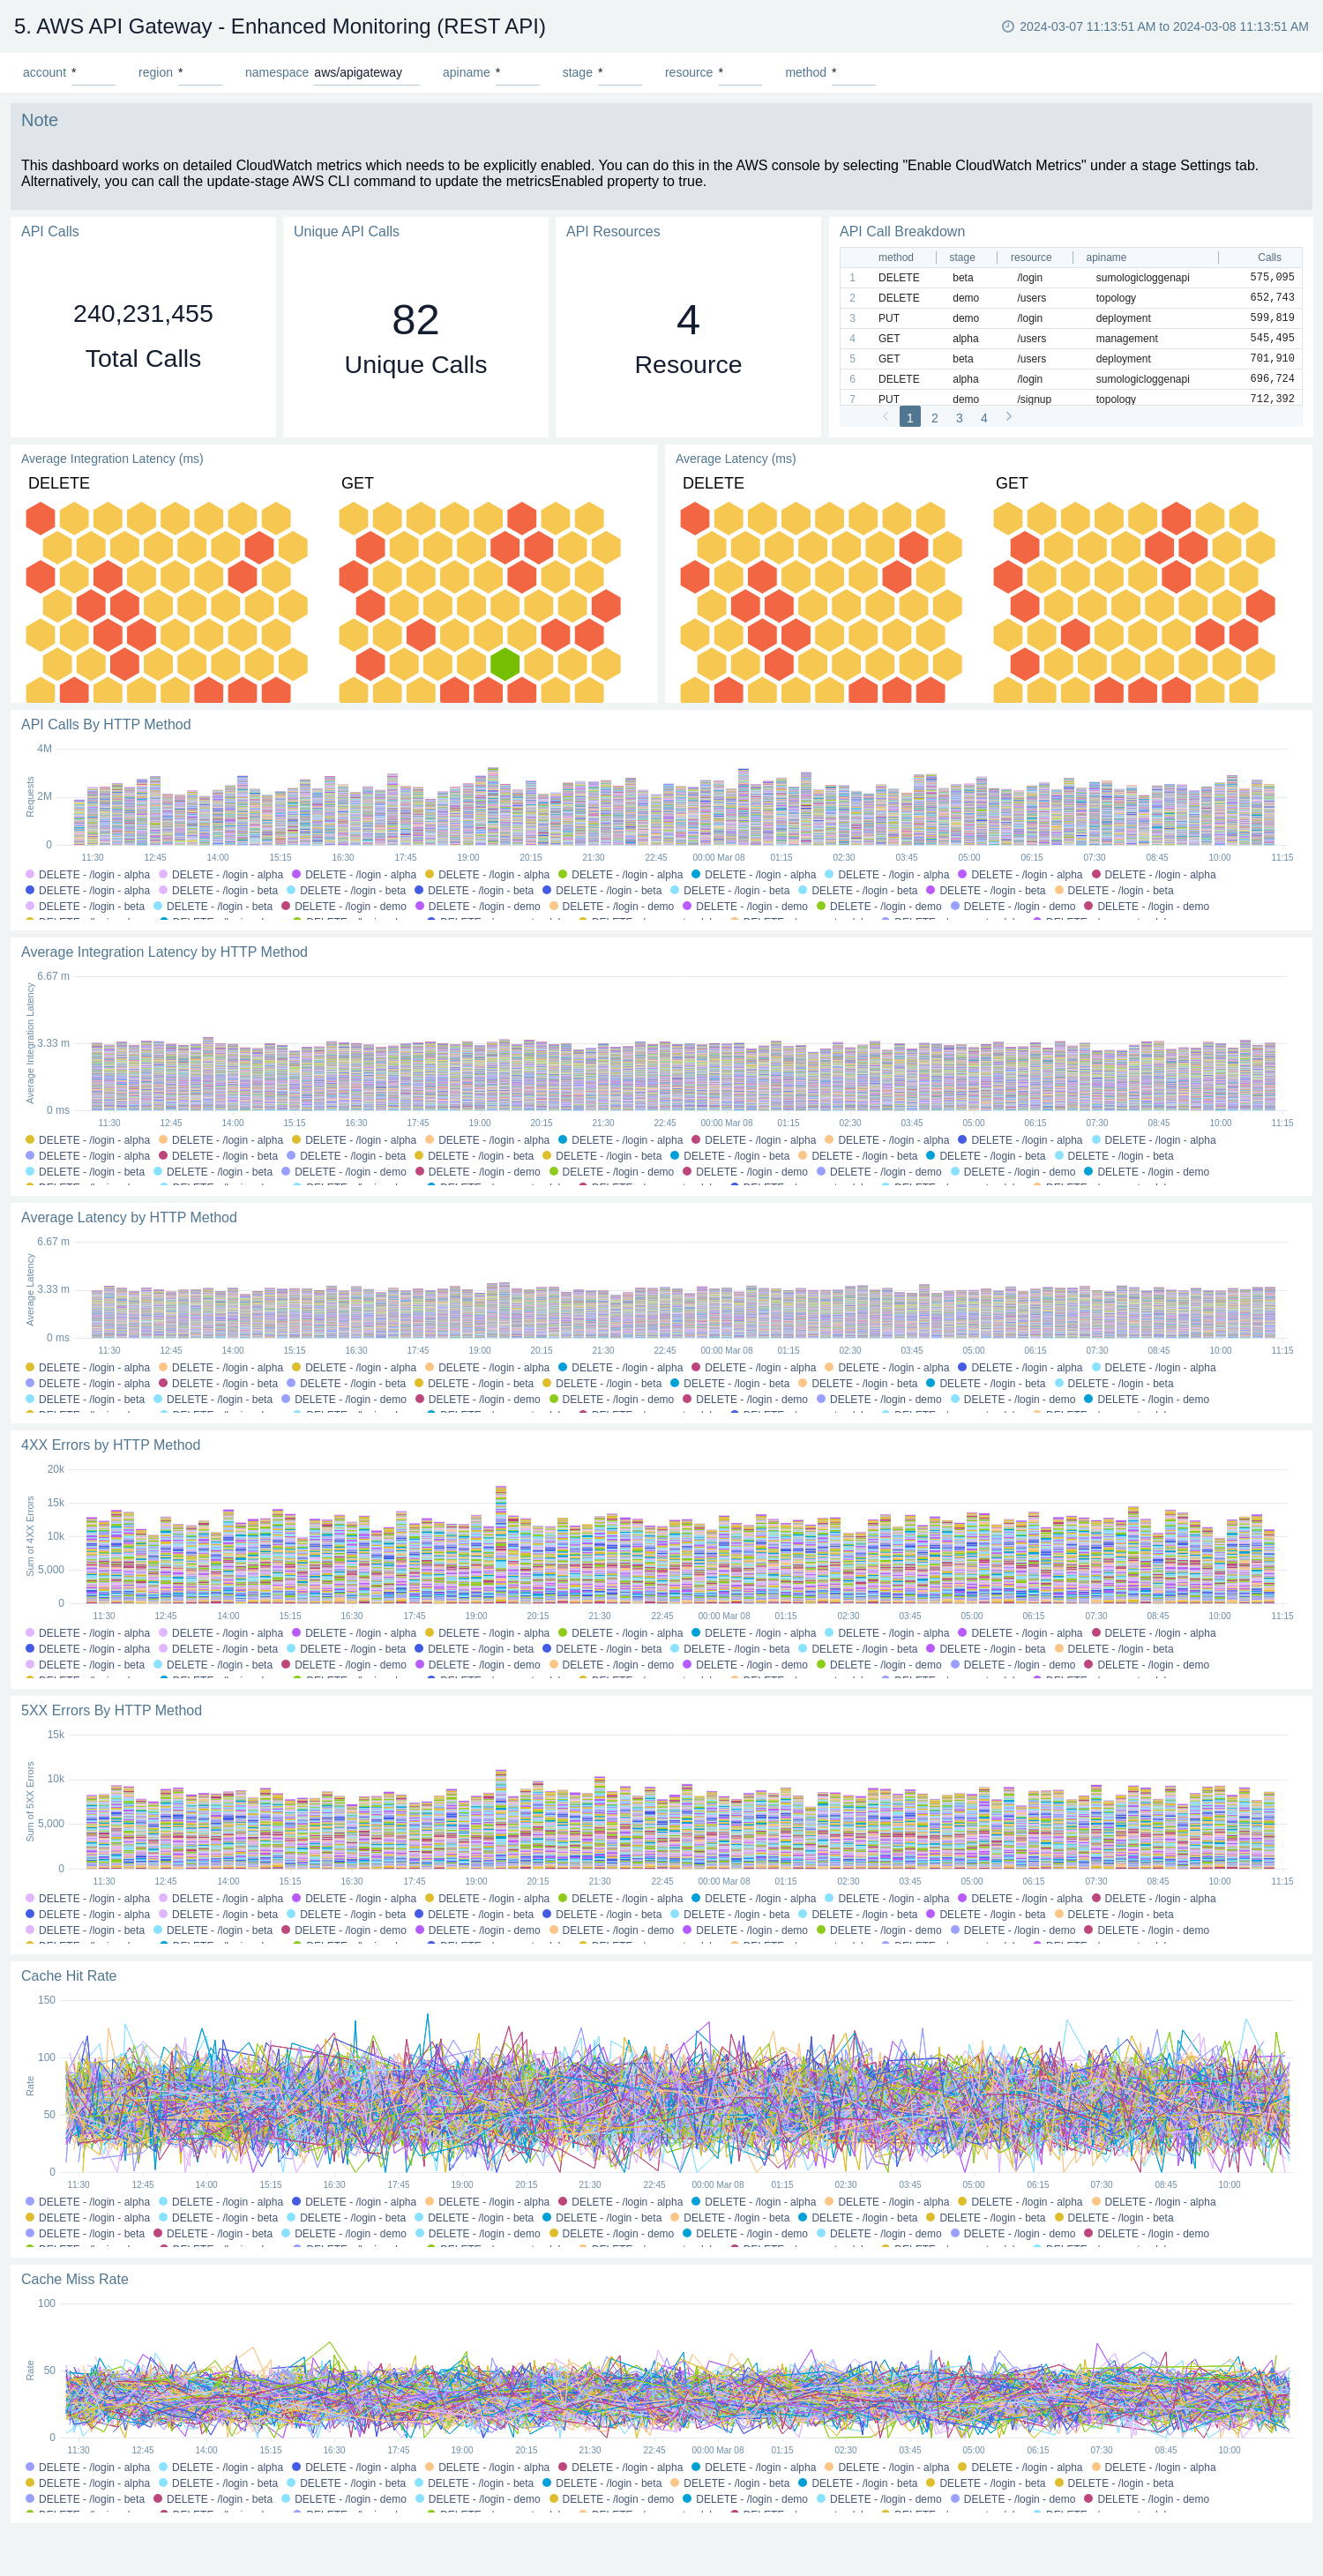
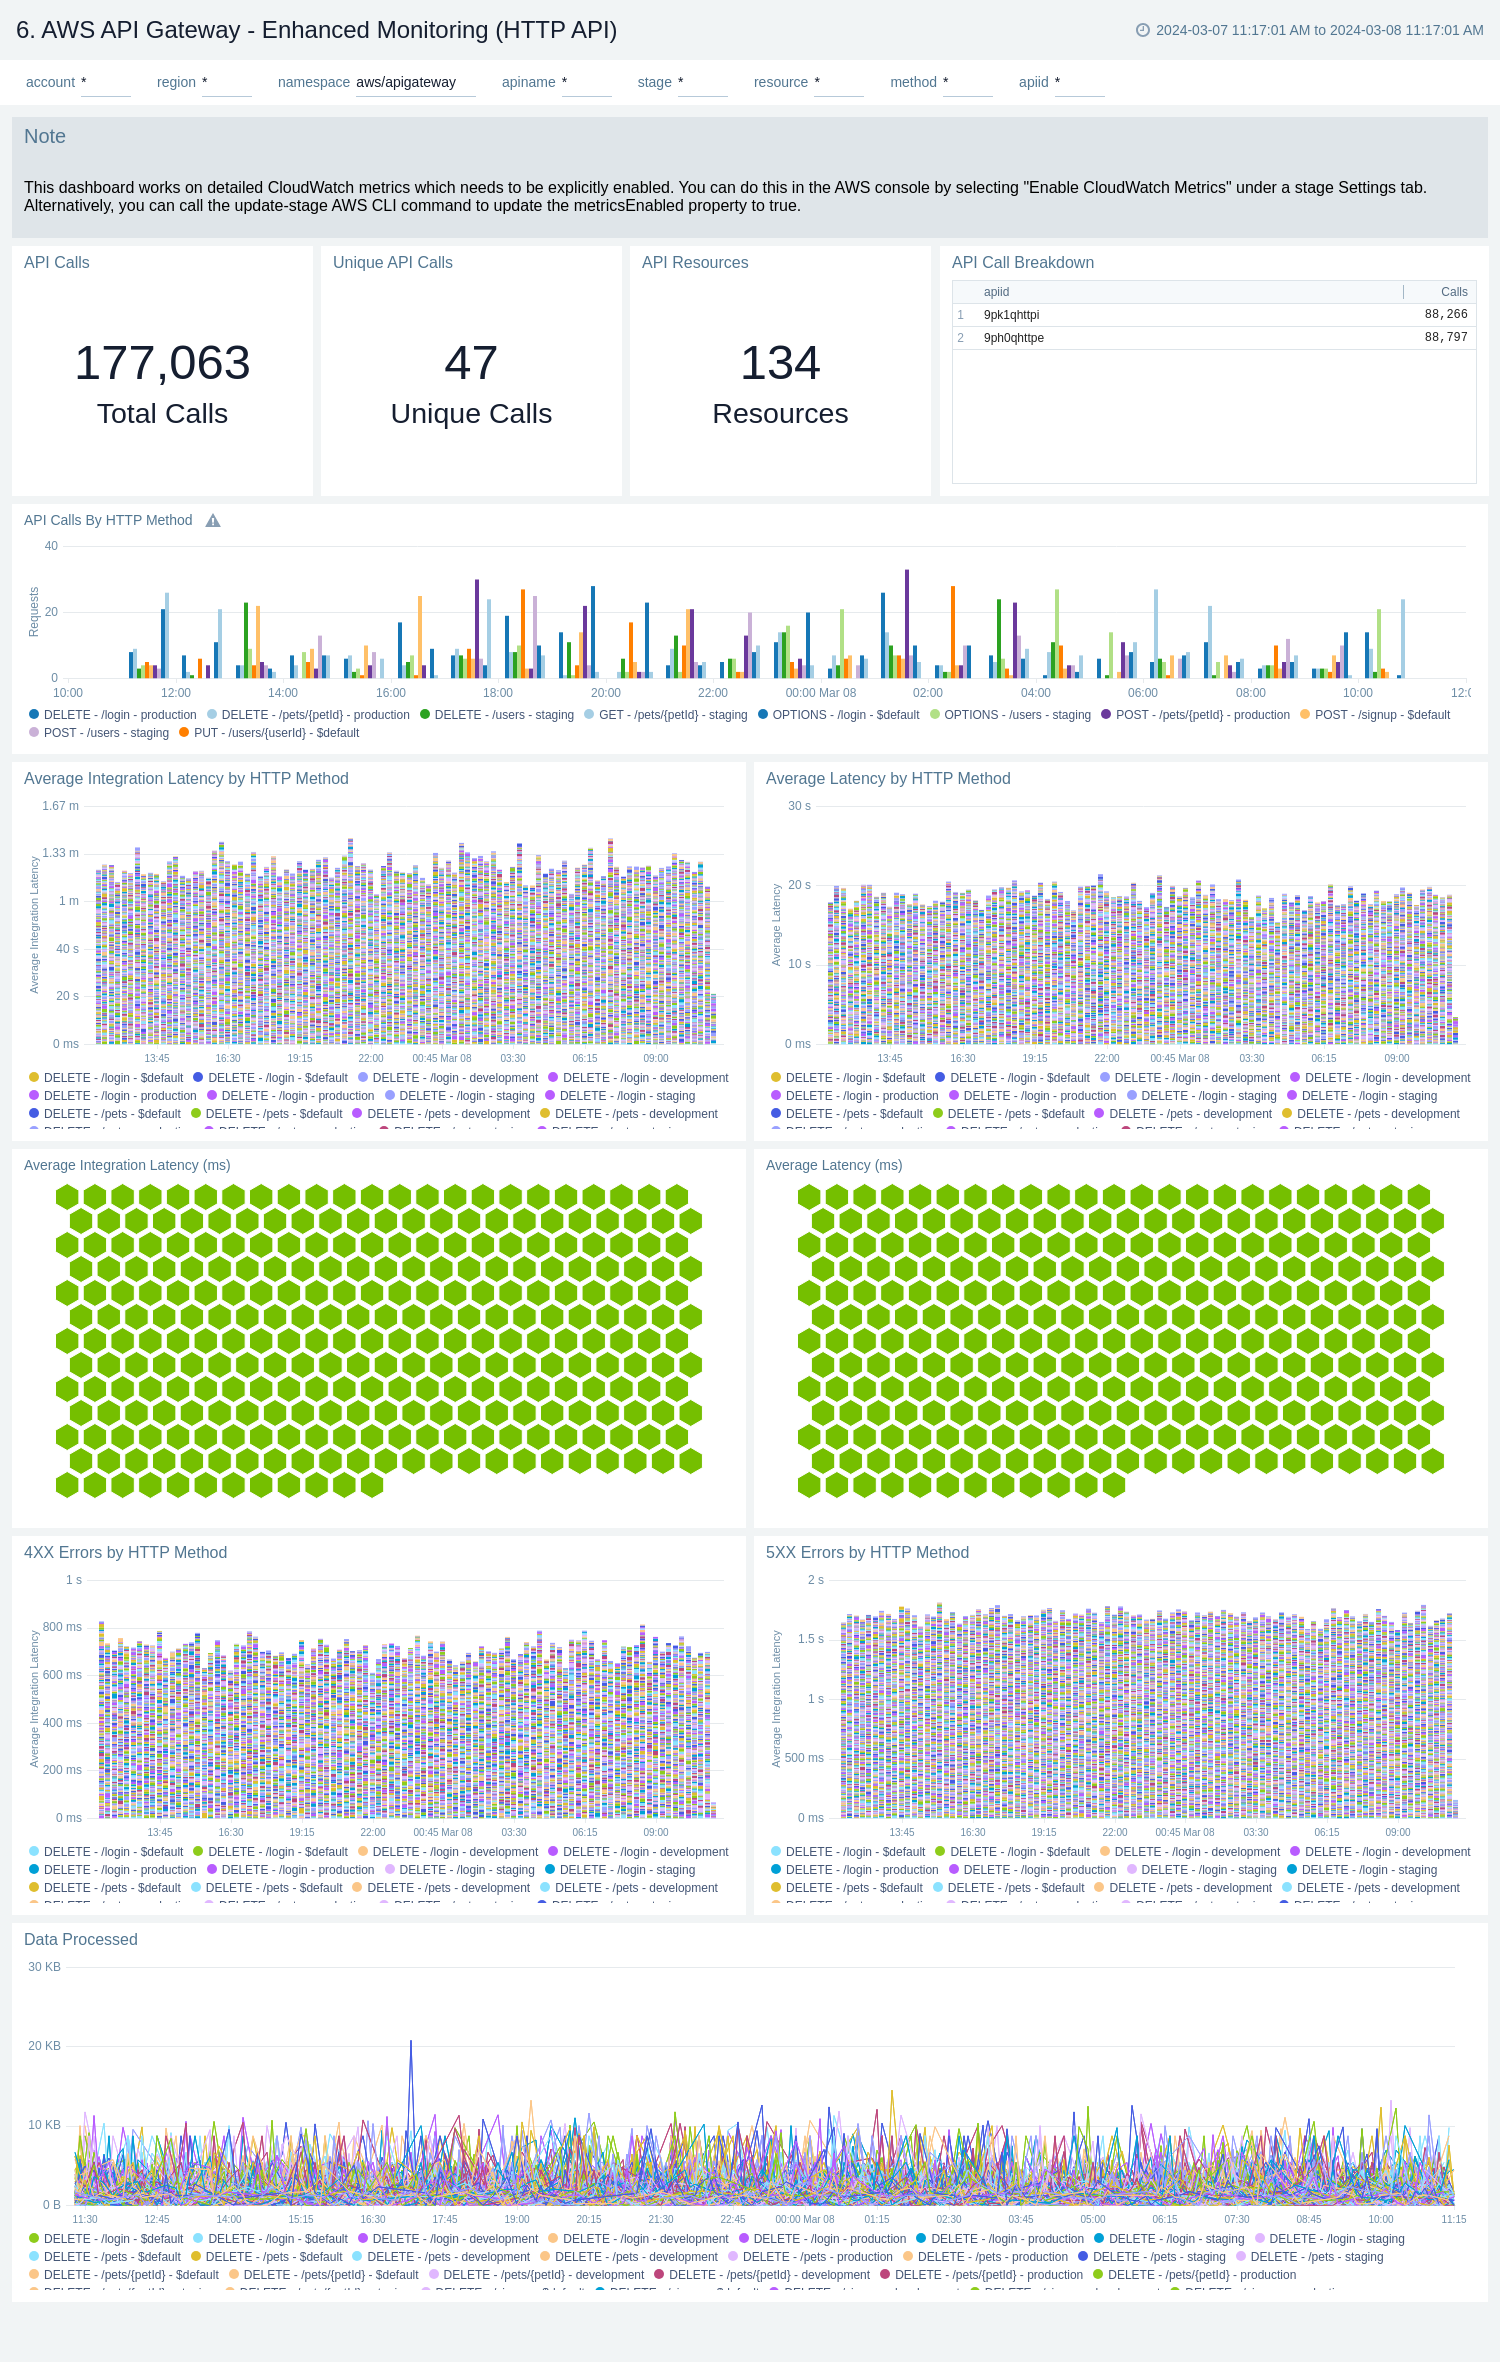
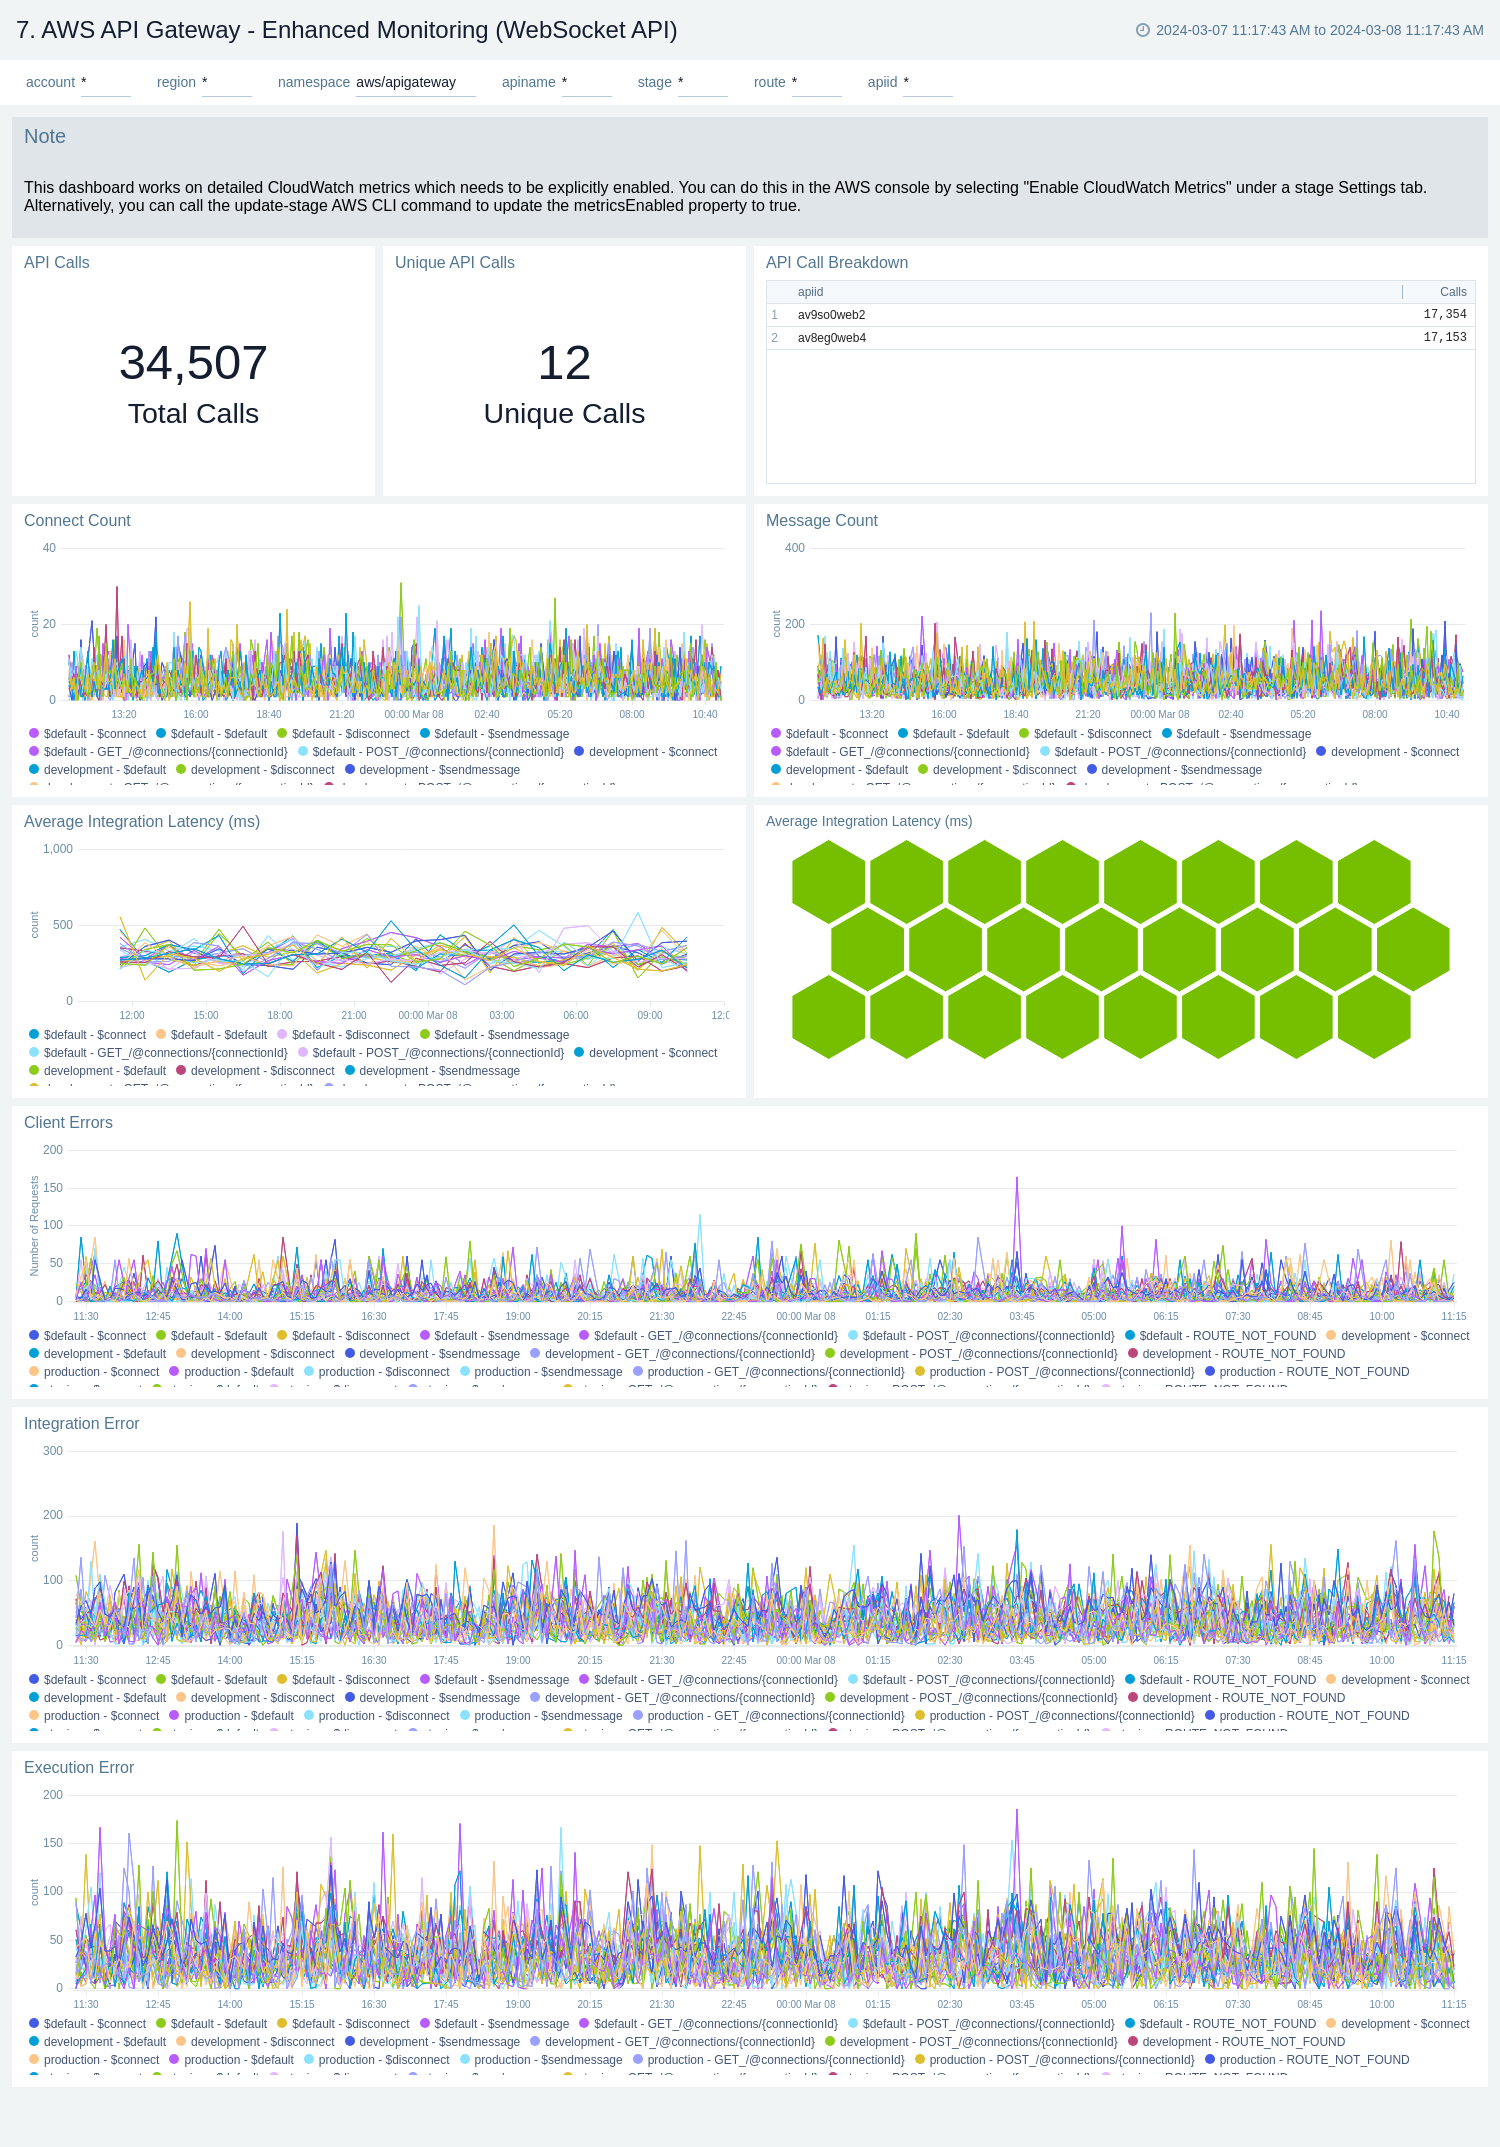
The AWS API Gateway - Enhanced Monitoring dashboards provides detailed insights into API Gateway performance throughout your infrastructure, including the number and types of API calls, API resources, cache hits, and misses, latency averages, data processed, and errors by HTTP method, resource and stage.
To populate the dashboards, you must explicitly enable detailed CloudWatch metrics.
There are three dashboards related to enhanced monitoring: AWS API Gateway - Enhanced Monitoring (REST API), AWS API Gateway - Enhanced Monitoring (HTTP API), and AWS API Gateway - Enhanced Monitoring (WebSocket API).
Use these dashboards to:
- Monitor API Gateways across your infrastructure using enhanced metrics.
- Monitor API requests trend by resource, HTTP method, and deployment stage.
- Monitor API cache hits and misses to optimize cache capacities to achieve desired performance.
- Monitor the overall responsiveness of API calls and the backend origin servers
- Monitor the total number of client-side and server-side errors based on HTTP methods
AWS API Gateway - Enhanced Monitoring (REST API)
AWS API Gateway - Enhanced Monitoring (HTTP API)
AWS API Gateway - Enhanced Monitoring (WebSocket API)
Create monitors for AWS API Gateway app
From your App Catalog:
- From the Sumo Logic navigation, select App Catalog.
- In the Search Apps field, search for and then select your app.
- Make sure the app is installed.
- Navigate to What's Included tab and scroll down to the Monitors section.
- Click Create next to the pre-configured monitors. In the create monitors window, adjust the trigger conditions and notifications settings based on your requirements.
- Scroll down to Monitor Details.
- Under Location click on New Folder.
note
By default, monitor will be saved in the root folder. So to make the maintenance easier, create a new folder in the location of your choice.
- Enter Folder Name. Folder Description is optional.
tip
Using app version in the folder name will be helpful to determine the versioning for future updates.
- Click Create. Once the folder is created, click on Save.
AWS API Gateway alerts
| Name | Description | Alert Condition | Recover Condition |
|---|---|---|---|
AWS API Gateway - High Server-Side Errors | This alert fires where there are too many API requests (>5%) with server-side errors within 5 minutes. | Count > = 0.05 | Count < 0.05 |
AWS API Gateway - High Client-Side Errors | This alert fires where there are too many API requests (>5%) with client-side errors within 5 minutes. | Count > = 0.05 | Count < 0.05 |
AWS API Gateway - High Integration Latency | This alert fires when we detect the high integration latency for the API requests in a stage within 5 minutes. | Count > = 2000 | Count < 2000 |
AWS API Gateway - High Latency | This alert fires when we detect the high latency in a stage within 5 minutes for REST and HTTP API. | Count > = 2500 | Count < 2500 |
AWS API Gateway - Low Traffic API | This alert fires when there is low message traffic volume for the API within 5 minutes. | Count < = 1 | Count > 1 |
AWS API Gateway - High Authorizer Errors | This alert fires when there are too many API requests (>5%) with authorizer errors within 5 minutes. | Count > 5 | Count < = 5 |
AWS API Gateway - High Integration Errors | This alert fires when there are too many API requests (>5%) with integration errors within 5 minutes. | Count > 5 | Count < = 5 |
AWS API Gateway - High WAF Errors | This alert fires when there are too many API requests (>5%) with WAF errors within 5 minutes. | Count > 5 | Count < = 5 |
AWS API Gateway - High WAF Latency | This alert fires when we detect the high WAF latency for the REST and WebSocket API requests in a stage within 5 minutes. | Count > 1000 | Count < = 1000 |
Upgrade/Downgrade the AWS API Gateway app (Optional)
To update the app, do the following:
Next-Gen App: To install or update the app, you must be an account administrator or a user with Manage Apps, Manage Monitors, Manage Fields, Manage Metric Rules, and Manage Collectors capabilities depending upon the different content types part of the app.
- Select App Catalog.
- In the Search Apps field, search for and then select your app.
Optionally, you can identify apps that can be upgraded in the Upgrade available section. - To upgrade the app, select Upgrade from the Manage dropdown.
- If the upgrade does not have any configuration or property changes, you will be redirected to the Preview & Done section.
- If the upgrade has any configuration or property changes, you will be redirected to the Setup Data page.
- In the Configure section of your respective app, complete the following fields.
- Field Name. If you already have collectors and sources set up, select the configured metadata field name (eg _sourcecategory) or specify other custom metadata (eg: _collector) along with its metadata Field Value.
- Click Next. You will be redirected to the Preview & Done section.
Post-update
Your upgraded app will be installed in the Installed Apps folder and dashboard panels will start to fill automatically.
See our Release Notes changelog for new updates in the app.
To revert the app to a previous version, do the following:
- Select App Catalog.
- In the Search Apps field, search for and then select your app.
- To version down the app, select Revert to < previous version of your app > from the Manage dropdown.
Uninstalling the AWS API Gateway app (Optional)
To uninstall the app, do the following:
- Select App Catalog.
- In the 🔎 Search Apps field, run a search for your desired app, then select it.
- Click Uninstall.