GitHub Copilot

The Sumo Logic app for GitHub Copilot delivers clear, actionable visibility into Copilot adoption, engagement, and productivity across your organization. It consolidates key metrics, such as active users, suggestion efficiency, language usage, and chat activity, so you can monitor how Copilot is used and measure its impact on development workflows.
With dashboards tracking adoption trends, feature usage, engagement differences across teams, and low‑usage or zero‑engagement conditions, the app helps optimize license utilization and training opportunities. Metrics on code suggestion and acceptance rates reveal how effectively Copilot’s recommendations enhance coding efficiency, while language and chat insights highlight where Copilot drives the most value.
By unifying these data points, the Sumo Logic app for GitHub Copilot empowers you to optimize Copilot adoption, improve developer productivity, and ensure secure, data-driven use of AI-assisted coding.
Log types
This app uses Sumo Logic’s GitHub Copilot source to collect the organization metrics and team metrics from the GitHub Copilot platform.
Sample log messages
Metric Log
{
        "date": "2024-06-24",
        "total_active_users": 24,
        "total_engaged_users": 20,
        "copilot_ide_code_completions": {
            "total_engaged_users": 20,
            "languages": [
                {
                    "name": "python",
                    "total_engaged_users": 10
                },
                {
                    "name": "ruby",
                    "total_engaged_users": 10
                }
            ],
            "editors": [
                {
                    "name": "vscode",
                    "total_engaged_users": 13,
                    "models": [
                        {
                            "name": "default",
                            "is_custom_model": false,
                            "custom_model_training_date": null,
                            "total_engaged_users": 13,
                            "languages": [
                                {
                                    "name": "python",
                                    "total_engaged_users": 6,
                                    "total_code_suggestions": 249,
                                    "total_code_acceptances": 123,
                                    "total_code_lines_suggested": 225,
                                    "total_code_lines_accepted": 135
                                },
                                {
                                    "name": "ruby",
                                    "total_engaged_users": 7,
                                    "total_code_suggestions": 496,
                                    "total_code_acceptances": 253,
                                    "total_code_lines_suggested": 520,
                                    "total_code_lines_accepted": 270
                                }
                            ]
                        }
                    ]
                },
                {
                    "name": "neovim",
                    "total_engaged_users": 7,
                    "models": [
                        {
                            "name": "a-custom-model",
                            "is_custom_model": true,
                            "custom_model_training_date": "2024-02-01",
                            "languages": [
                                {
                                    "name": "typescript",
                                    "total_engaged_users": 3,
                                    "total_code_suggestions": 112,
                                    "total_code_acceptances": 56,
                                    "total_code_lines_suggested": 143,
                                    "total_code_lines_accepted": 61
                                }
                            ]
                        }
                    ]
                }
            ]
        },
        "copilot_ide_chat": {
            "total_engaged_users": 13,
            "editors": [
                {
                    "name": "vscode",
                    "total_engaged_users": 13,
                    "models": [
                        {
                            "name": "default",
                            "is_custom_model": false,
                            "custom_model_training_date": null,
                            "total_engaged_users": 12,
                            "total_chats": 45,
                            "total_chat_insertion_events": 12,
                            "total_chat_copy_events": 16
                        }
                    ]
                }
            ]
        },
        "copilot_dotcom_chat": {
            "total_engaged_users": 14,
            "models": [
                {
                    "name": "default",
                    "is_custom_model": false,
                    "custom_model_training_date": null,
                    "total_engaged_users": 14,
                    "total_chats": 38
                }
            ]
        },
        "copilot_dotcom_pull_requests": {
            "total_engaged_users": 12,
            "repositories": [
                {
                    "name": "demo/repo1",
                    "total_engaged_users": 8,
                    "models": [
                        {
                            "name": "default",
                            "is_custom_model": false,
                            "custom_model_training_date": null,
                            "total_pr_summaries_created": 6,
                            "total_engaged_users": 8
                        }
                    ]
                },
                {
                    "name": "demo/repo2",
                    "total_engaged_users": 4,
                    "models": [
                        {
                            "name": "a-custom-model",
                            "is_custom_model": true,
                            "custom_model_training_date": "2024-02-01",
                            "total_pr_summaries_created": 10,
                            "total_engaged_users": 4
                        }
                    ]
                }
            ]
        }
}
Sample queries
_sourceCategory="Labs/GithubCopilot"
| json "date","copilot_ide_code_completions.editors[*].models[*].languages[*]" as date, copilot_ide_code_completions_editors_models_languages nodrop
| extract field=copilot_ide_code_completions_editors_models_languages "\"?(?<editor_language>\{[^\}]+\})\"?[,\n\]]" multi
| json field=editor_language "total_code_acceptances", "total_code_suggestions", "name", "total_code_lines_accepted", "total_code_lines_suggested" as code_acceptances, code_suggestions, name, code_lines_accepted, code_lines_suggested

| where _type matches "{{_type}}"

| sum(code_acceptances) as total_code_acceptances, sum(code_suggestions) as total_code_suggestions by date
| (total_code_acceptances/total_code_suggestions)*100 as acceptance_rate
| round(acceptance_rate, 2) as acceptance_rate
| count by date, acceptance_rate
| sort by date desc
| fields - _count
Collection configuration and app installation
Depending on the set up collection method, you can configure and install the app in three ways:
- Create a new collector and install the app. Create a new Sumo Logic Cloud-to-Cloud (C2C) source under a new Sumo Logic Collector and later install the app, or
- Use an existing collector and install the app. Create a new Sumo Logic Cloud-to-Cloud (C2C) source under an existing Sumo Logic Collector and later install the app, or
- Use existing source and install the app. Use your existing configured Sumo Logic Cloud-to-Cloud (C2C) source and install the app.
Use the Cloud-to-Cloud Integration for GitHub Copilot to create the source and use the same source category while installing the app. By following these steps, you can ensure that your GitHub Copilot app is properly integrated and configured to collect and analyze your GitHub Copilot data.
Create a new collector and install the app
To set up collection and install the app, do the following:
Next-Gen App: To install or update the app, you must be an account administrator or a user with Manage Apps, Manage Monitors, Manage Fields, Manage Metric Rules, and Manage Collectors capabilities depending upon the different content types part of the app.
- Select App Catalog.
- In the 🔎 Search Apps field, run a search for your desired app, then select it.
- Click Install App.
note
Sometimes this button says Add Integration.
- In the Set Up Collection section of your respective app, select Create a new Collector.
- Collector Name. Enter a Name to display the Source in the Sumo Logic web application. The description is optional.
- Timezone. Set the default time zone when it is not extracted from the log timestamp. Time zone settings on Sources override a Collector time zone setting.
- (Optional) Metadata. Click the +Add Metadata link to add a custom log Metadata Fields. Define the fields you want to associate, each metadata field needs a name (key) and value.
 A green circle with a checkmark is shown when the field exists and is enabled in the Fields table schema.
 An orange triangle with an exclamation point is shown when the field doesn't exist, or is disabled in the Fields table schema. In this case, you'll see an option to automatically add or enable the nonexistent fields to the Fields table schema. If a field is sent to Sumo Logic but isn’t present or enabled in the schema, it’s ignored and marked as Dropped.
- Click Next.
- Configure the source as specified in the
Infobox above, ensuring all required fields are included. - In the Configure section of your respective app, complete the following fields.
- Field Name. If you already have collectors and sources set up, select the configured metadata field name (eg _sourcecategory) or specify other custom metadata (eg: _collector) along with its metadata Field Value.
- Click Next. You will be redirected to the Preview & Done section.
Post-installation
Once your app is installed, it will appear in your Installed Apps folder, and dashboard panels will start to fill automatically.
Each panel slowly fills with data matching the time range query received since the panel was created. Results will not immediately be available but will be updated with full graphs and charts over time.
Use an existing collector and install the app
To set up the source in the existing collector and install the app, do the following:
Next-Gen App: To install or update the app, you must be an account administrator or a user with Manage Apps, Manage Monitors, Manage Fields, Manage Metric Rules, and Manage Collectors capabilities depending upon the different content types part of the app.
- Select App Catalog.
- In the 🔎 Search Apps field, run a search for your desired app, then select it.
- Click Install App.
note
Sometimes this button says Add Integration.
- In the Set Up Collection section of your respective app, select Use an existing Collector.
- From the Select Collector dropdown, select the collector that you want to set up your source with and click Next.
- Configure the source as specified in the
Infobox above, ensuring all required fields are included. - In the Configure section of your respective app, complete the following fields.
- Field Name. If you already have collectors and sources set up, select the configured metadata field name (eg _sourcecategory) or specify other custom metadata (eg: _collector) along with its metadata Field Value.
- Click Next. You will be redirected to the Preview & Done section.
Post-installation
Once your app is installed, it will appear in your Installed Apps folder, and dashboard panels will start to fill automatically.
Each panel slowly fills with data matching the time range query received since the panel was created. Results will not immediately be available but will be updated with full graphs and charts over time.
Use an existing source and install the app
To skip collection and only install the app, do the following:
Next-Gen App: To install or update the app, you must be an account administrator or a user with Manage Apps, Manage Monitors, Manage Fields, Manage Metric Rules, and Manage Collectors capabilities depending upon the different content types part of the app.
- Select App Catalog.
- In the 🔎 Search Apps field, run a search for your desired app, then select it.
- Click Install App.
note
Sometimes this button says Add Integration.
- In the Set Up Collection section of your respective app, select Skip this step and use existing source and click Next.
- In the Configure section of your respective app, complete the following fields.
- Field Name. If you already have collectors and sources set up, select the configured metadata field name (eg _sourcecategory) or specify other custom metadata (eg: _collector) along with its metadata Field Value.
- Click Next. You will be redirected to the Preview & Done section.
Post-installation
Once your app is installed, it will appear in your Installed Apps folder, and dashboard panels will start to fill automatically.
Each panel slowly fills with data matching the time range query received since the panel was created. Results will not immediately be available but will be updated with full graphs and charts over time.
Viewing the GitHub Copilot dashboards
All dashboards have a set of filters that you can apply to the entire dashboard. Use these filters to drill down and examine the data to a granular level.
- You can change the time range for a dashboard or panel by selecting a predefined interval from a drop-down list, choosing a recently used time range, or specifying custom dates and times. Learn more.
- You can use template variables to drill down and examine the data on a granular level. For more information, see Filtering Dashboards with Template Variables.
- Most Next-Gen apps allow you to provide the scope at the installation time and are comprised of a key (
_sourceCategoryby default) and a default value for this key. Based on your input, the app dashboards will be parameterized with a dashboard variable, allowing you to change the dataset queried by all panels. This eliminates the need to create multiple copies of the same dashboard with different queries.
Adoption and Anomaly
The GitHub Copilot - Adoption and Anomaly dashboard offers a unified view of Copilot usage across your organization, tracking active and engaged users, adoption trends, and anomalies over time. It surfaces engagement patterns across key features, such as code completions, IDE chat, and pull-request summaries, while enabling side-by-side comparisons between teams and organizational averages. Low-usage and zero-engagement panels highlight areas where adoption is lagging, supporting targeted actions to boost utilization. By consolidating these insights, the dashboard helps stakeholders monitor adoption health, encourage consistent Copilot use, and maximize the value of AI-assisted development. 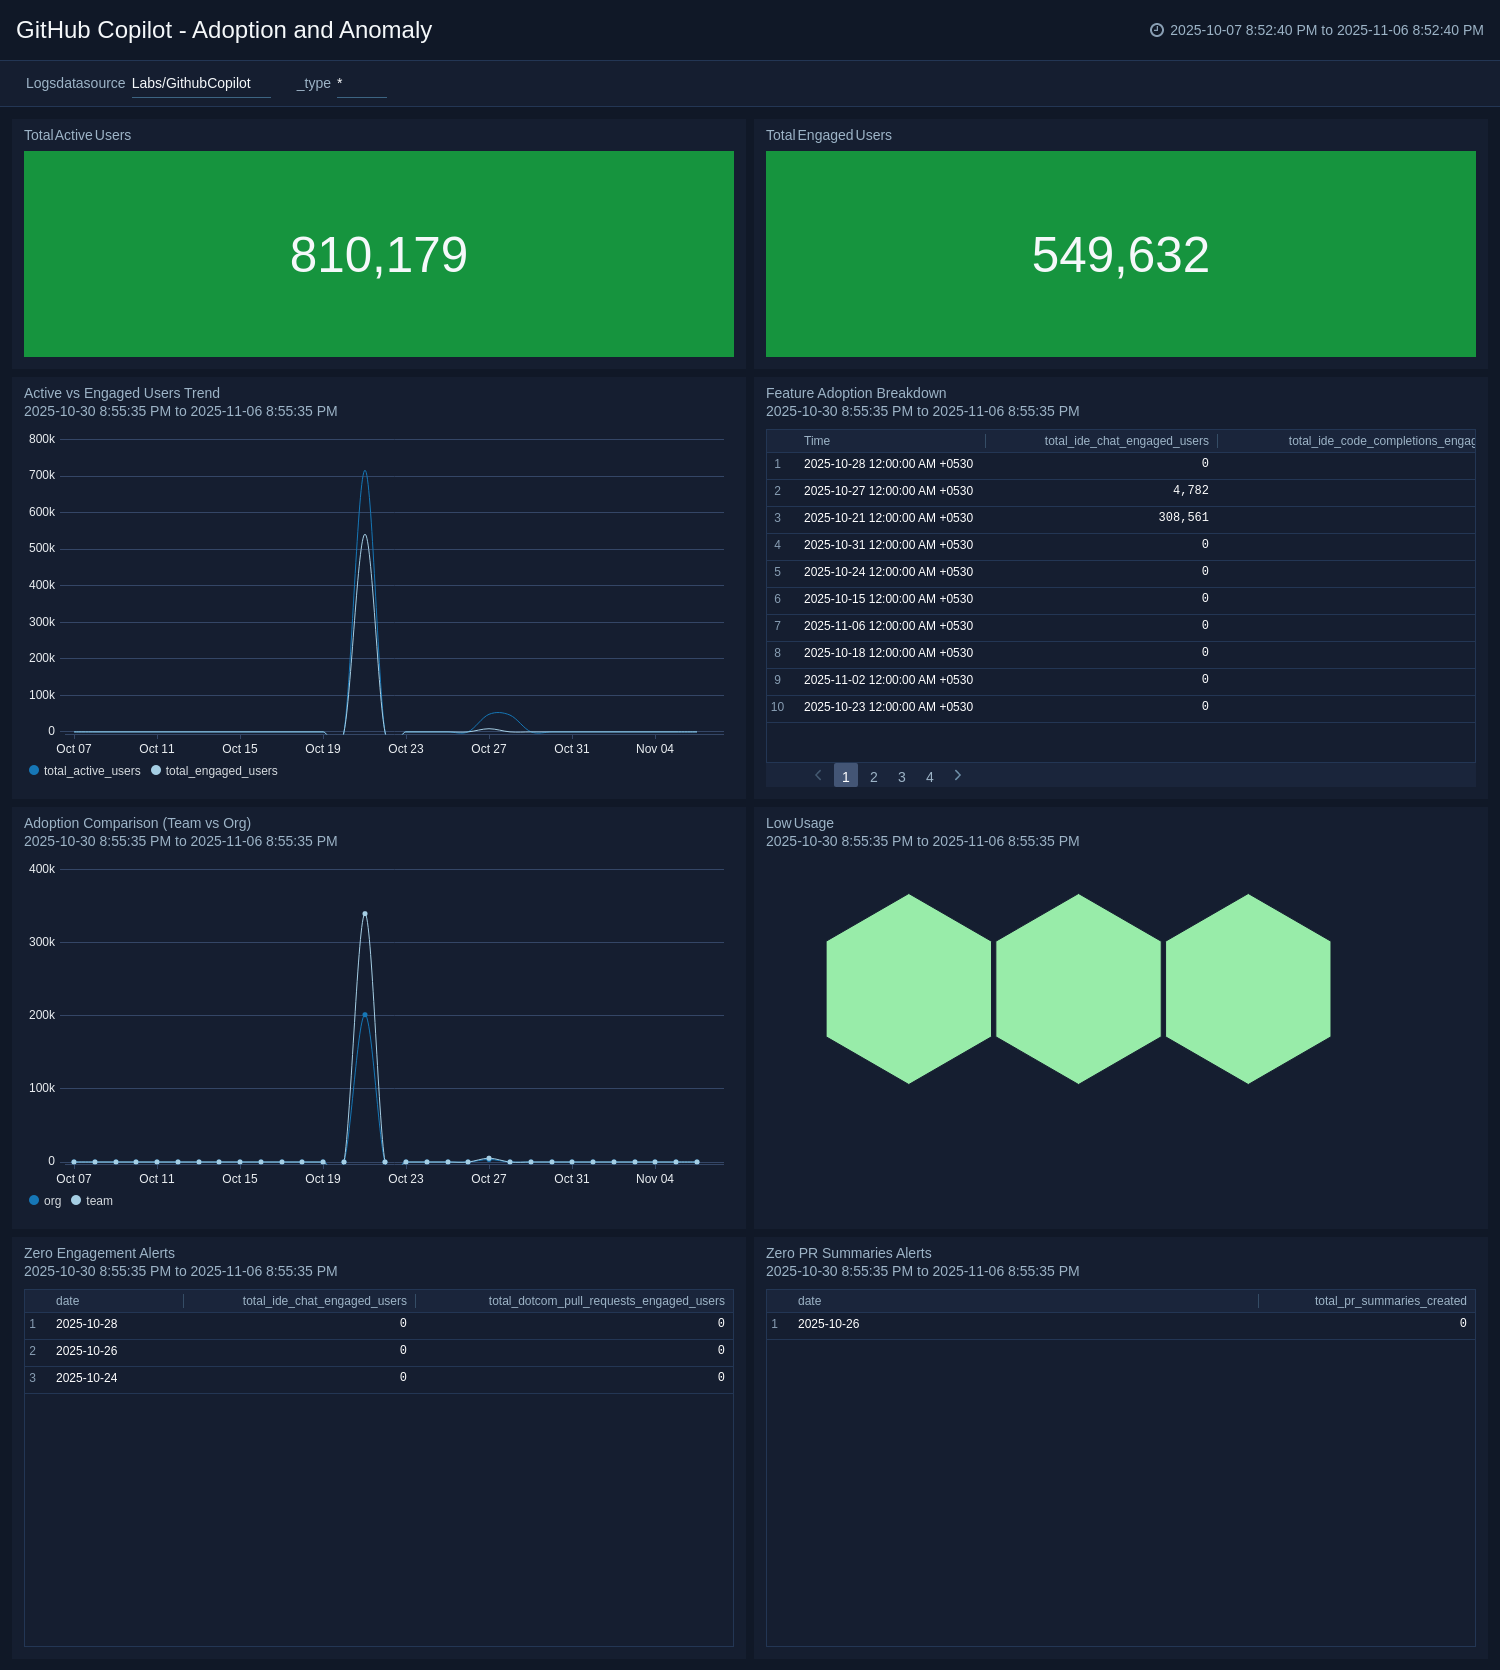
Code Completion Efficiency
The GitHub Copilot - Code Completion Efficiency dashboard evaluates how effectively you use Copilot’s code suggestions across languages and timeframes. It tracks suggestion and acceptance rates, compares accepted versus suggested lines of code, and highlights efficiency variations by language. By visualizing acceptance trends and language-specific performance, the dashboard enables teams to assess the quality of Copilot’s recommendations, pinpoint where developers may need support or model adjustments, and optimize AI-assisted coding to enhance productivity and code quality. 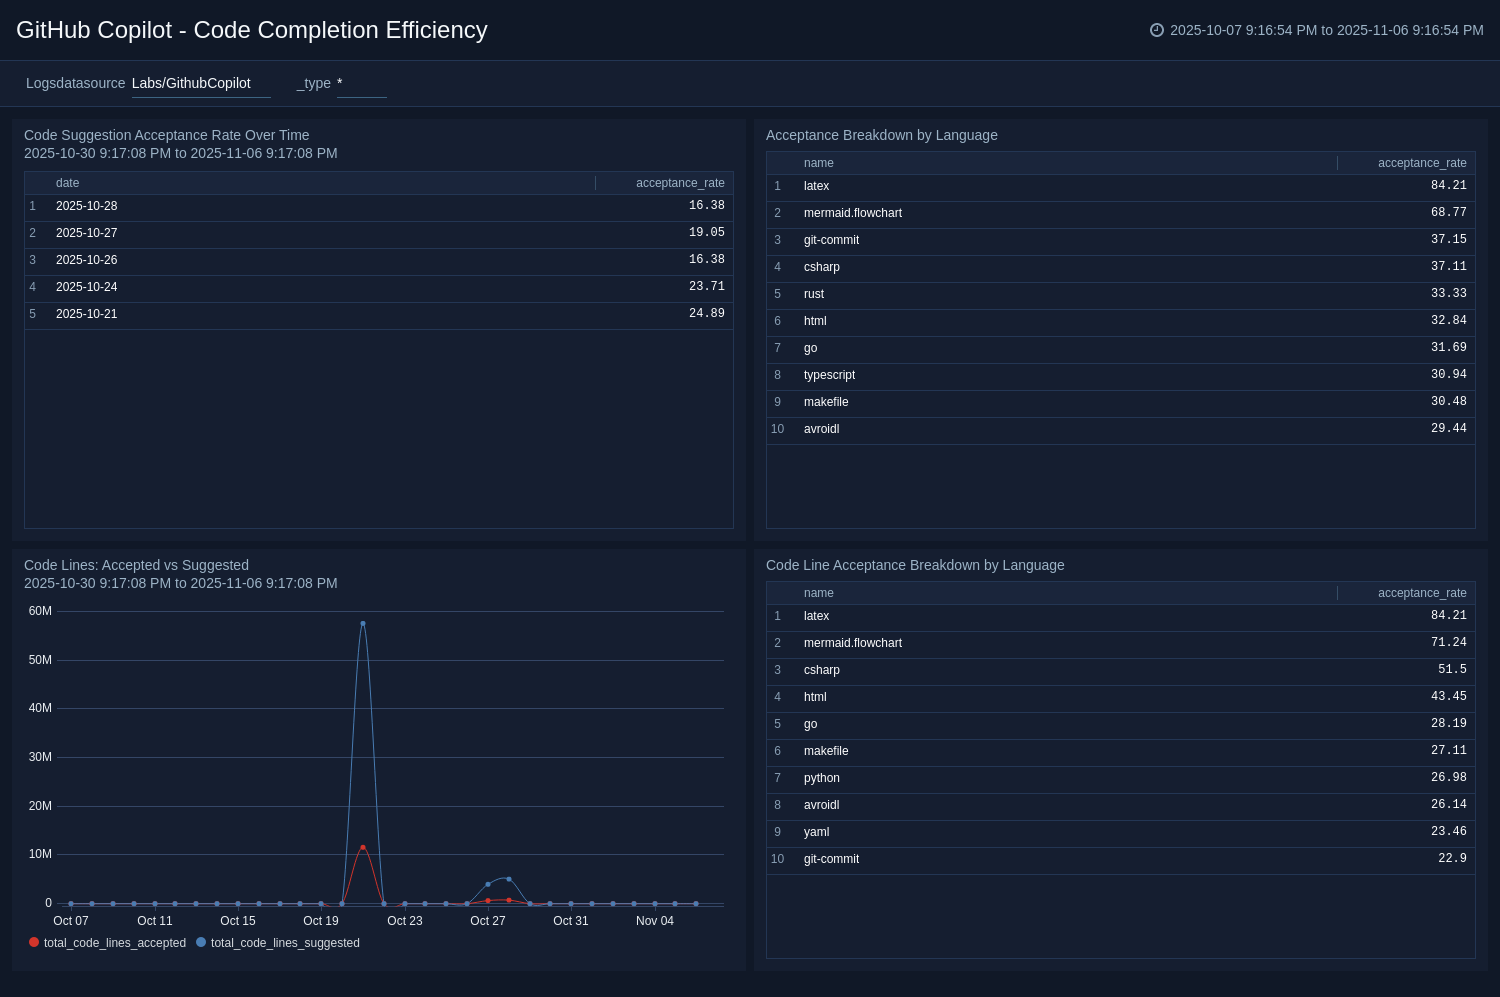
Language Insights
The GitHub Copilot - Language Insights dashboard reveals how you use Copilot across programming and configuration languages. It identifies the most frequently used languages, compares engagement levels, and visualizes acceptance rates to highlight where Copilot suggestions deliver the most value. Low-engagement metrics expose languages with limited adoption, while dedicated views for infrastructure languages, such as YAML, Terraform, and Dockerfile, provide visibility into DevOps and configuration activity. By consolidating language-specific performance and adoption data, the dashboard helps teams assess Copilot’s impact across the technology stack and focus enablement efforts where they’ll drive the greatest improvement. 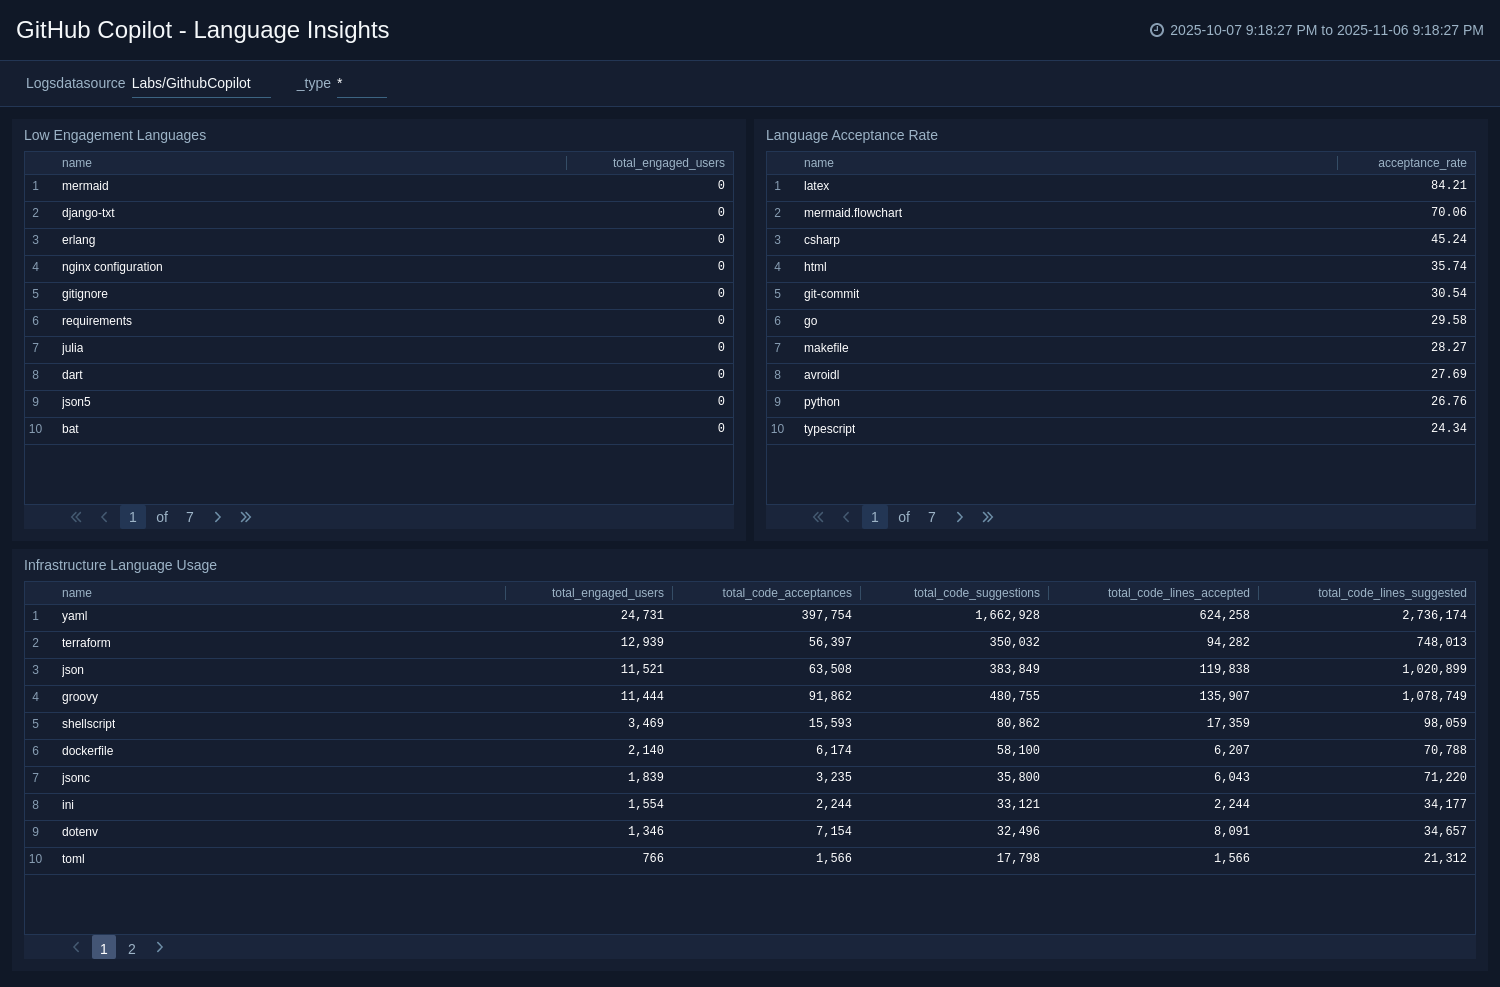
Chat Engagement and Interaction Quality
The GitHub Copilot - Chat Engagement and Interaction Quality dashboard offers visibility into how you use Copilot’s chat features across development environments. It tracks chat activity over time, analyzes user behavior through copy-versus-insert trends, and distinguishes engagement by model type to reveal adoption of default versus custom models. By unifying these insights, the dashboard helps teams understand how developers leverage chat for assistance, assess interaction quality, and identify opportunities to promote secure, effective use of Copilot’s conversational capabilities. 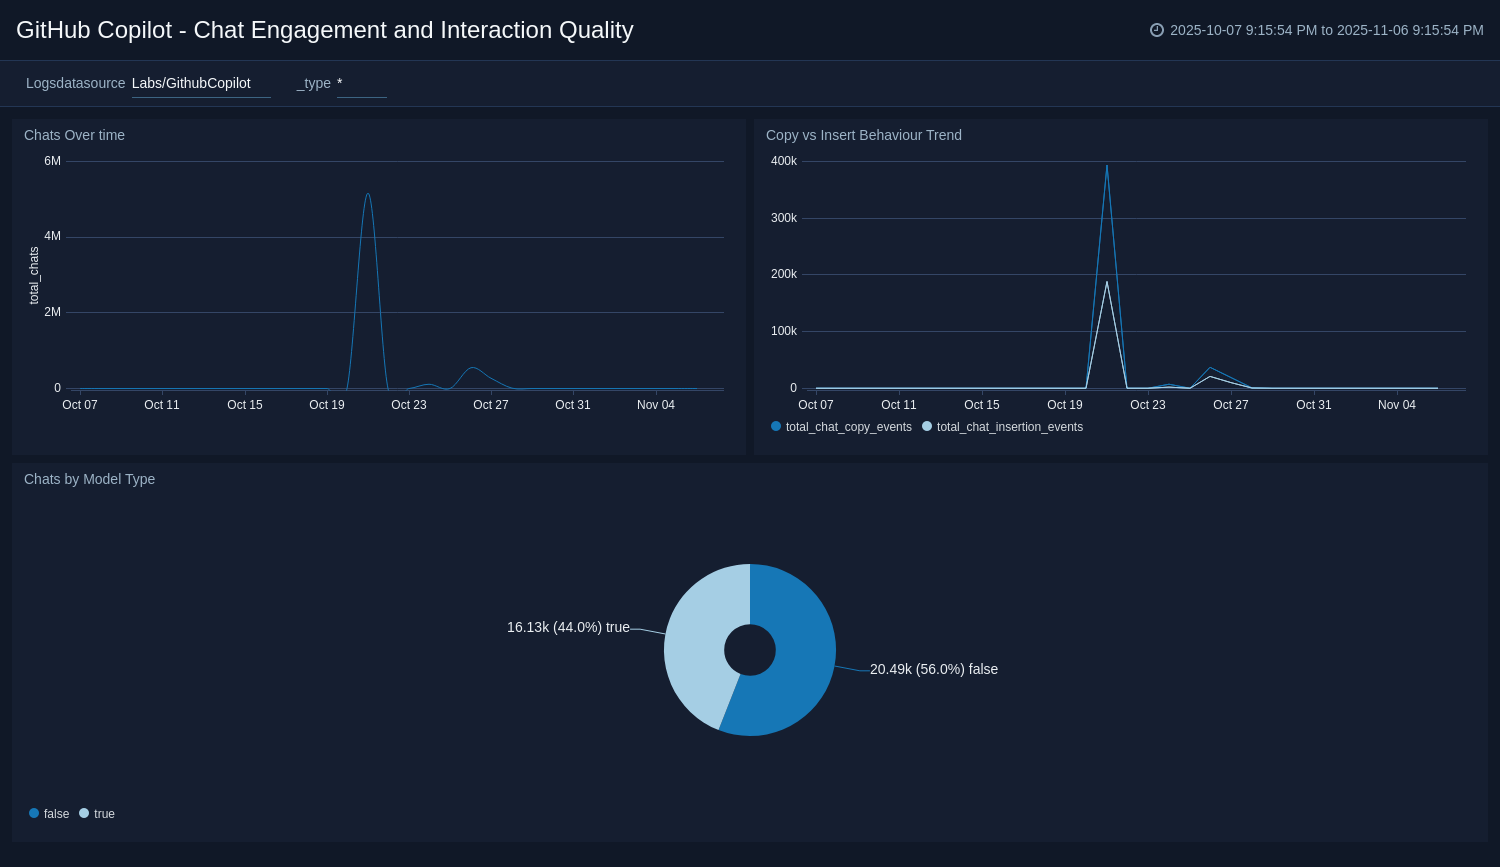
Upgrading the GitHub Copilot app (Optional)
To update the app, do the following:
Next-Gen App: To install or update the app, you must be an account administrator or a user with Manage Apps, Manage Monitors, Manage Fields, Manage Metric Rules, and Manage Collectors capabilities depending upon the different content types part of the app.
- Select App Catalog.
- In the Search Apps field, search for and then select your app.
Optionally, you can identify apps that can be upgraded in the Upgrade available section. - To upgrade the app, select Upgrade from the Manage dropdown.
- If the upgrade does not have any configuration or property changes, you will be redirected to the Preview & Done section.
- If the upgrade has any configuration or property changes, you will be redirected to the Setup Data page.
- In the Configure section of your respective app, complete the following fields.
- Field Name. If you already have collectors and sources set up, select the configured metadata field name (eg _sourcecategory) or specify other custom metadata (eg: _collector) along with its metadata Field Value.
- Click Next. You will be redirected to the Preview & Done section.
Post-update
Your upgraded app will be installed in the Installed Apps folder and dashboard panels will start to fill automatically.
See our Release Notes changelog for new updates in the app.
To revert the app to a previous version, do the following:
- Select App Catalog.
- In the Search Apps field, search for and then select your app.
- To version down the app, select Revert to < previous version of your app > from the Manage dropdown.
Uninstalling the GitHub Copilot app (Optional)
To uninstall the app, do the following:
- Select App Catalog.
- In the 🔎 Search Apps field, run a search for your desired app, then select it.
- Click Uninstall.