 Meet the new
 SailPoint
SailPoint is an identity management solution that helps organizations manage employee permissions, digital identities, information security, data access, and compliance. The Sumo Logic app for SailPoint provides comprehensive visibility into identity governance and administration activities, including authentication events, access requests, provisioning operations, identity lifecycle changes, privileged access monitoring, source health, and workflow automation.
Log types
The SailPoint Source ingests:
- Events from the Search API Endpoint.
- Users Inventory data from the Public Identities API Endpoint.
Sample log messages
{
	"org":"sp-ITgrp",
	"pod":"stg02-useast1",
	"created":"2022-10-05T11:52:42.119Z",
	"id":"aa138dc5c4c8dbfdbdb68336ac89730cb9531a0e5bfec876af6630a6f12e4a2e",
	"action":"update",
	"type":"WORKFLOW",
	"actor":"▶"{
		"..."
	},
	"target":"▶"{
		"..."
	},
	"stack":"tpe",
	"trackingNumber":"8e2b88914f2d4ffea13c541daeb57952",
	"attributes":"▶"{
		"..."
	},
	"objects":"▶"[
		"..."
	],
	"operation":"UPDATE",
	"status":"PASSED",
	"technicalName":"TASK_SCHEDULE_UPDATE_PASSED",
	"name":"Update Task Schedule Passed",
	"synced":"2022-10-05T11:52:42.119Z",
	"_type":"event",
	"_version":"v7"
}
{
	"org":"sp-solgrp",
	"pod":"stg02-useast1",
	"created":"2022-10-05T11:43:02.214Z",
	"id":"e554182b1186adbd0e6183701a39c534dc434dce218822dc4817090ddaac2c4c",
	"action":"AUTHENTICATION-103",
	"type":"AUTH",
	"actor":"▶"{
		"..."
	},
	"target":"▶"{
		"..."
	},
	"stack":"oathkeeper",
	"trackingNumber":"5624c8b0a8a843adbd979d5de12e3723",
	"ipAddress":"177.53.184.122",
	"details":"5624c8b0a8a843adbd979d5de12e3723",
	"attributes":"▶"{
		"..."
	},
	"objects":"▶"[
		"..."
	],
	"operation":"REQUEST",
	"status":"PASSED",
	"technicalName":"AUTHENTICATION_REQUEST_PASSED",
	"name":"Request Authentication Passed",
	"synced":"2022-10-05T11:43:02.214Z",
	"_type":"event",
	"_version":"v7"
}
Sample queries
=Labs/sailpoint ipAddress
| json field= "created", "type", "technicalName", "status","operation","actor.name", "action", "name", "target.name", "attributes.sourceName" as created, event_type, technical_name_in_search, event_status, operation, user_name, action, event_desc, target_name, source_name
| json "org" as org
| where technical_name_in_search = "AUTHENTICATION_REQUEST_PASSED"
| json field= "ipAddress" as client_ip
| lookup latitude, longitude, country_code, country_name, region, city, postal_code from geo://location on ip = client_ip
| where country_name matches "*" and city matches "*"
| count by latitude, longitude, country_code, country_name, region, city, postal_code
| sort _count
=Labs/sailpoint
| json field= "created", "type", "technicalName", "status","operation","actor.name", "action", "name", "target.name", "attributes.sourceName" as created, event_type, technical_name_in_search, event_status, operation, user_name, action, event_desc, target_name, source_name | json "org" as org
| count by event_type
| sort by _count
Collection configuration and app installation
Depending on the set up collection method, you can configure and install the app in three ways:
- Create a new collector and install the app. Create a new Sumo Logic Cloud-to-Cloud (C2C) source under a new Sumo Logic Collector and later install the app, or
- Use an existing collector and install the app. Create a new Sumo Logic Cloud-to-Cloud (C2C) source under an existing Sumo Logic Collector and later install the app, or
- Use existing source and install the app. Use your existing configured Sumo Logic Cloud-to-Cloud (C2C) source and install the app.
Use the Cloud-to-Cloud Integration for SailPoint to create the source and use the same source category while installing the app. By following these steps, you can ensure that your SailPoint app is properly integrated and configured to collect and analyze your SailPoint data.
Create a new collector and install the app
To set up collection and install the app, do the following:
Next-Gen App: To install or update the app, you must be an account administrator or a user with Manage Apps, Manage Monitors, Manage Fields, Manage Metric Rules, and Manage Collectors capabilities depending upon the different content types part of the app.
- Select App Catalog.
- In the 🔎 Search Apps field, run a search for your desired app, then select it.
- Click Install App.
note
Sometimes this button says Add Integration.
- In the Set Up Collection section of your respective app, select Create a new Collector.
- Collector Name. Enter a Name to display the Source in the Sumo Logic web application. The description is optional.
- Timezone. Set the default time zone when it is not extracted from the log timestamp. Time zone settings on Sources override a Collector time zone setting.
- (Optional) Metadata. Click the +Add Metadata link to add a custom log Metadata Fields. Define the fields you want to associate, each metadata field needs a name (key) and value.
 A green circle with a checkmark is shown when the field exists and is enabled in the Fields table schema.
 An orange triangle with an exclamation point is shown when the field doesn't exist, or is disabled in the Fields table schema. In this case, you'll see an option to automatically add or enable the nonexistent fields to the Fields table schema. If a field is sent to Sumo Logic but isn’t present or enabled in the schema, it’s ignored and marked as Dropped.
- Click Next.
- Configure the source as specified in the
Infobox above, ensuring all required fields are included. - In the Configure section of your respective app, complete the following fields.
- Field Name. If you already have collectors and sources set up, select the configured metadata field name (eg _sourcecategory) or specify other custom metadata (eg: _collector) along with its metadata Field Value.
- Click Next. You will be redirected to the Preview & Done section.
Post-installation
Once your app is installed, it will appear in your Installed Apps folder, and dashboard panels will start to fill automatically.
Each panel slowly fills with data matching the time range query received since the panel was created. Results will not immediately be available but will be updated with full graphs and charts over time.
Use an existing collector and install the app
To set up the source in the existing collector and install the app, do the following:
Next-Gen App: To install or update the app, you must be an account administrator or a user with Manage Apps, Manage Monitors, Manage Fields, Manage Metric Rules, and Manage Collectors capabilities depending upon the different content types part of the app.
- Select App Catalog.
- In the 🔎 Search Apps field, run a search for your desired app, then select it.
- Click Install App.
note
Sometimes this button says Add Integration.
- In the Set Up Collection section of your respective app, select Use an existing Collector.
- From the Select Collector dropdown, select the collector that you want to set up your source with and click Next.
- Configure the source as specified in the
Infobox above, ensuring all required fields are included. - In the Configure section of your respective app, complete the following fields.
- Field Name. If you already have collectors and sources set up, select the configured metadata field name (eg _sourcecategory) or specify other custom metadata (eg: _collector) along with its metadata Field Value.
- Click Next. You will be redirected to the Preview & Done section.
Post-installation
Once your app is installed, it will appear in your Installed Apps folder, and dashboard panels will start to fill automatically.
Each panel slowly fills with data matching the time range query received since the panel was created. Results will not immediately be available but will be updated with full graphs and charts over time.
Use an existing source and install the app
To skip collection and only install the app, do the following:
Next-Gen App: To install or update the app, you must be an account administrator or a user with Manage Apps, Manage Monitors, Manage Fields, Manage Metric Rules, and Manage Collectors capabilities depending upon the different content types part of the app.
- Select App Catalog.
- In the 🔎 Search Apps field, run a search for your desired app, then select it.
- Click Install App.
note
Sometimes this button says Add Integration.
- In the Set Up Collection section of your respective app, select Skip this step and use existing source and click Next.
- In the Configure section of your respective app, complete the following fields.
- Field Name. If you already have collectors and sources set up, select the configured metadata field name (eg _sourcecategory) or specify other custom metadata (eg: _collector) along with its metadata Field Value.
- Click Next. You will be redirected to the Preview & Done section.
Post-installation
Once your app is installed, it will appear in your Installed Apps folder, and dashboard panels will start to fill automatically.
Each panel slowly fills with data matching the time range query received since the panel was created. Results will not immediately be available but will be updated with full graphs and charts over time.
Viewing SailPoint dashboards
All dashboards have a set of filters that you can apply to the entire dashboard. Use these filters to drill down and examine the data to a granular level.
- You can change the time range for a dashboard or panel by selecting a predefined interval from a drop-down list, choosing a recently used time range, or specifying custom dates and times. Learn more.
- You can use template variables to drill down and examine the data on a granular level. For more information, see Filtering Dashboards with Template Variables.
- Most Next-Gen apps allow you to provide the scope at the installation time and are comprised of a key (
_sourceCategoryby default) and a default value for this key. Based on your input, the app dashboards will be parameterized with a dashboard variable, allowing you to change the dataset queried by all panels. This eliminates the need to create multiple copies of the same dashboard with different queries.
Overview
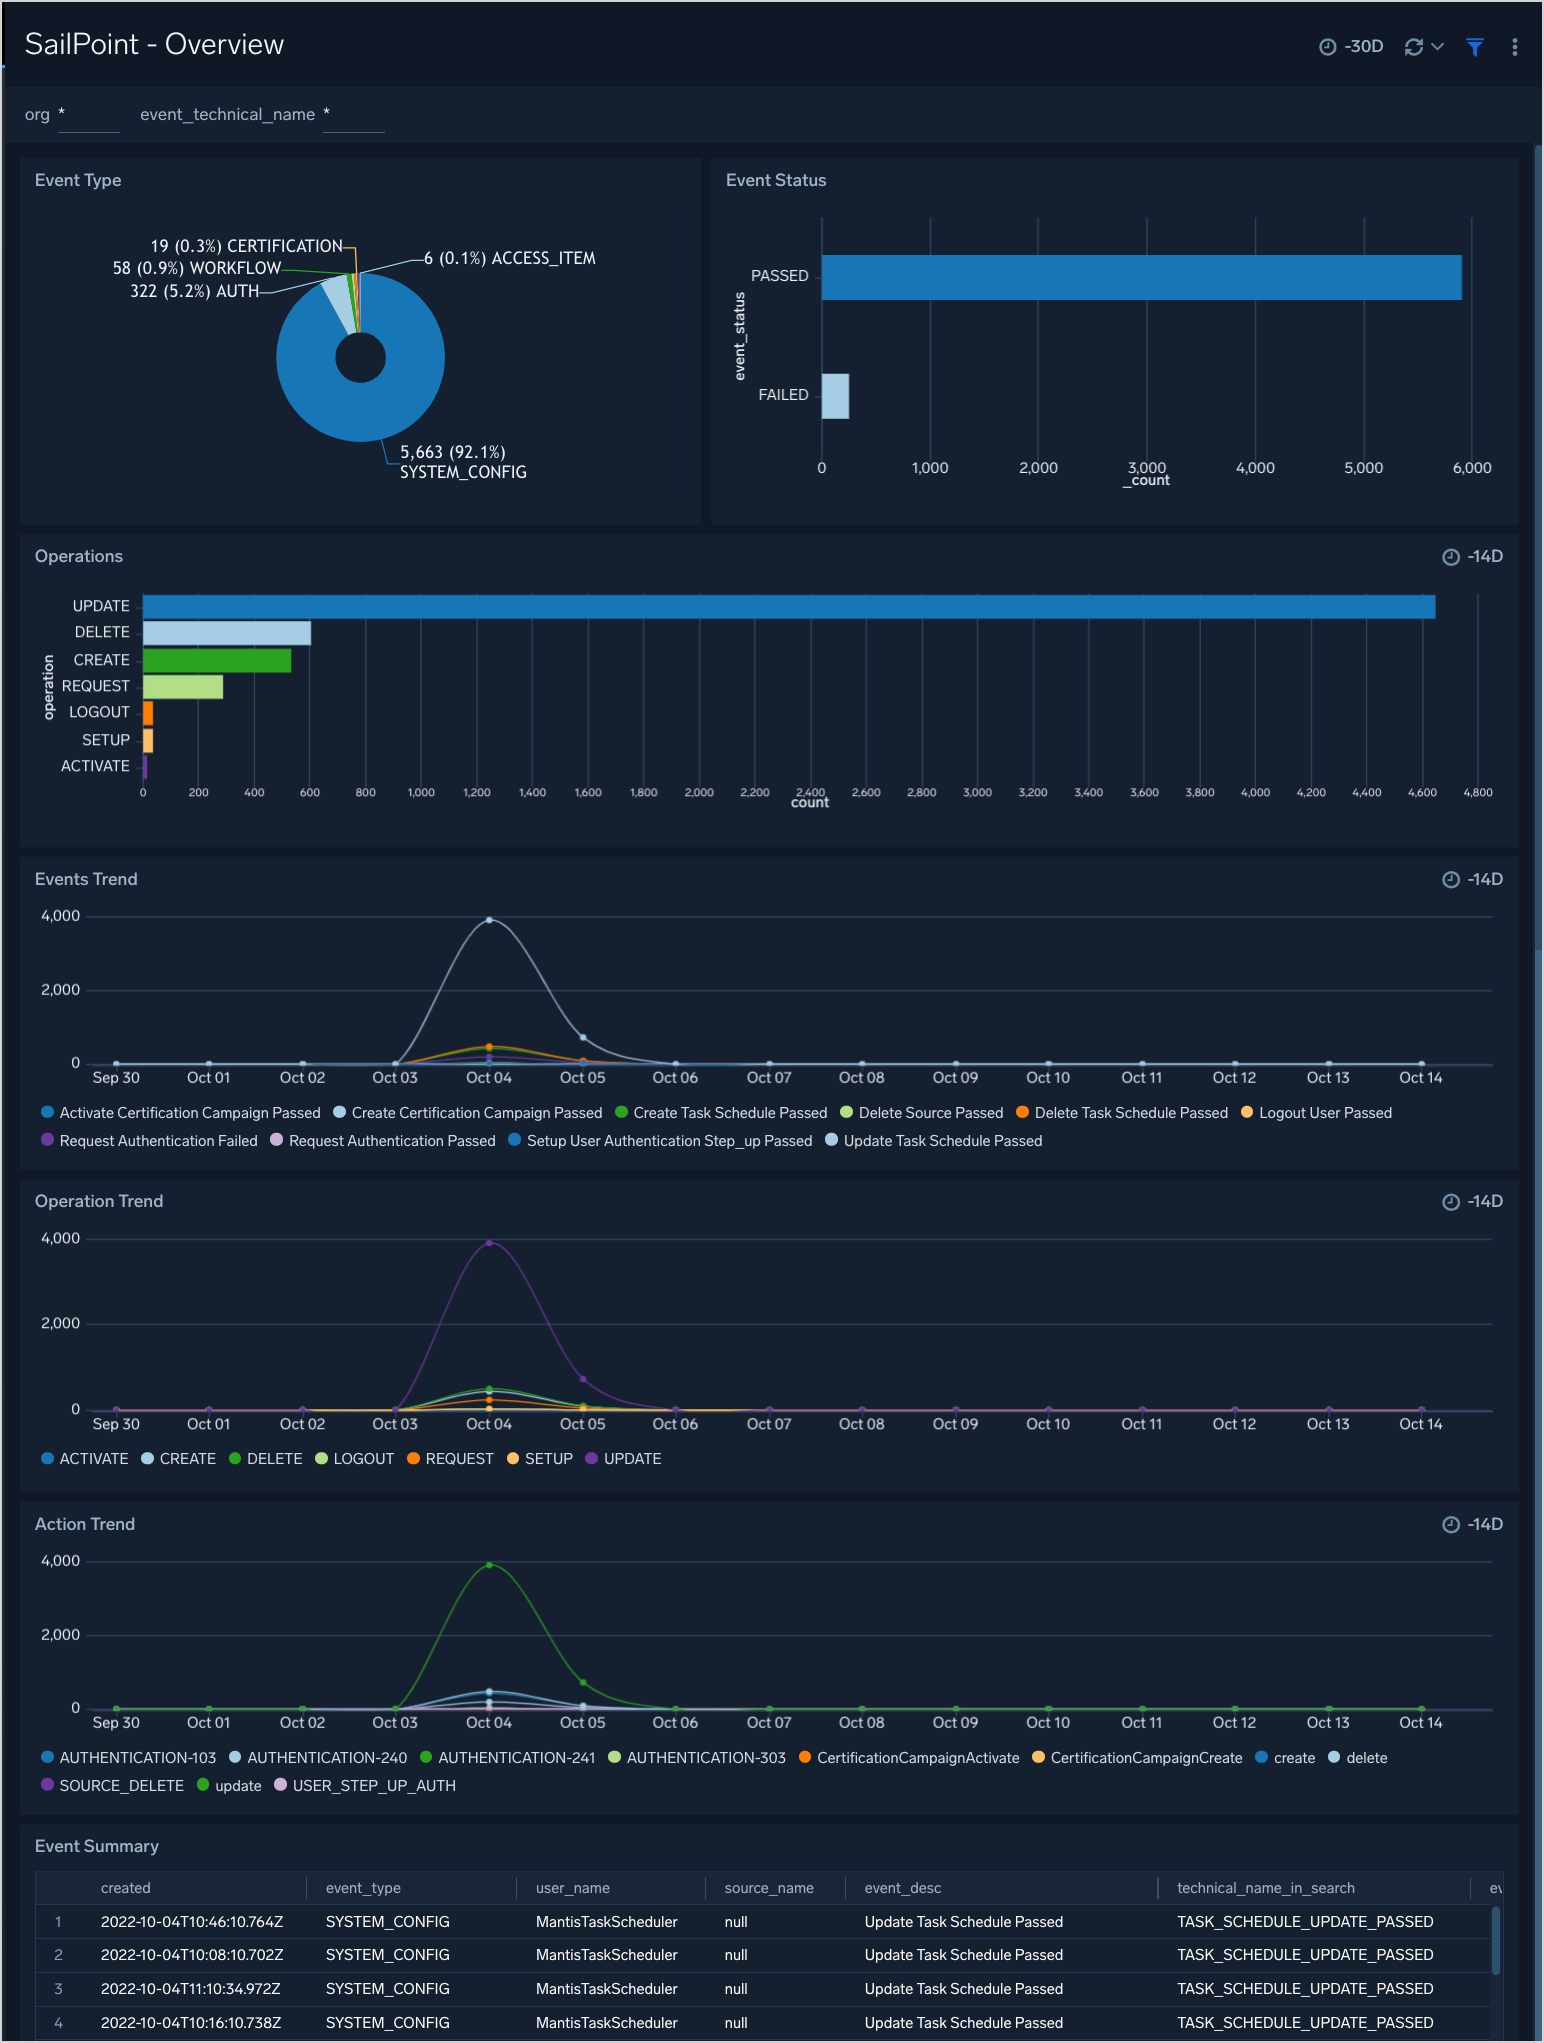
The SailPoint - Overview dashboard provides a high-level operational view of SailPoint activity, including total event volume, event type distribution, operation breakdown, trends, geolocation of events, and recent event history for rapid situational awareness.
Security
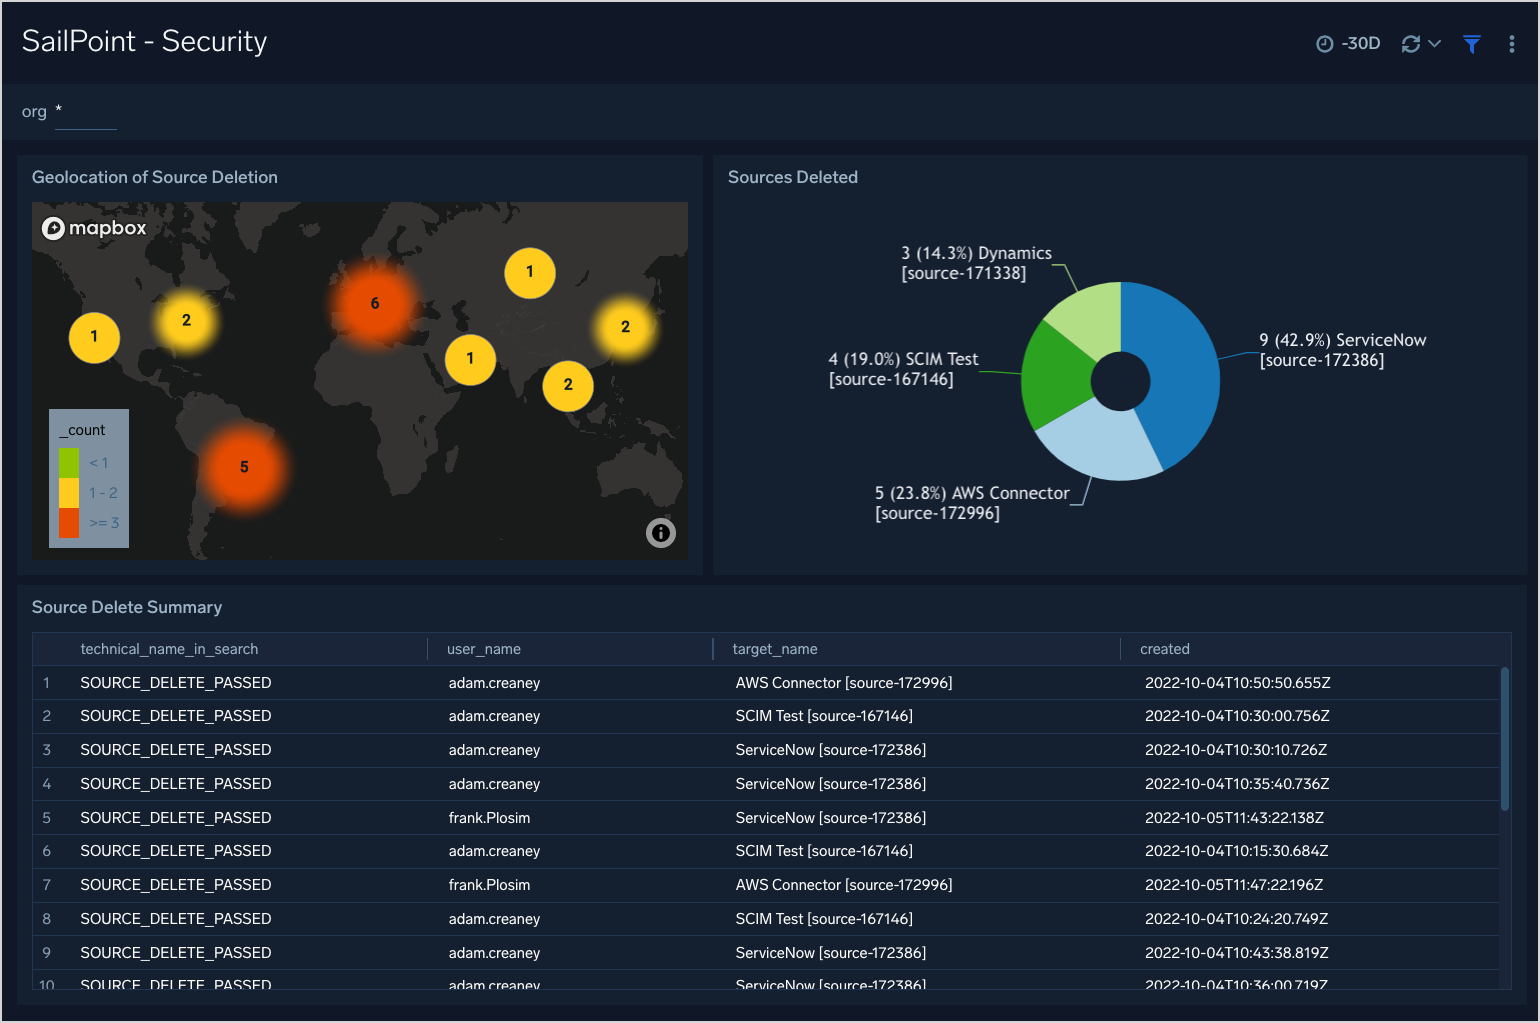
The SailPoint - Security dashboard highlights critical security signals, including source deletions, identity deletions, bulk account removals, admin configuration changes, and high-risk events that may indicate unauthorized access or insider threats.
Failed authentication events
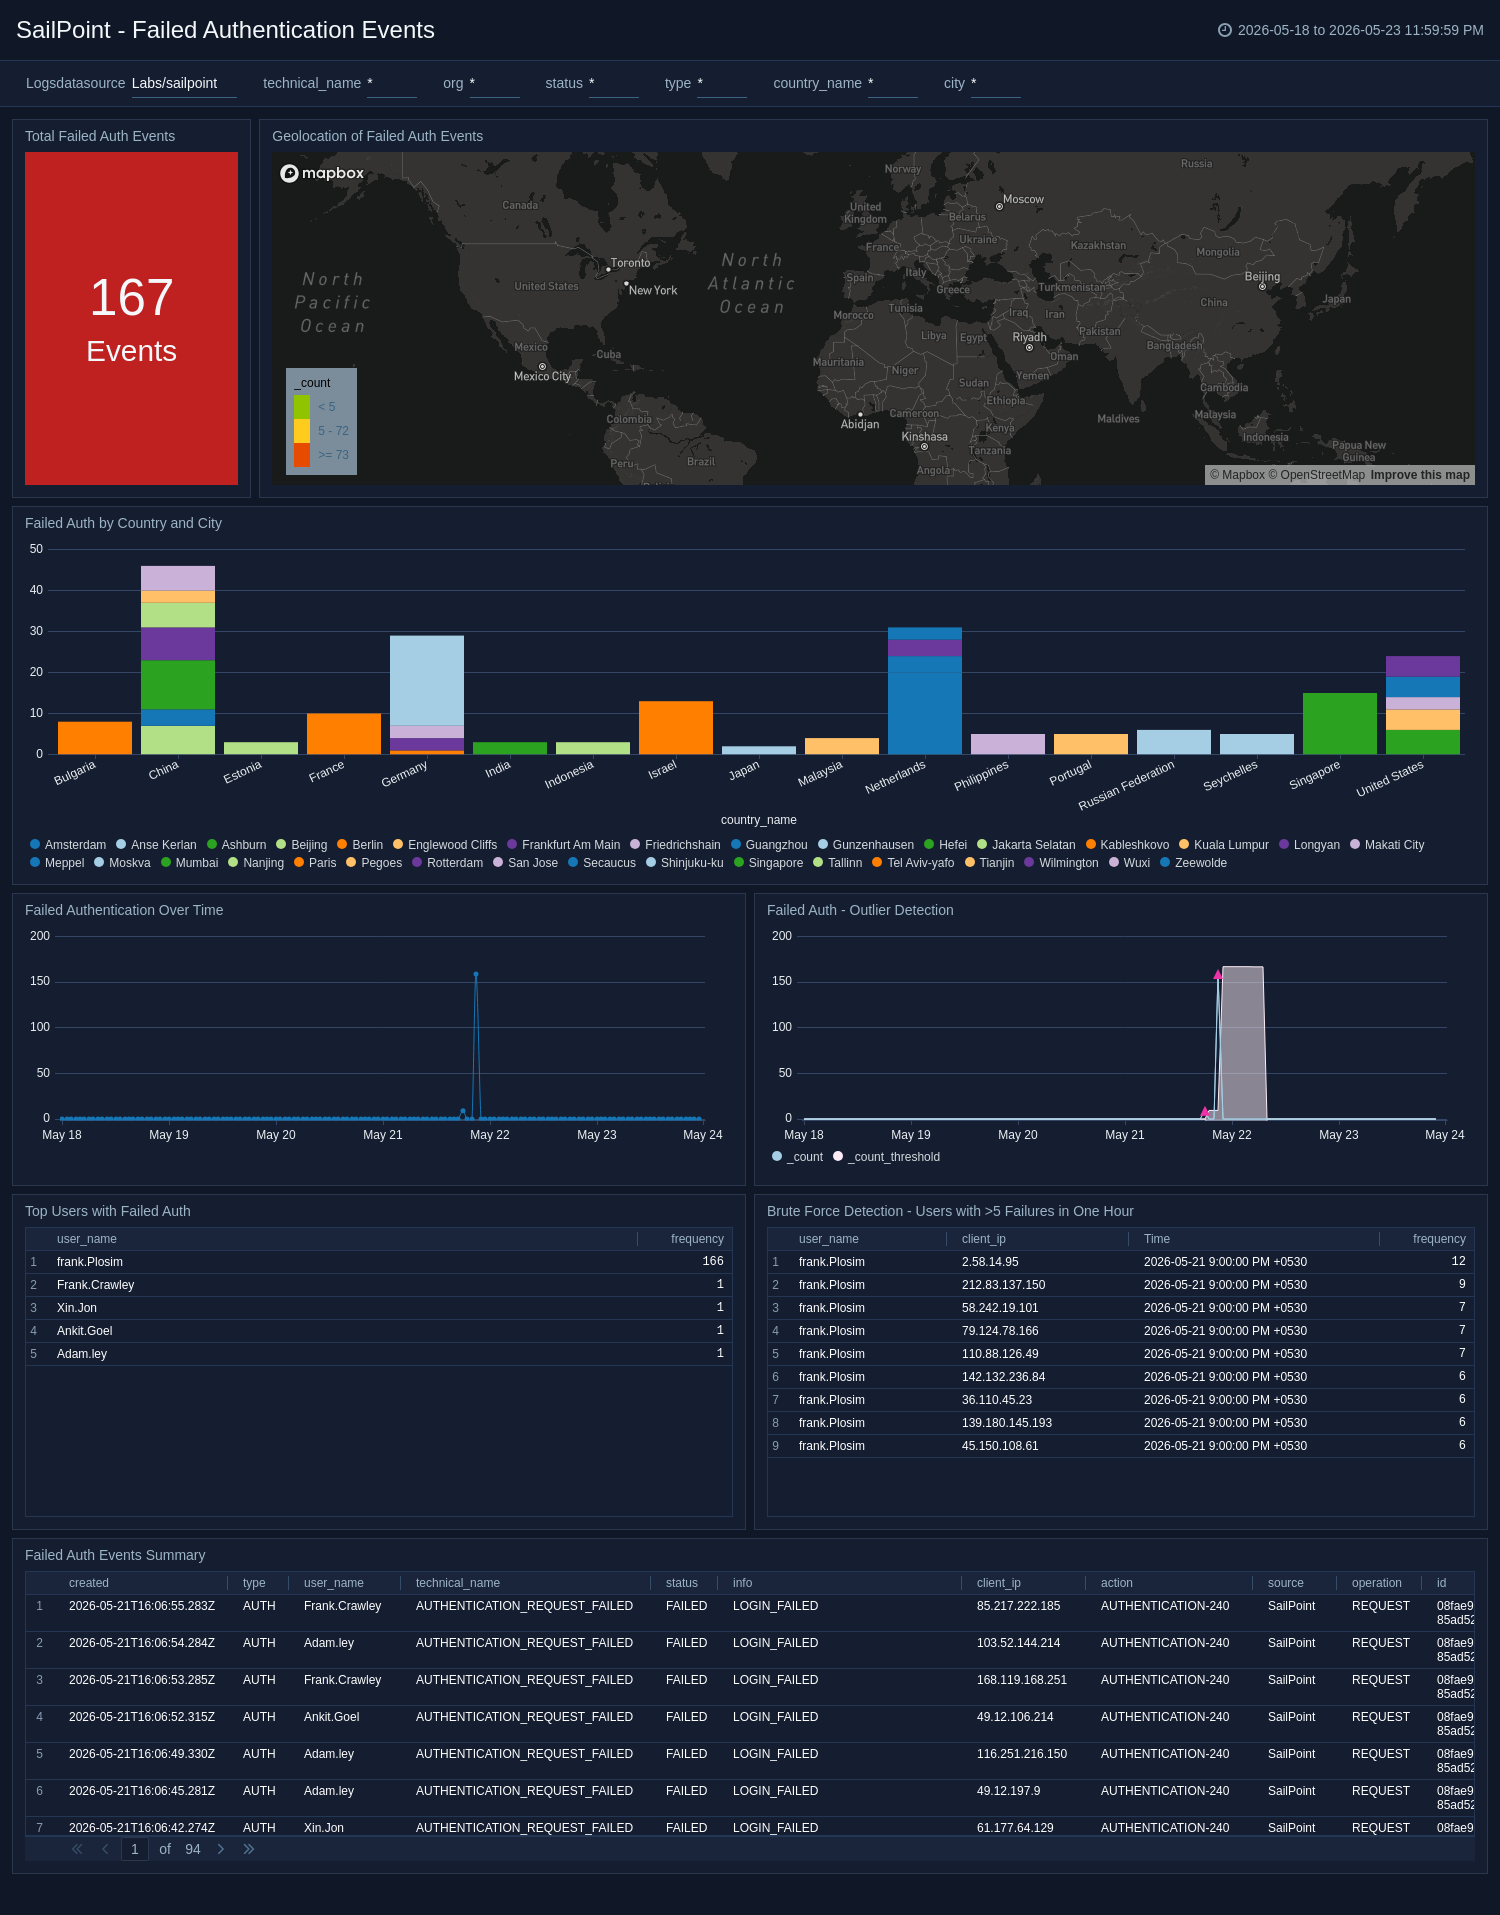
The SailPoint - Failed Authentication Events dashboard provides focused analysis of failed login activity by user, source, and location, with geo maps, outlier detection, and trend comparisons to identify brute-force attacks and anomalies.
Successful authentication events
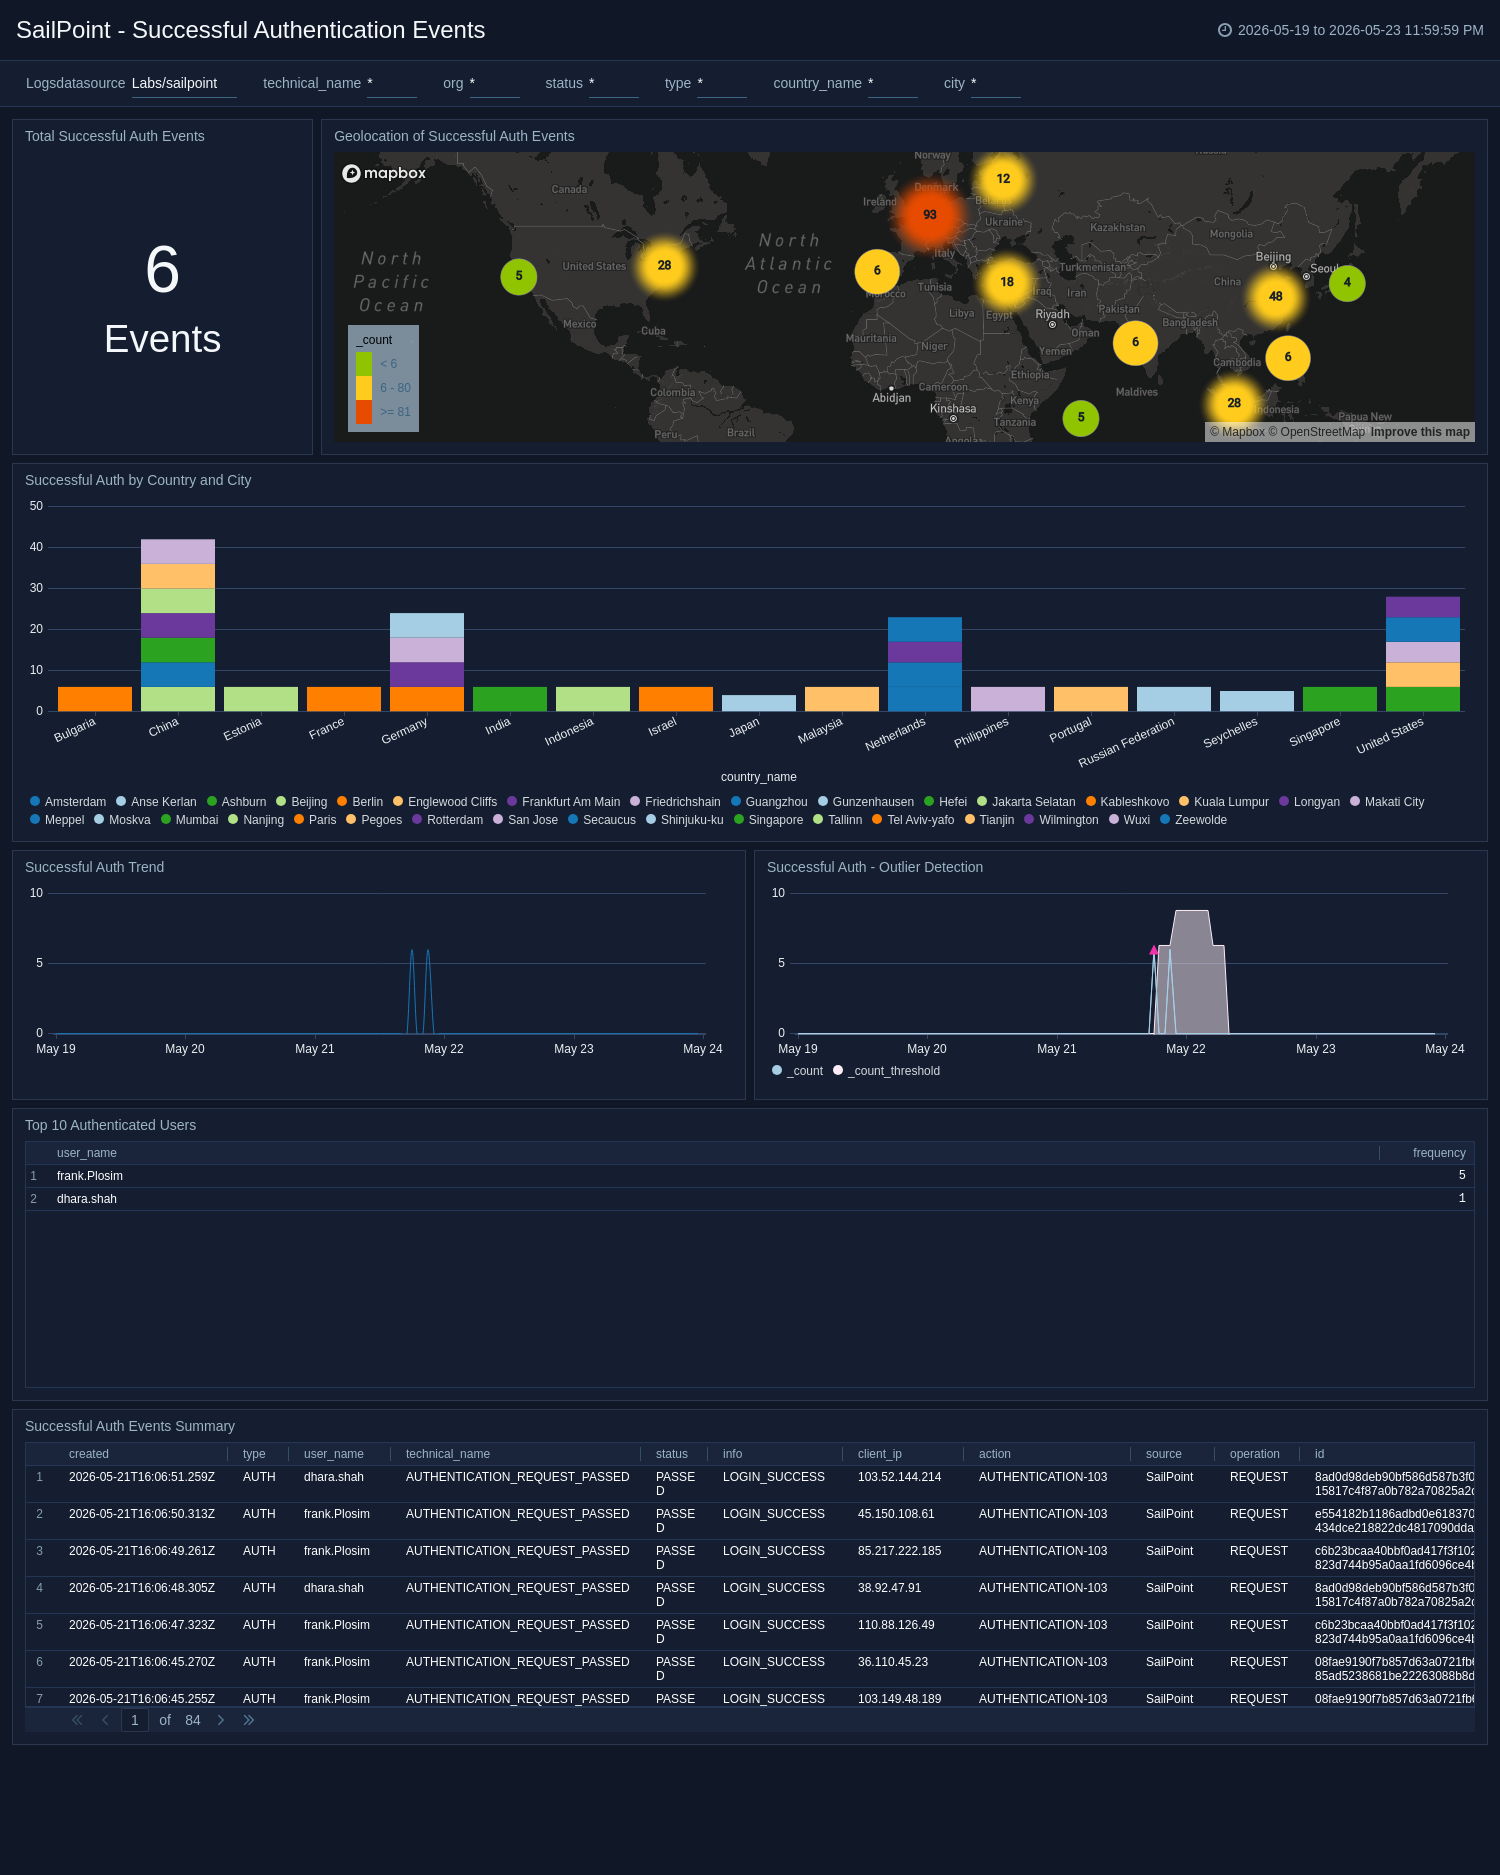
The SailPoint - Successful Authentication Events dashboard provides analysis of successful login events by user, source, and location, with geo maps and trends to validate expected access behavior.
Identity inventory
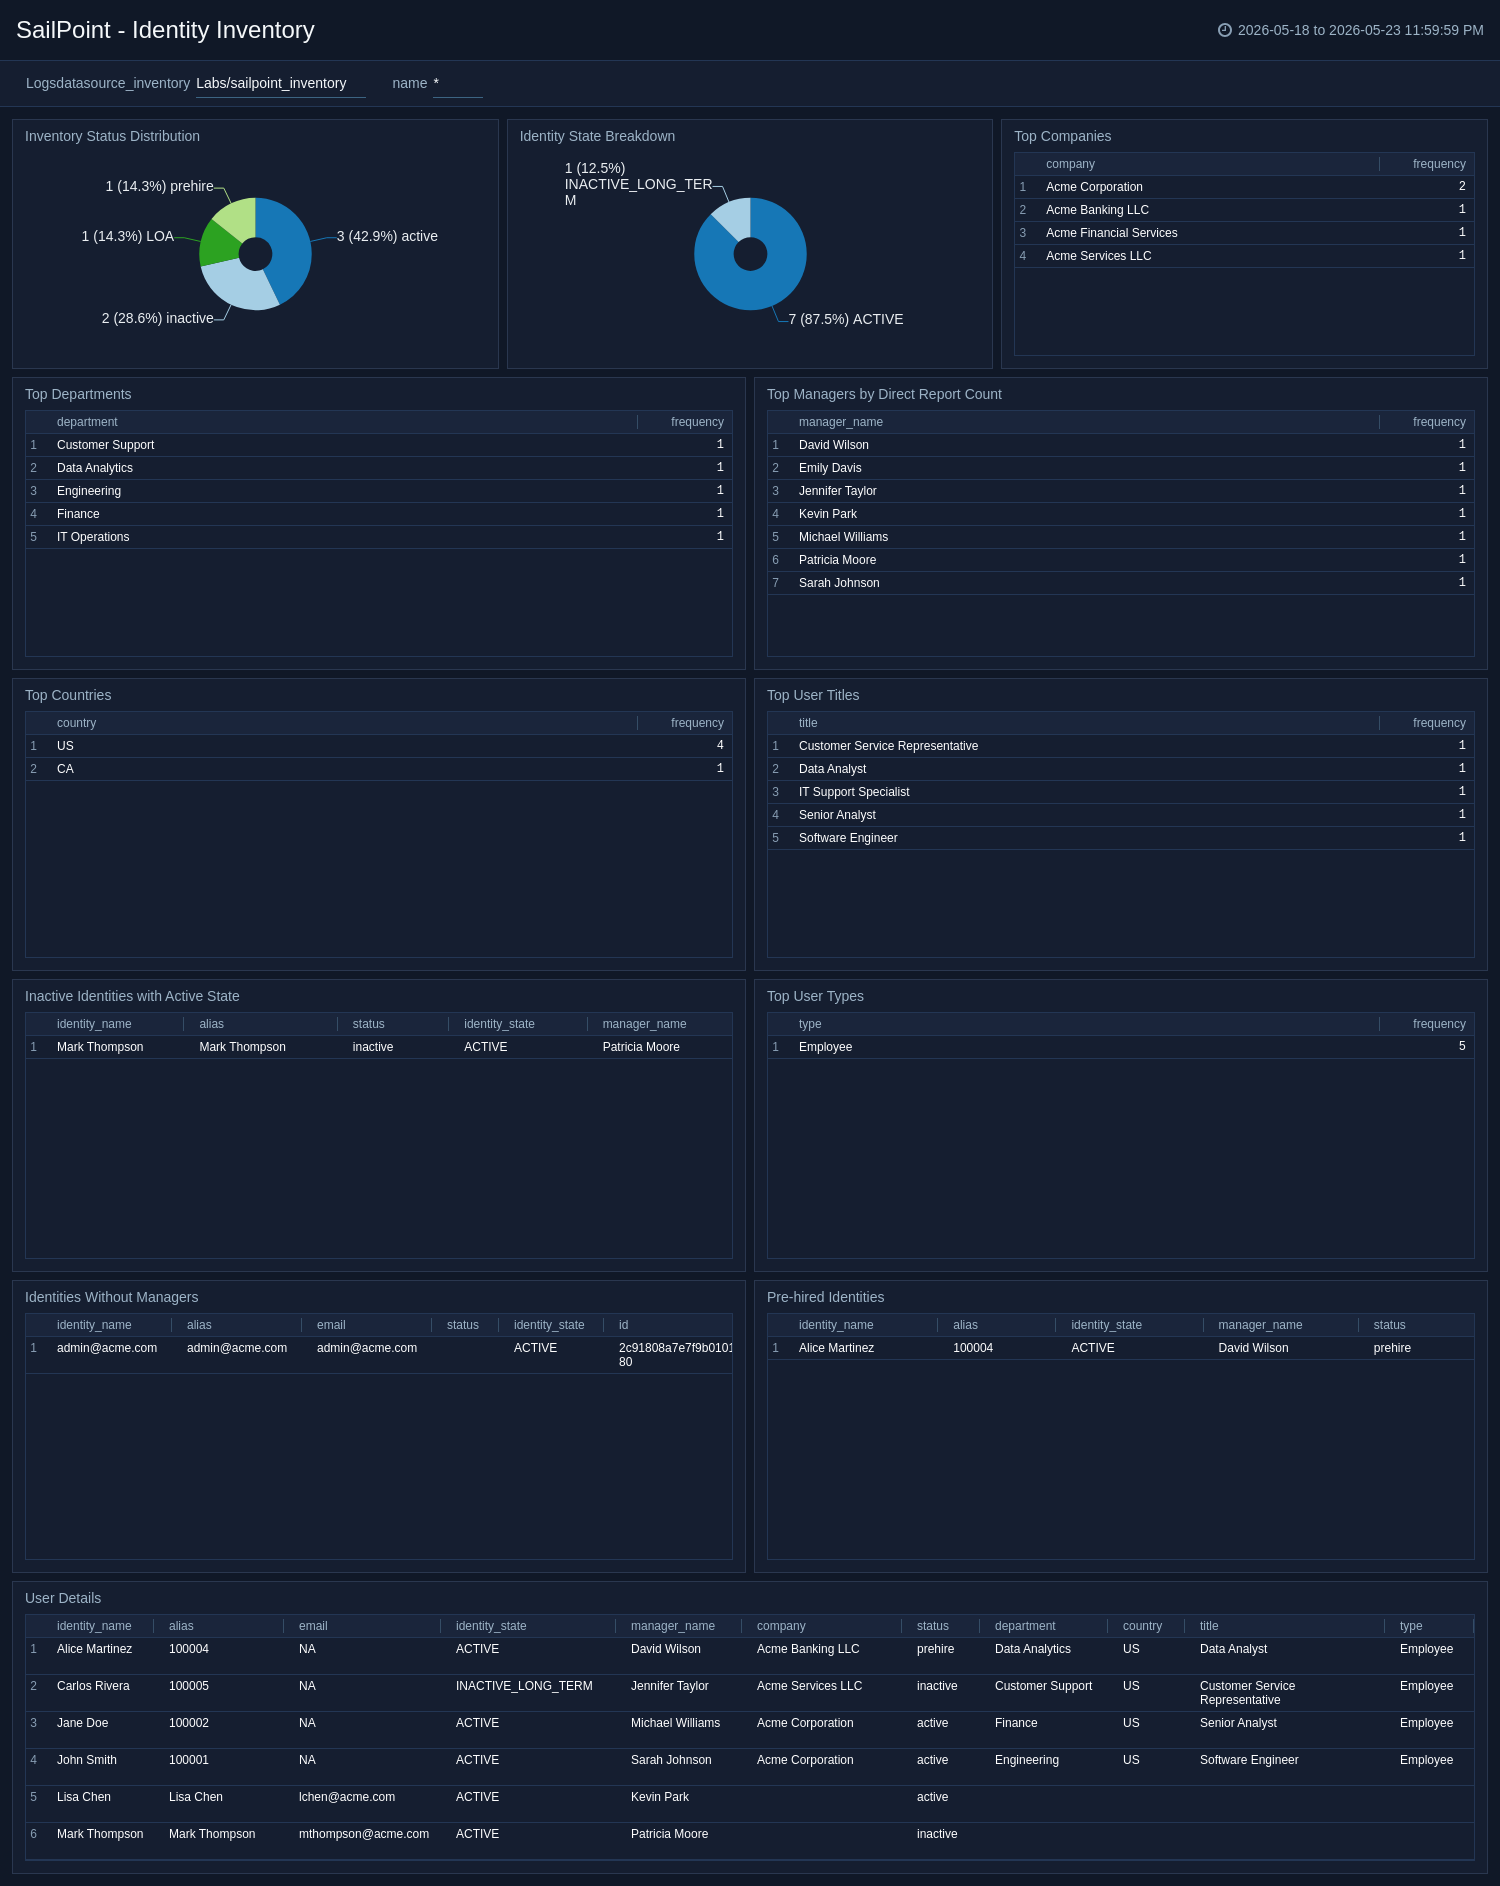
The SailPoint - Identity Inventory dashboard provides visibility into the identity population including status distribution, identity state breakdown, manager relationships, department and company breakdown, and governance anomalies like inactive identities with active state or missing managers.
Identity lifecycle and governance
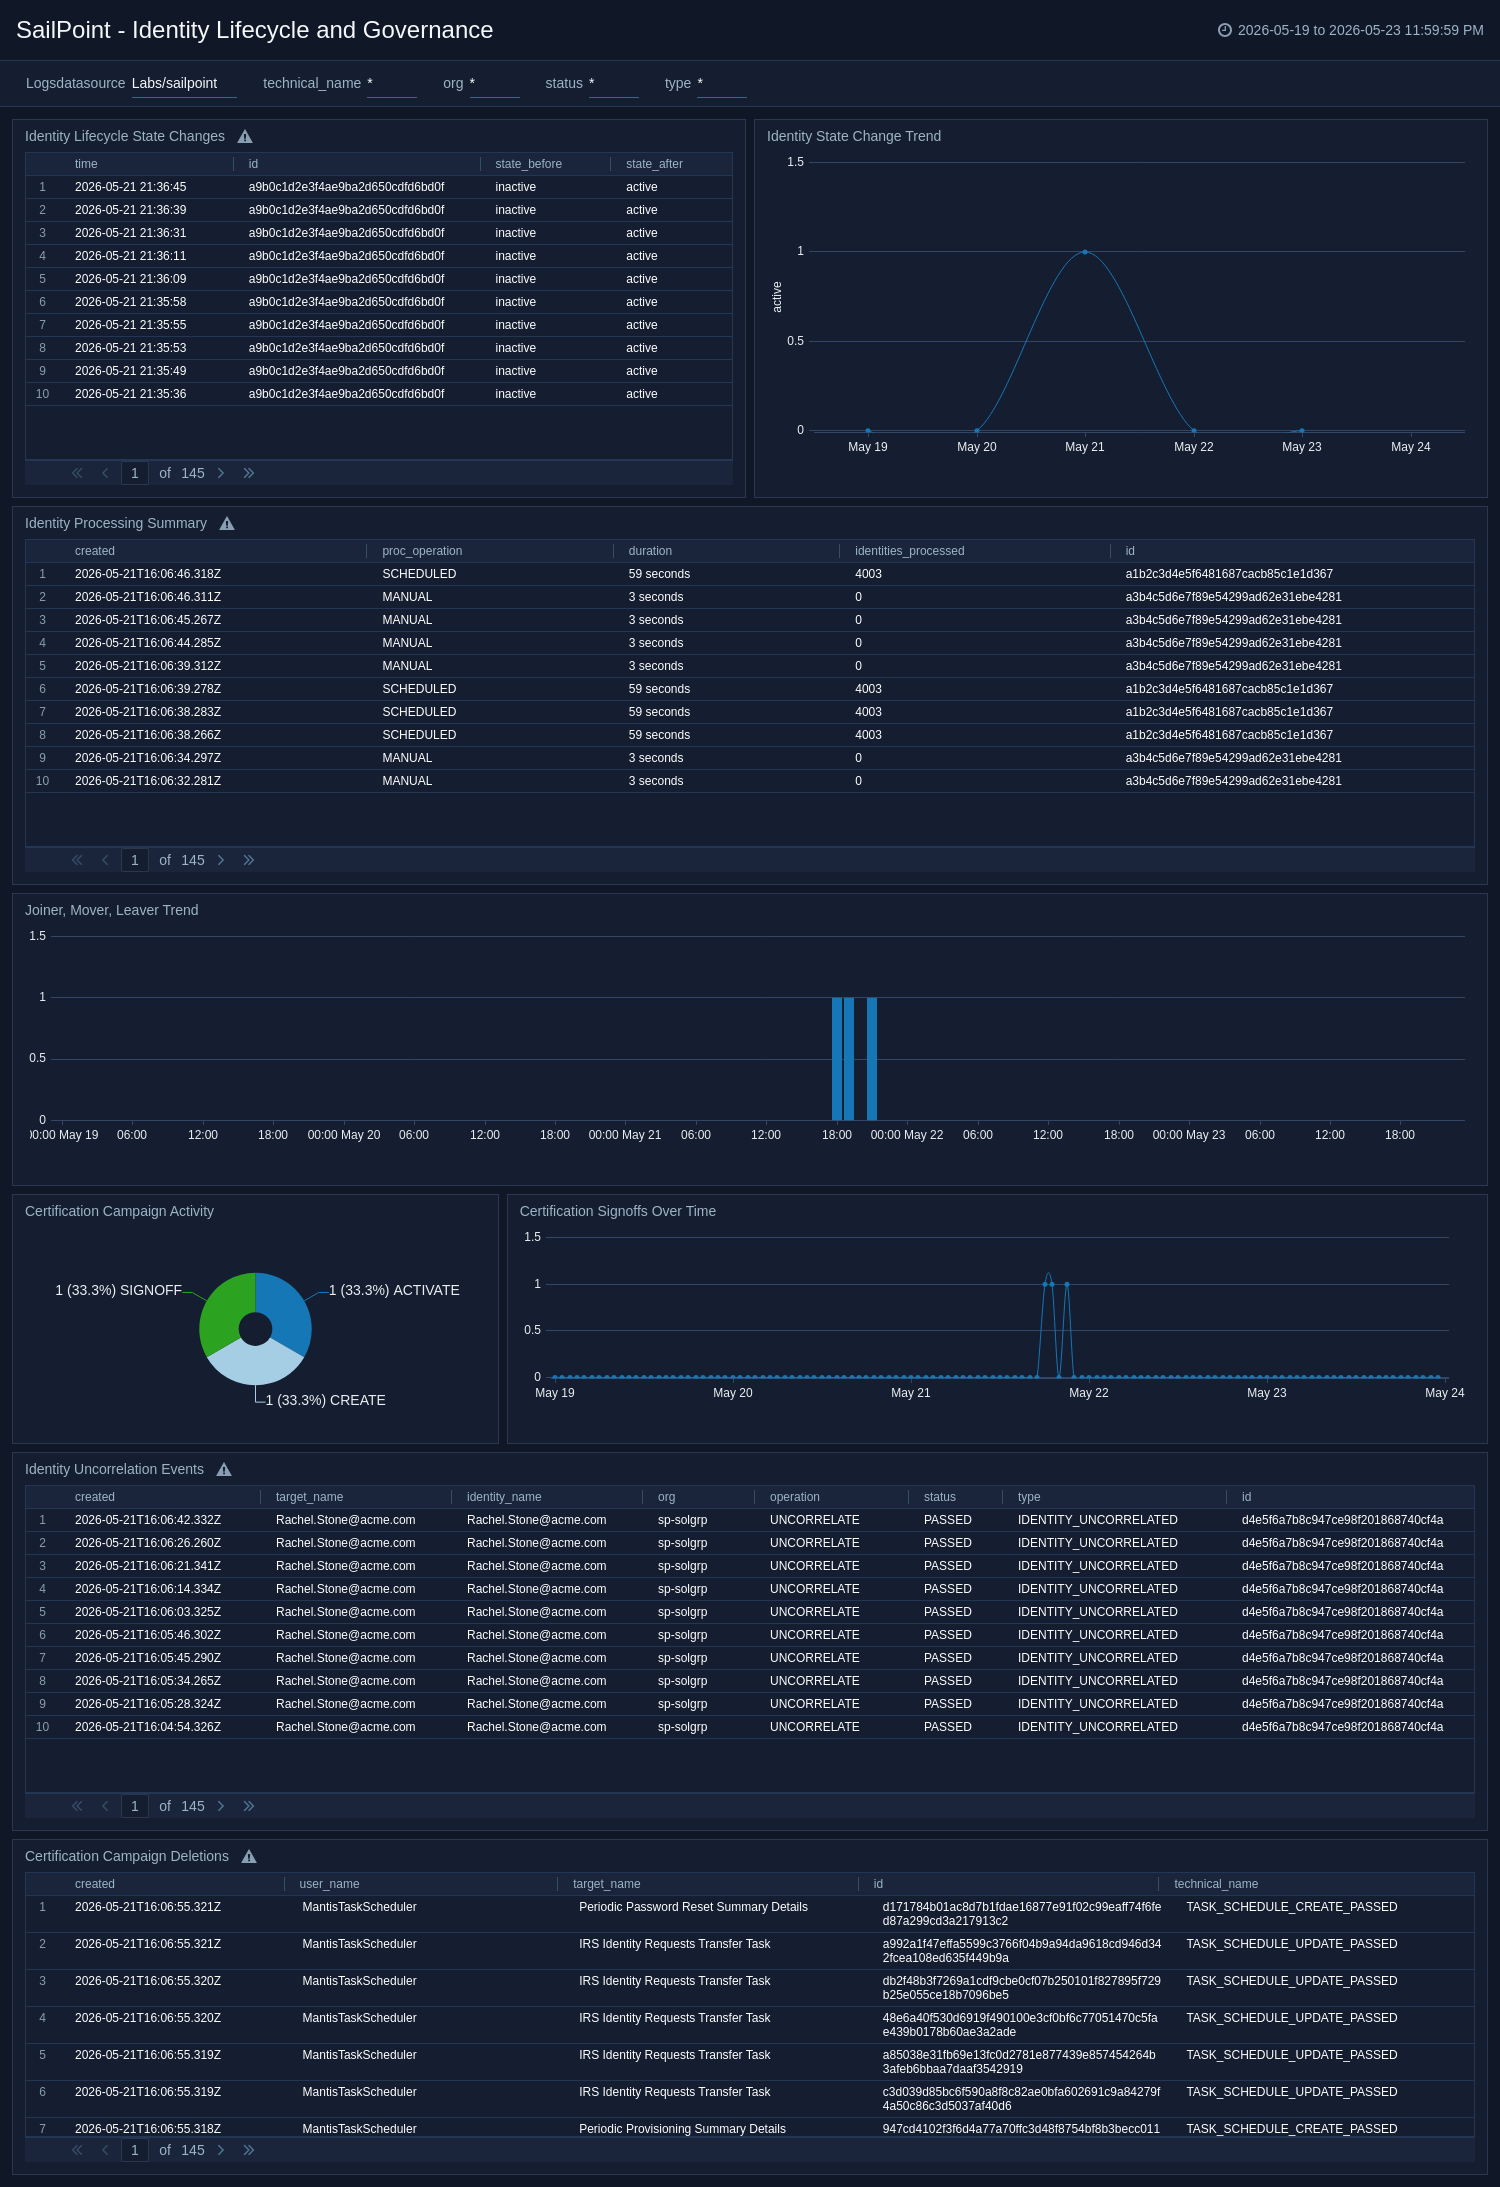
The SailPoint - Identity Lifecycle and Governance dashboard monitors identity lifecycle state changes, certification campaigns, access reviews, and governance events to help ensure compliance and proper identity management.
Access items
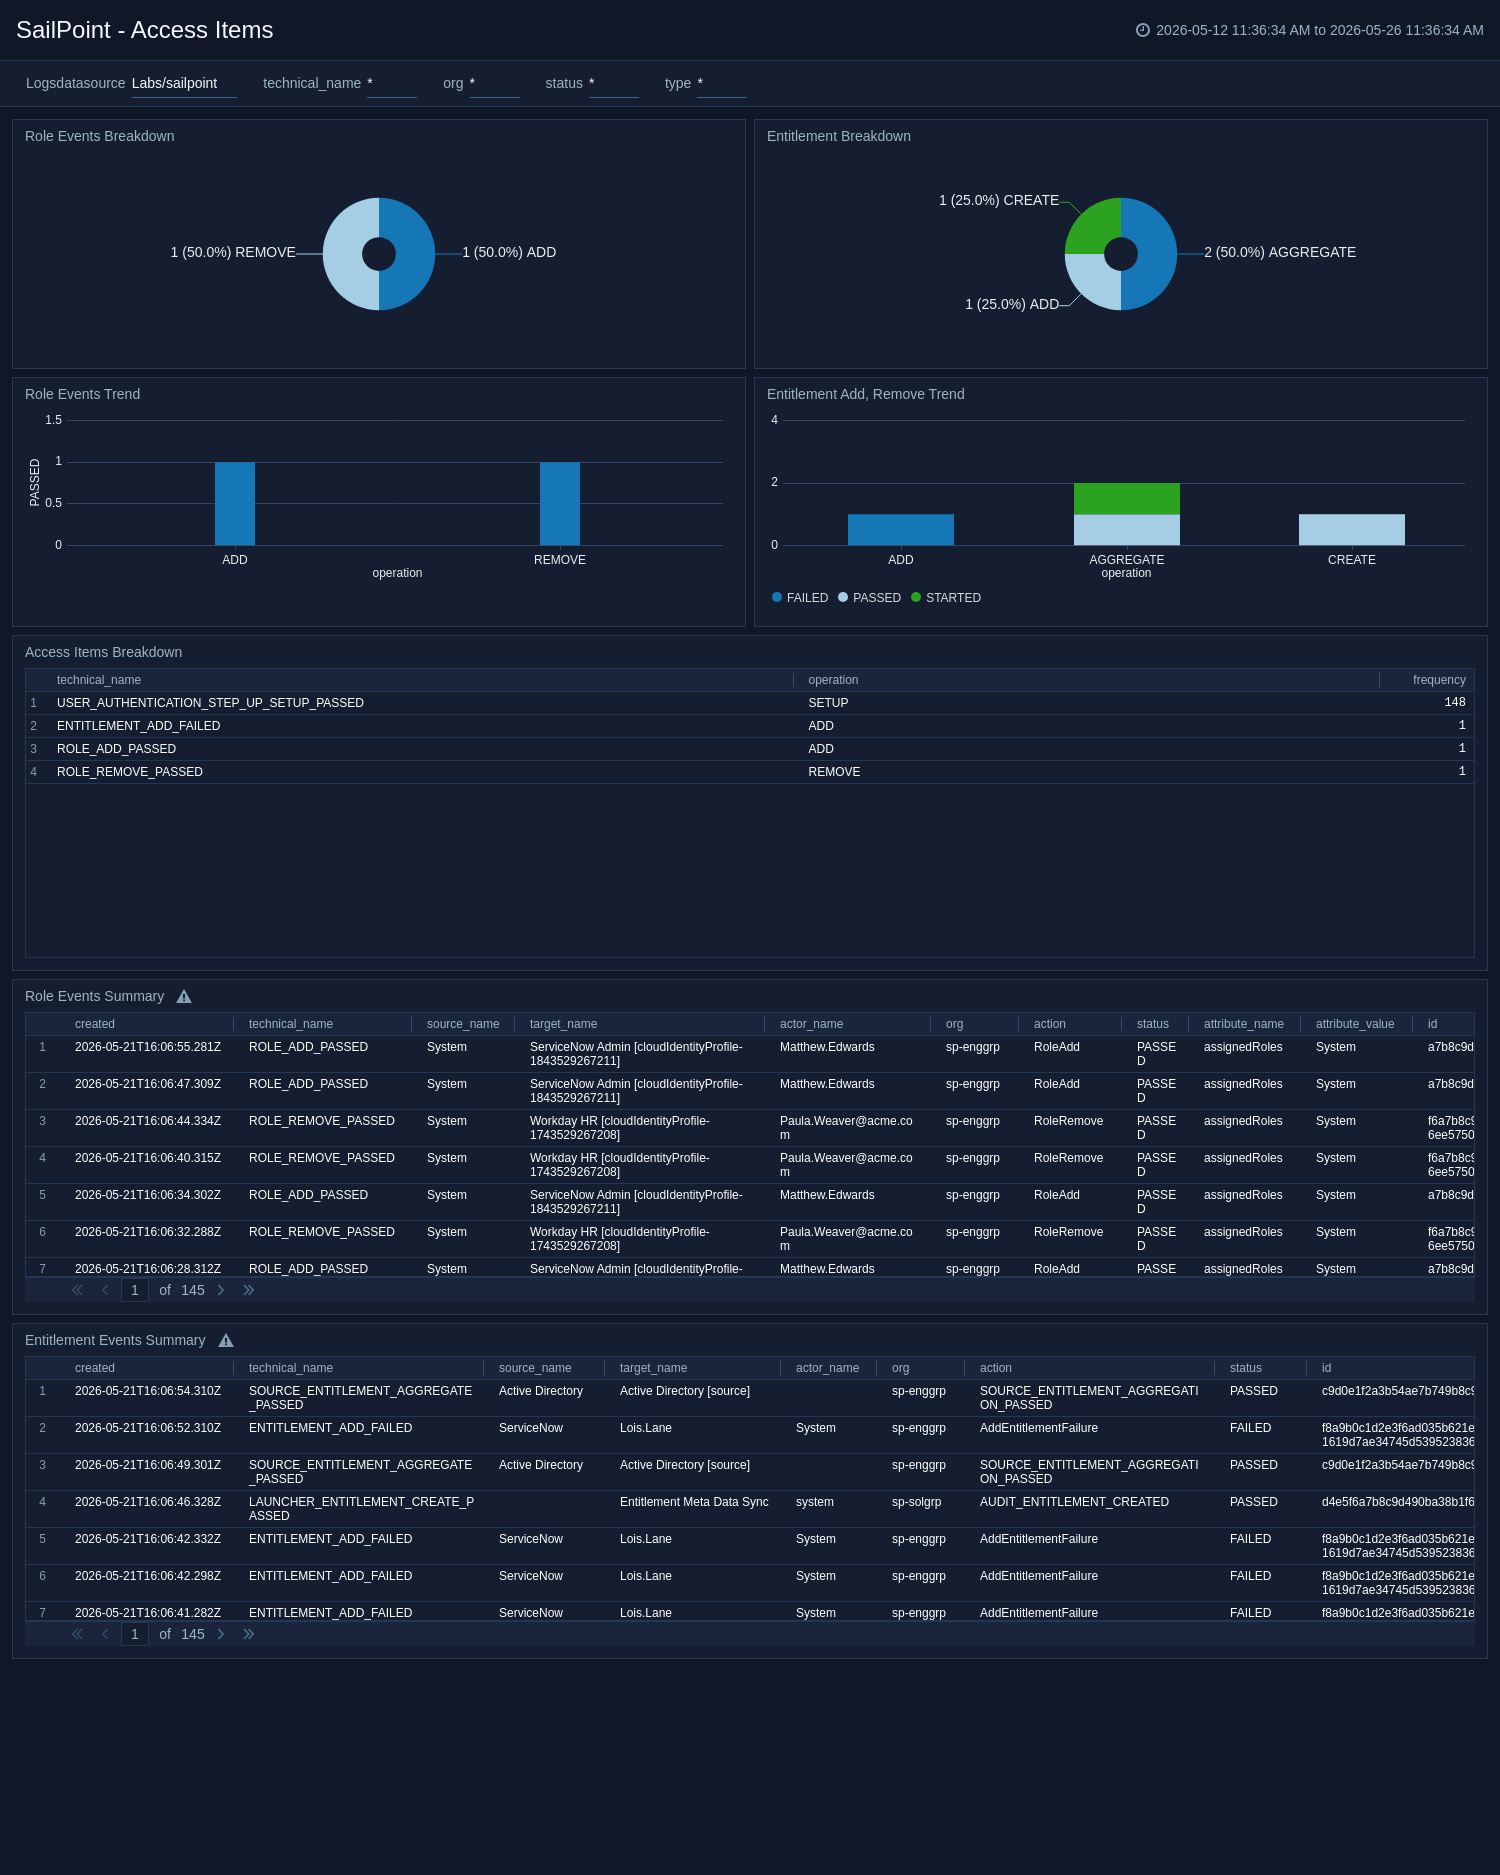
The SailPoint - Access Items dashboard provides visibility into entitlement and role event breakdowns, trends, and summaries to monitor access item changes across identities.
Access requests and provisioning
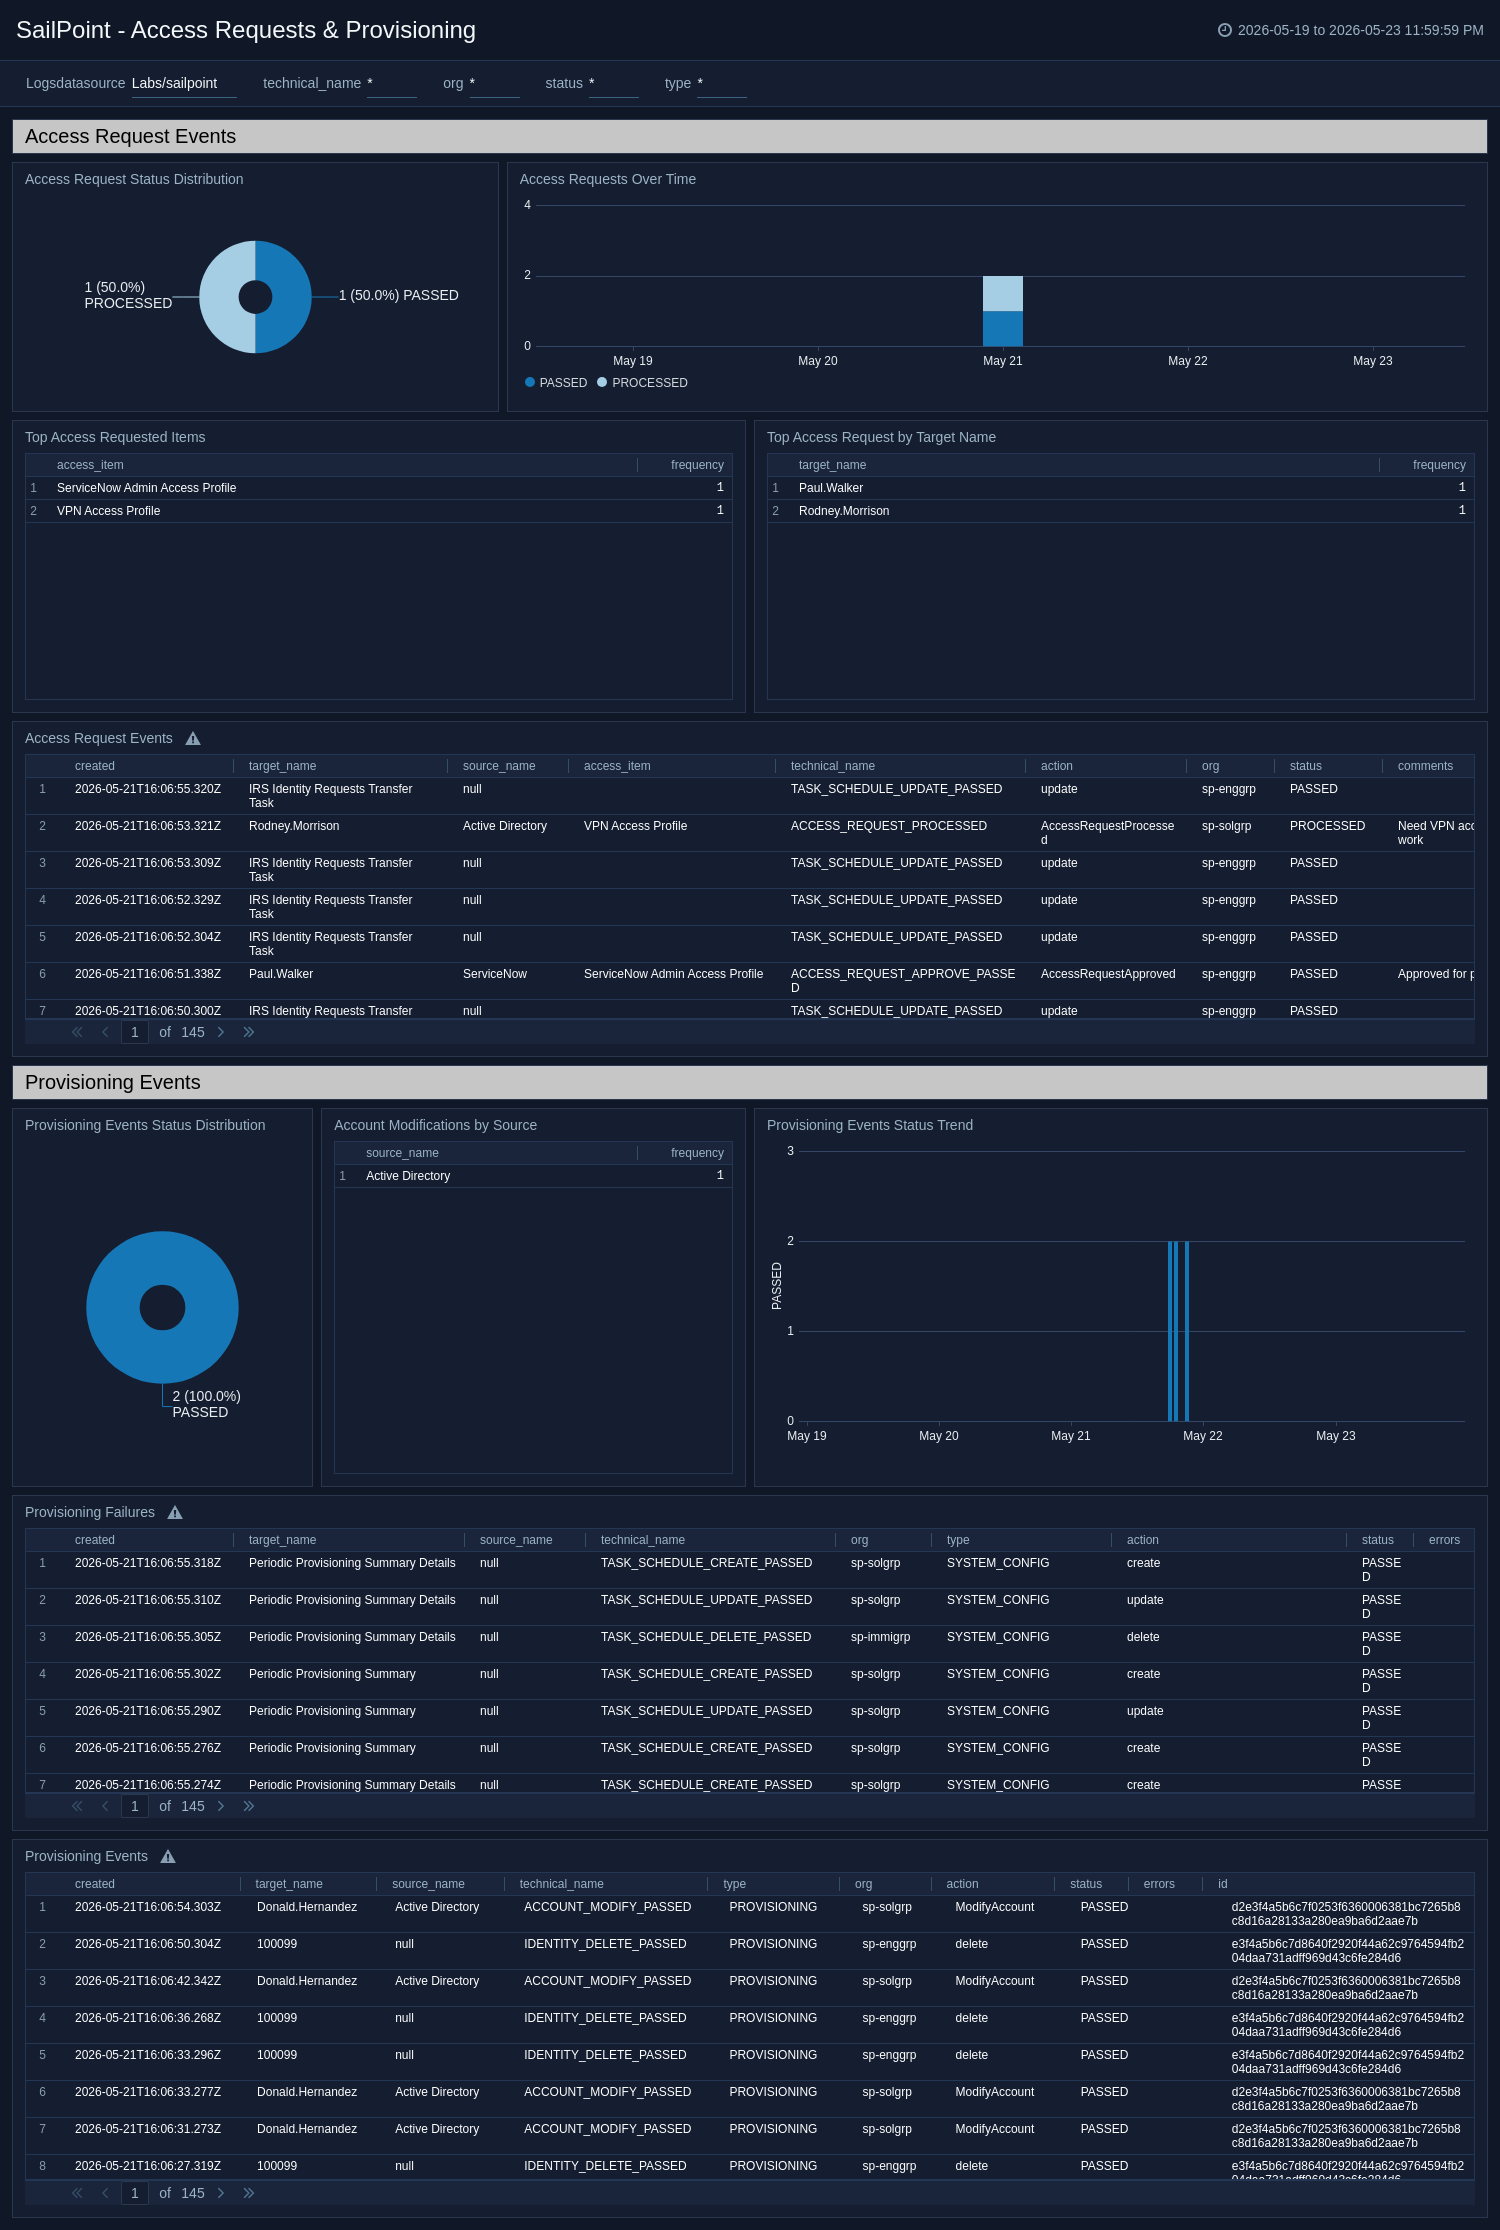
The SailPoint - Access Requests & Provisioning dashboard monitors access request lifecycle, including approvals, denials, provisioning successes and failures, entitlement changes, role assignments, and account modifications.
Privileged access and token activity
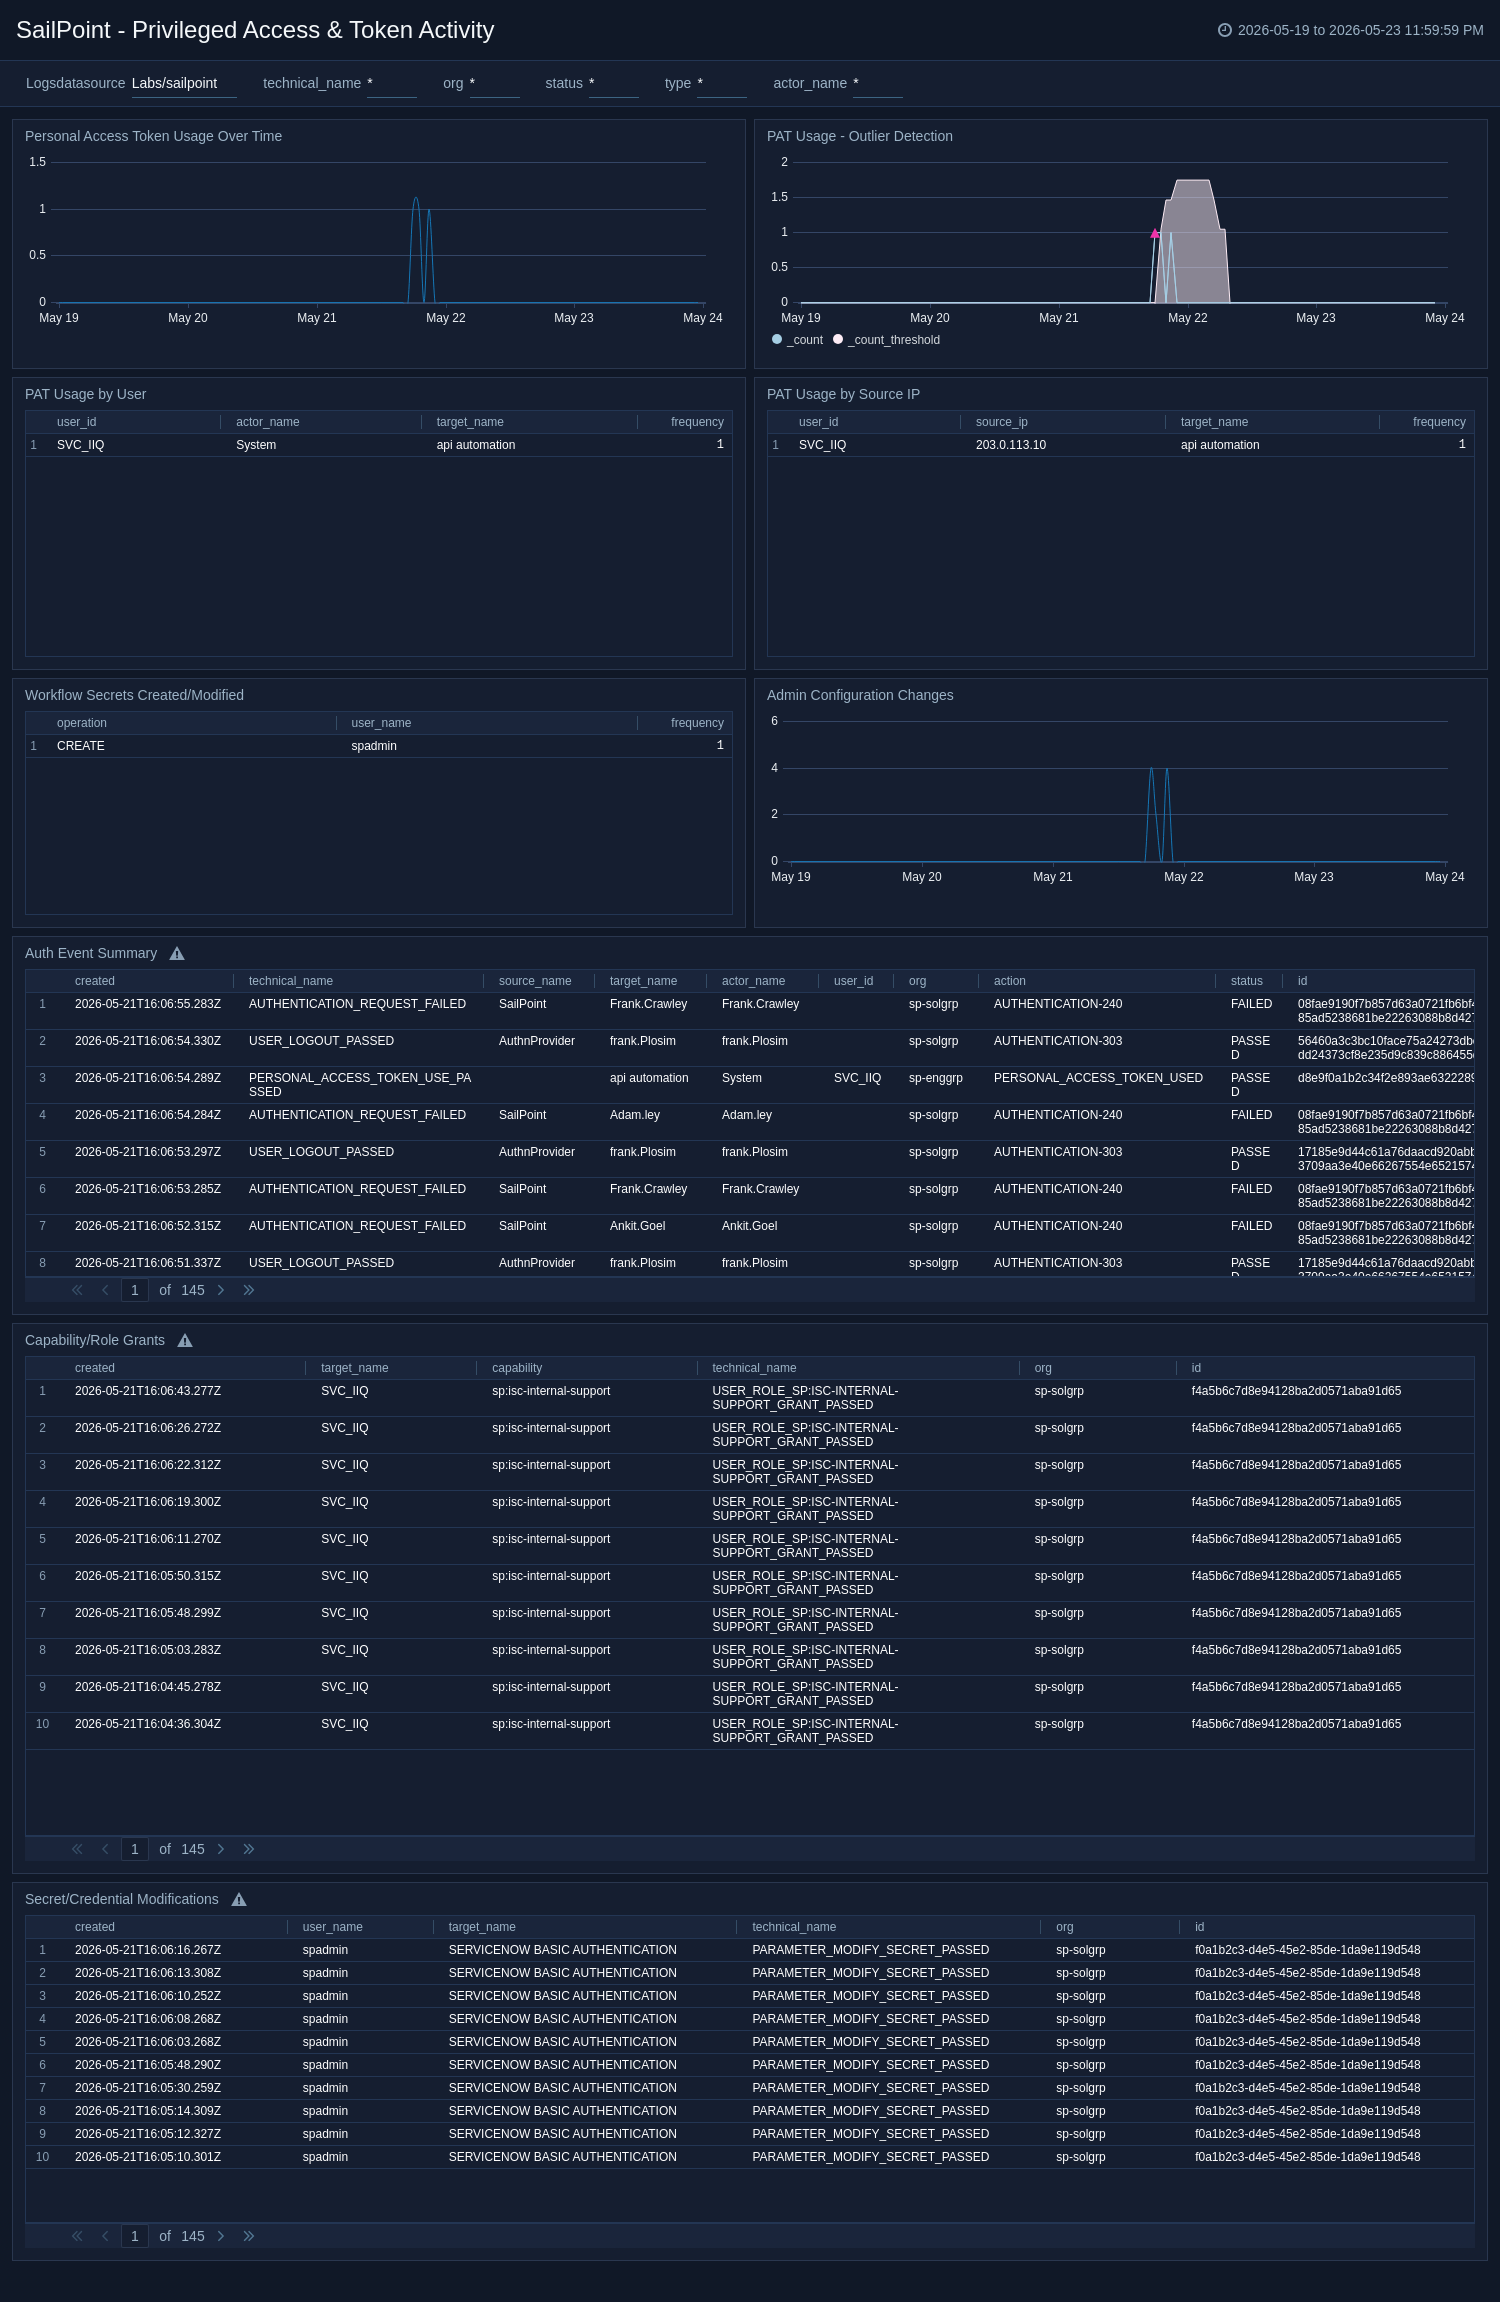
The SailPoint - Privileged Access & Token Activity dashboard monitors personal access token usage, capability grants, admin configuration changes, secret modifications, and other privileged operations that may indicate insider threats or compromised credentials.
Source health and configuration
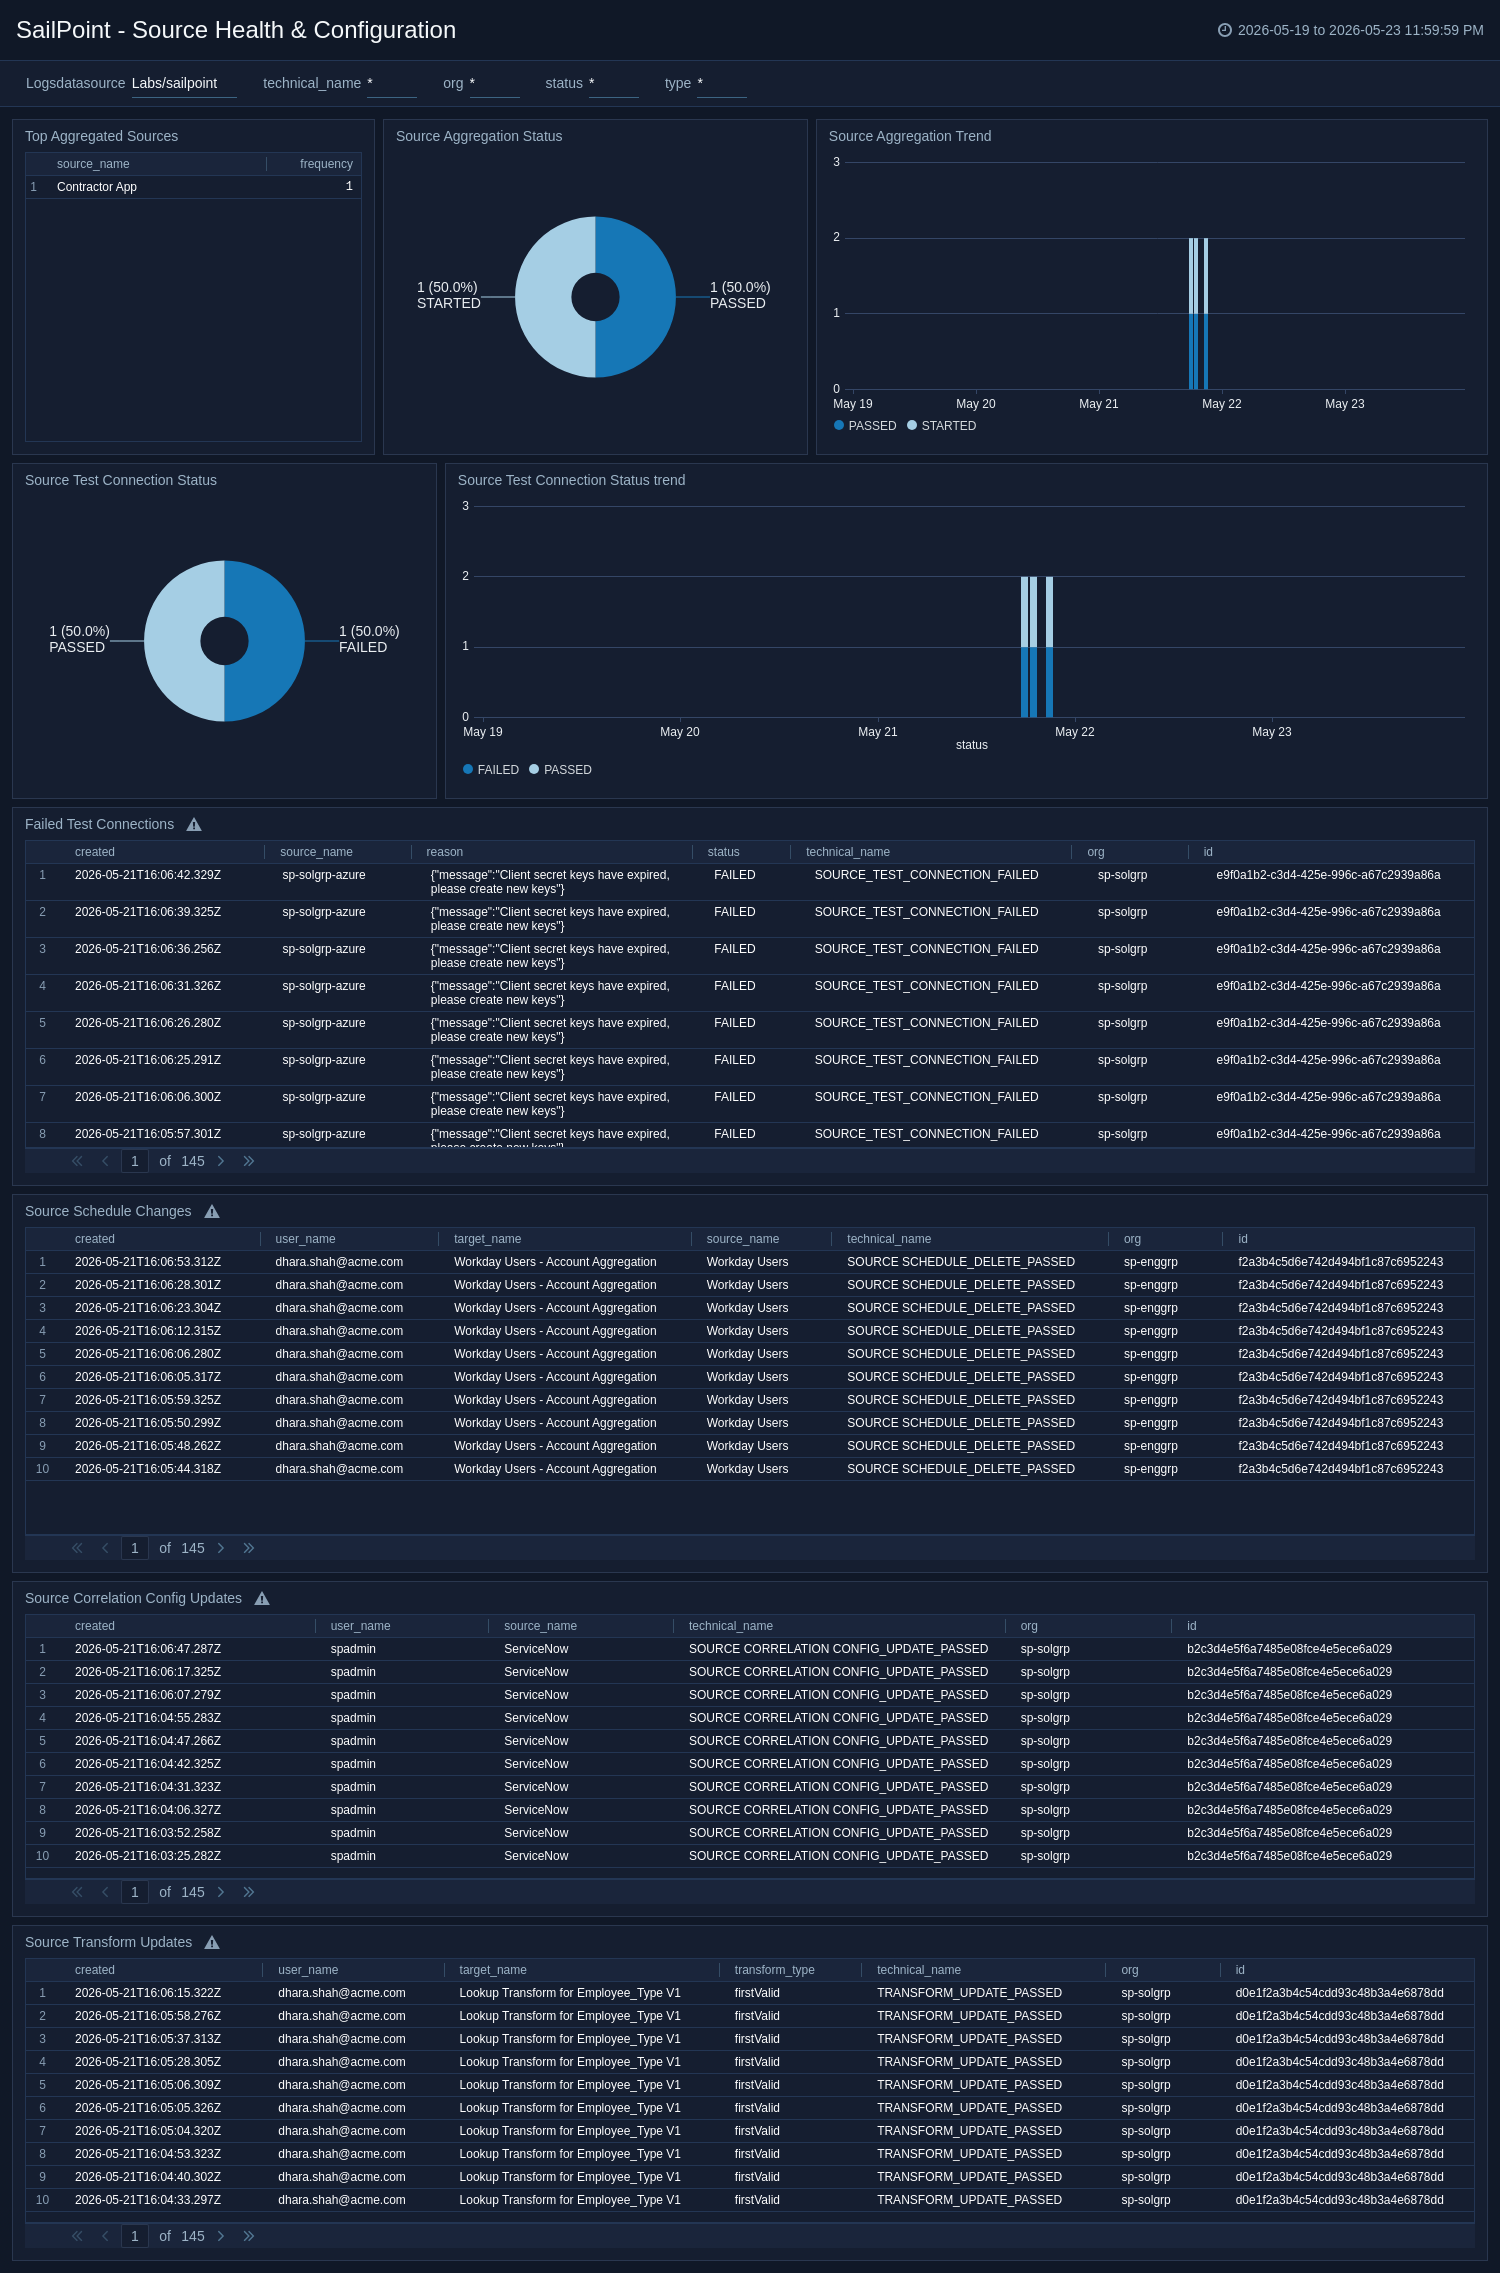
The SailPoint - Source Health & Configuration dashboard monitors source account aggregation health, connection test results, configuration changes, and source lifecycle events to help ensure identity data collection operates reliably.
Workflow and automation
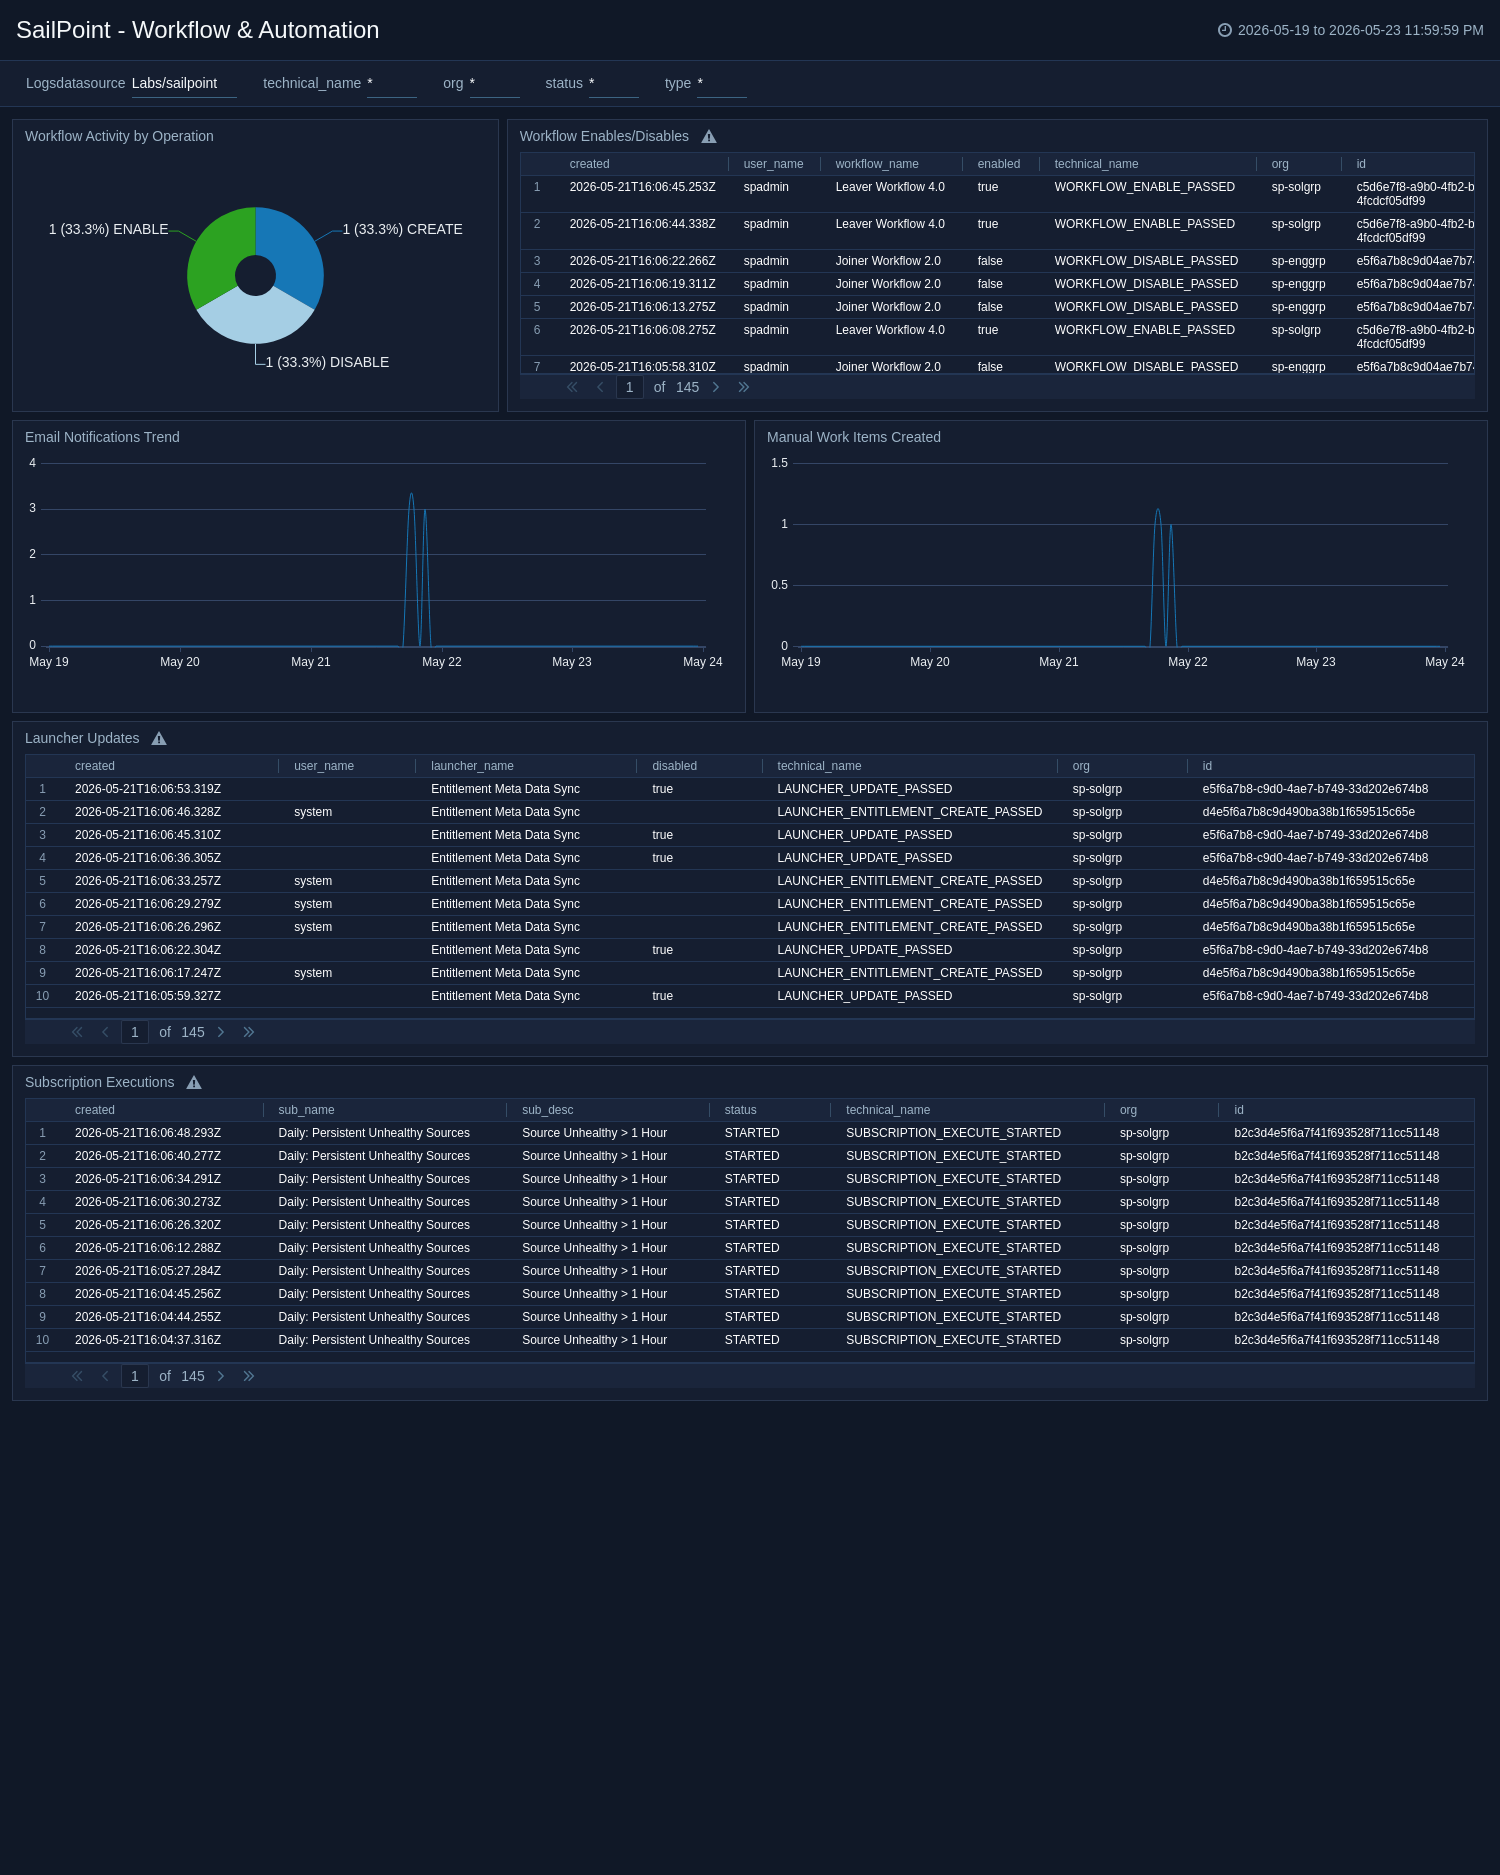
The SailPoint - Workflow & Automation dashboard tracks workflow executions, automation triggers, launcher activity, and workflow failures to monitor the health and effectiveness of automated governance processes.
Create monitors for the SailPoint app
From your App Catalog:
- From the Sumo Logic navigation, select App Catalog.
- In the Search Apps field, search for and then select your app.
- Make sure the app is installed.
- Navigate to What's Included tab and scroll down to the Monitors section.
- Click Create next to the pre-configured monitors. In the create monitors window, adjust the trigger conditions and notifications settings based on your requirements.
- Scroll down to Monitor Details.
- Under Location click on New Folder.
note
By default, monitor will be saved in the root folder. So to make the maintenance easier, create a new folder in the location of your choice.
- Enter Folder Name. Folder Description is optional.
tip
Using app version in the folder name will be helpful to determine the versioning for future updates.
- Click Create. Once the folder is created, click on Save.
SailPoint app alerts
| Name | Description | Alert Condition | Recover Condition |
|---|---|---|---|
SailPoint - Brute Force Detection (>5 Failed Authentications) | This alert is triggered when a user exceeds five failed authentication attempts. This may indicate brute-force activity, credential stuffing, or unauthorized access attempts against SailPoint accounts. | Count > 5 | Count < = 5 |
SailPoint - Bulk Account Removals | This alert is triggered when a large number of account removals occur within a short period. This may indicate unauthorized mass deprovisioning, insider threats, or compromised admin credentials used to remove access at scale. | Count > 0 | Count < = 0 |
SailPoint - Events from Embargoed Locations | This alert is triggered when SailPoint activity is observed from embargoed or high-risk countries. | Count > 0 | Count < = 0 |
SailPoint - Identity Uncorrelation Events | This alert is triggered when an identity uncorrelation event is detected in SailPoint. This may indicate unauthorized account detachment, insider threat activity, or administrative changes that could weaken identity governance controls. | Count > 0 | Count < = 0 |
SailPoint - Personal Access Token Usage Spike | This alert is triggered when an unusual spike in personal access token usage is detected. This may indicate compromised API tokens, automated attacks using stolen credentials, or insider misuse of programmatic access. | Count > 2 | Count < = 2 |
SailPoint - Source Deletion Events | This alert is triggered when an identity source is deleted from SailPoint. This may indicate data sabotage, insider threat activity, or unauthorized administrative changes that could disrupt identity governance. | Count > 0 | Count < = 0 |
Upgrade/Downgrade the SailPoint app (Optional)
To update the app, do the following:
Next-Gen App: To install or update the app, you must be an account administrator or a user with Manage Apps, Manage Monitors, Manage Fields, Manage Metric Rules, and Manage Collectors capabilities depending upon the different content types part of the app.
- Select App Catalog.
- In the Search Apps field, search for and then select your app.
Optionally, you can identify apps that can be upgraded in the Upgrade available section. - To upgrade the app, select Upgrade from the Manage dropdown.
- If the upgrade does not have any configuration or property changes, you will be redirected to the Preview & Done section.
- If the upgrade has any configuration or property changes, you will be redirected to the Setup Data page.
- In the Configure section of your respective app, complete the following fields.
- Field Name. If you already have collectors and sources set up, select the configured metadata field name (eg _sourcecategory) or specify other custom metadata (eg: _collector) along with its metadata Field Value.
- Click Next. You will be redirected to the Preview & Done section.
Post-update
Your upgraded app will be installed in the Installed Apps folder and dashboard panels will start to fill automatically.
See our Release Notes changelog for new updates in the app.
To revert the app to a previous version, do the following:
- Select App Catalog.
- In the Search Apps field, search for and then select your app.
- To version down the app, select Revert to < previous version of your app > from the Manage dropdown.
Uninstalling the SailPoint app (Optional)
To uninstall the app, do the following:
- Select App Catalog.
- In the 🔎 Search Apps field, run a search for your desired app, then select it.
- Click Uninstall.
Additional resources
- Use the SailPoint Automation Service Integration to automate response actions directly from Cloud SOAR playbooks.