 Meet the new
 Azure AD

Version: 1.17
Updated: Sep 3, 2026
Microsoft Entra ID, formerly known as Azure Active Directory (Azure AD), is an identity and access management solution from Microsoft that helps organizations secure and manage identities in cloud and on-premises environments.
Authentication modes
The integration supports two authentication types, configured via the Authentication Type field in the integration resource:
| Mode | When to use |
|---|---|
| Application (Client Credentials) | Uses client_id + client_secret. Works for all standard actions except Reset User Password With Writeback. |
| Delegated (Device Code Flow) | Actions that require a signed-in user's context, such as Reset User Password With Writeback, which requires the Privileged Auth Admin role. Tokens are scoped to the user who completes the browser sign-in. |
Use Application for most automation. Use Delegated only when Microsoft requires user context for the target operation.
Actions
- Add Member To Group (Enrichment) - Add a user to a specific group.
- Confirm User Compromised (Containment) - Confirm a user as compromised in Azure AD Identity Protection.
- Create Group (Enrichment) - Create a group.
- Create User (Enrichment) - Create a new user.
- Delete Group (Containment) - Delete a specific group.
- Delete User (Containment) - Delete a specific user.
- Disable User (Containment) - Block user account.
- Dismiss Risky User (Containment) - Dismiss the risk for a specific risky user.
- Enable User (Containment) - Enable a specific user account.
- Exchange Device Code (Custom) - Polls Microsoft until the user completes browser sign-in and returns tokens. (Delegated auth only.)
- Get Manager (Enrichment) - Get user manager.
- Get Member Groups (Enrichment) - Retrieve group memberships for the user.
- Get Risky User (Enrichment) - Retrieve risk details for a specific user.
- Get User (Enrichment) - Get details for a specific user.
- Initiate Delegated Auth (Enrichment) - Starts the Device Code Flow by calling Microsoft's
/oauth2/v2.0/devicecodeendpoint. Returnsuser_code,verification_uri,device_code,interval,expires_in, andmessage. (Delegated auth only.) - List Devices (Enrichment) - Retrieve a list of device objects registered in the organization.
- List Groups (Enrichment) - List all the groups available in an organization.
- List Of Group Members (Enrichment) - Retrieve a list of members in a specific group.
- List Risky Users (Enrichment) - Retrieve a list of risky users detected by Azure AD Identity Protection.
- List Users (Enrichment) - List all users.
- Remove Member From Group (Containment) - Remove a user from a specific group.
- Reset User MFA (Containment) - Reset the MFA authentication methods for a user, with an option to require re-enrollment at next sign-in.
- Reset User Password (Containment) - Reset user password.
- Reset User Password With Writeback (Containment) - Resets a user's password with writeback to on-premises AD. (Delegated auth only) — Microsoft does not support application permissions for this endpoint.
- Revoke Sign In Sessions (Containment) - Invalidates all the refresh tokens issued to applications for a user (as well as session cookies in a user's browser).
Azure Active Directory configuration
The following steps show how to create an Azure AD Application in order to work with Sumo Logic automation.
- Log in to the Azure portal with the user who has administrator privileges.
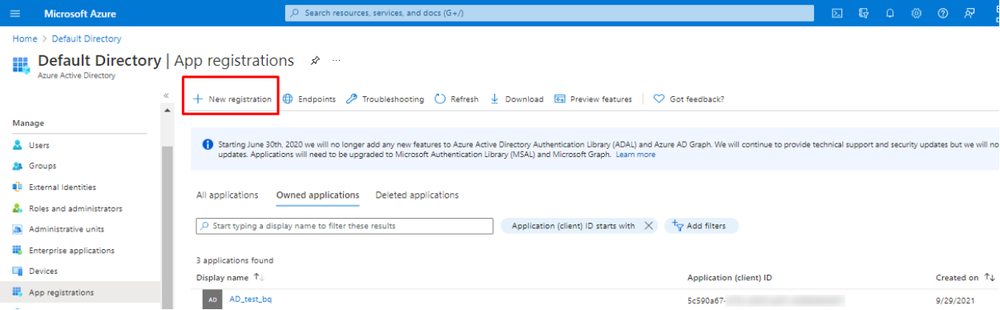
- Navigate to Azure Active Directory > App registrations > New registration.
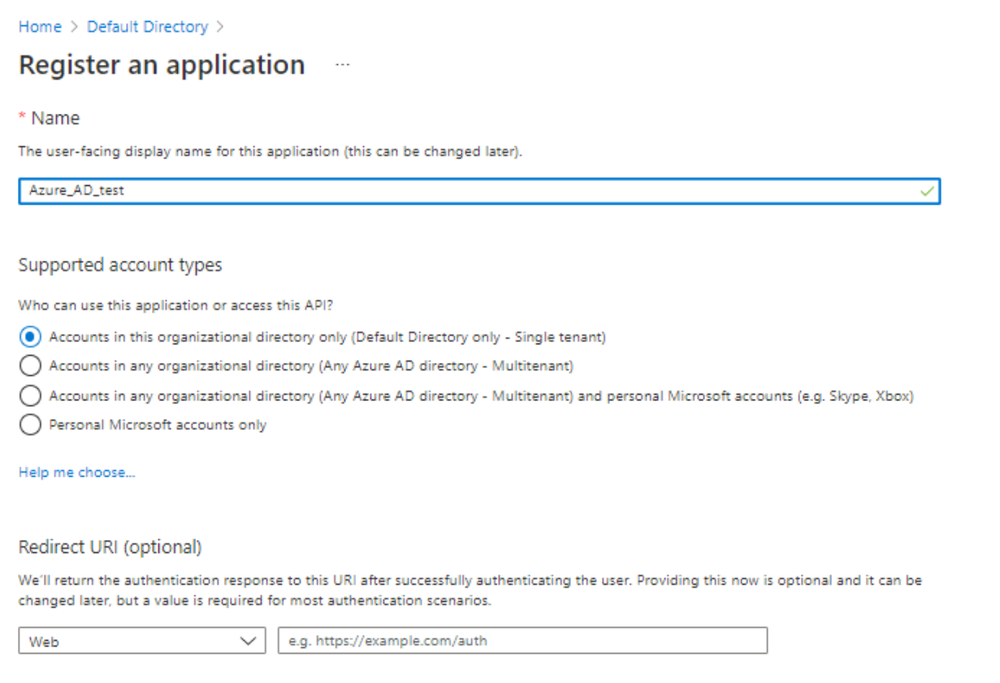
- In the registration form, choose a name for your application and then click Register.
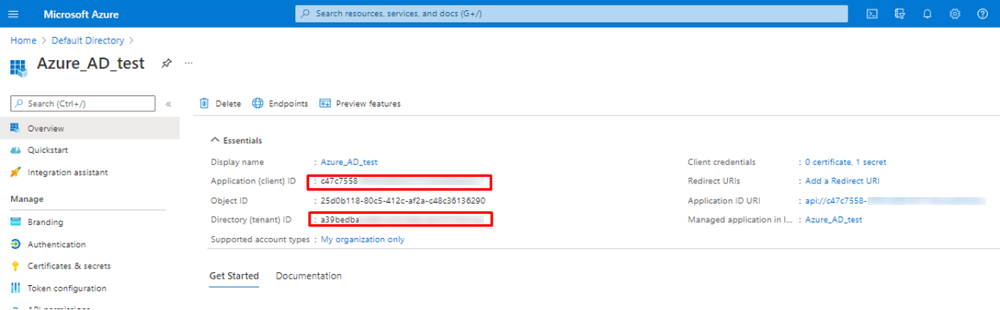
- Write down the Application ID and Directory ID. You will need them later for the integration configuration.
- To configure Azure AD Application permissions, on the left, choose API permissions.
- Click the Add a permission button.
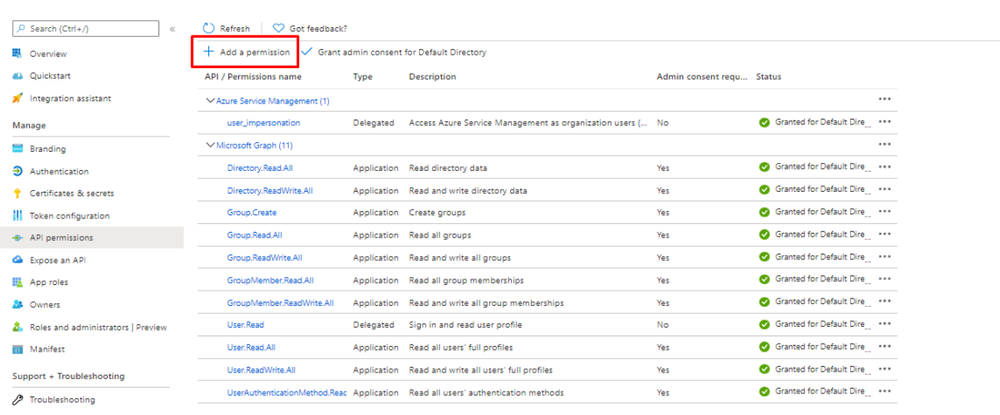
- Select your application in App registrations in the Azure portal. Application permissions are for service or daemon-type applications that need to access the API as themselves, without user interaction for sign-in or consent.
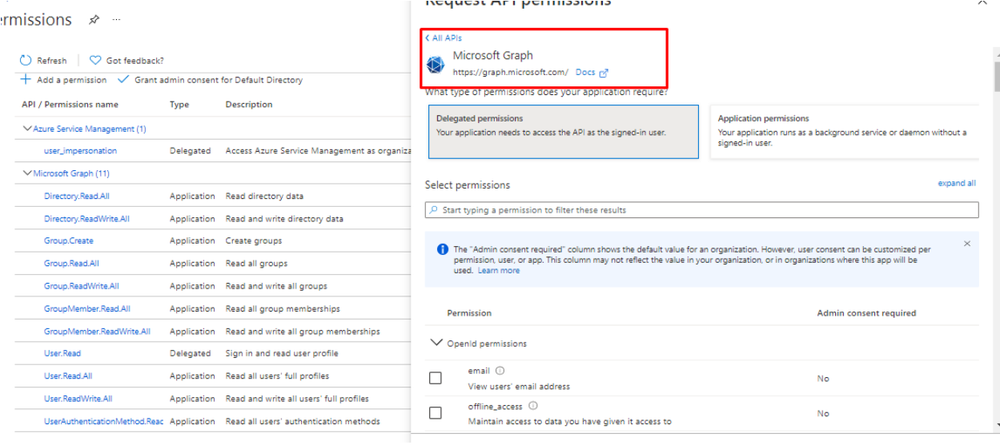
- Select the following Application permissions to add:
Device.ReadWrite.All,Directory.Read.All,Directory.ReadWrite.All,Group.ReadWrite.All,GroupMember.ReadWrite.All,IdentityRiskyUser.ReadWrite.All,User-PasswordProfile.ReadWrite.All,User.EnableDisableAccount.All,User.Read.All,User.ReadWrite.All,User.RevokeSessions.All,UserAuthenticationMethod.ReadWrite.All.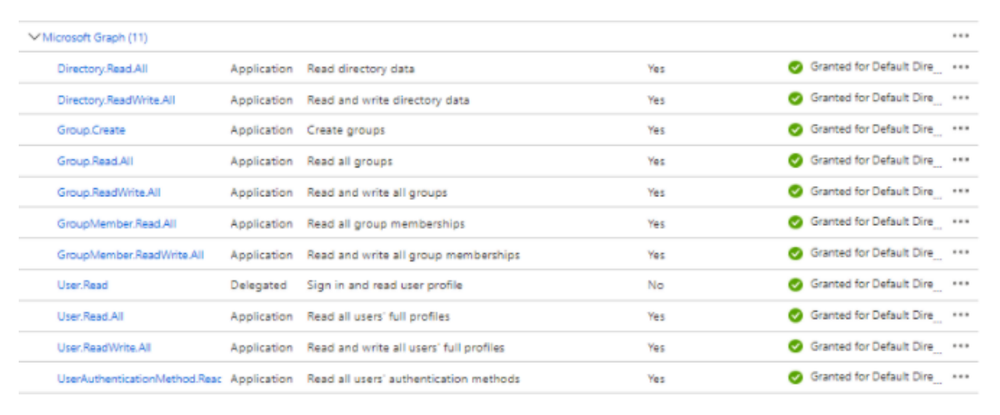
- Once API permissions are added, then Admin must consent to grant these permissions (Learn more about permissions and consent.)
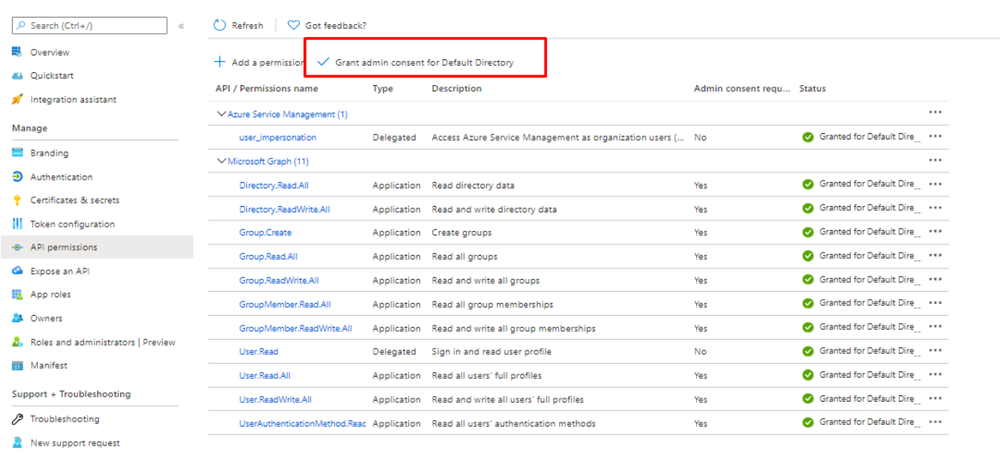
- Once Admin Consent is granted, API permissions configuration has been completed. Then we have to add a Client secret for authentication, along with the Client ID and Directory ID. To add a client secret, go to Certificates and secrets, and click New client secret.
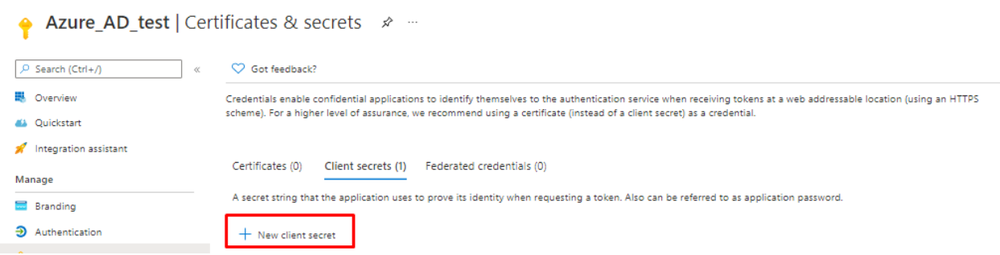
- Select the description and expiry period for the created secret and create it.
- Once it's created, make sure you save its value, since it's only displayed once.
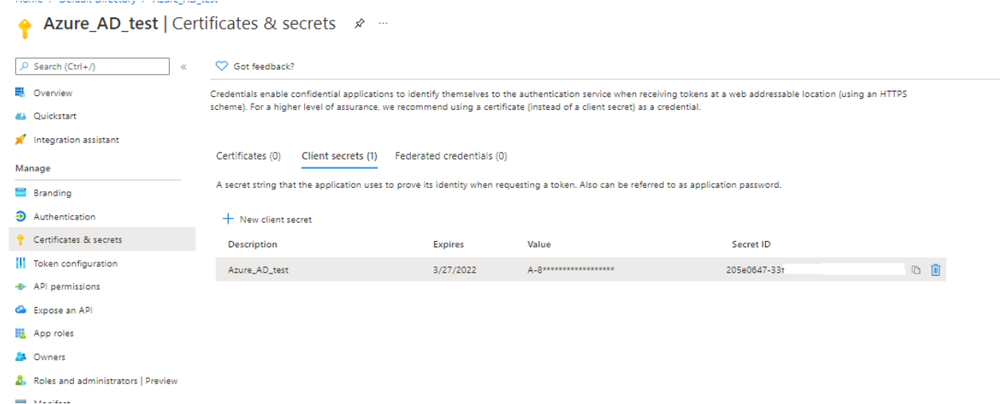
- Once you do these steps, you will need to find the Tenant ID in order to use it on your resources file.
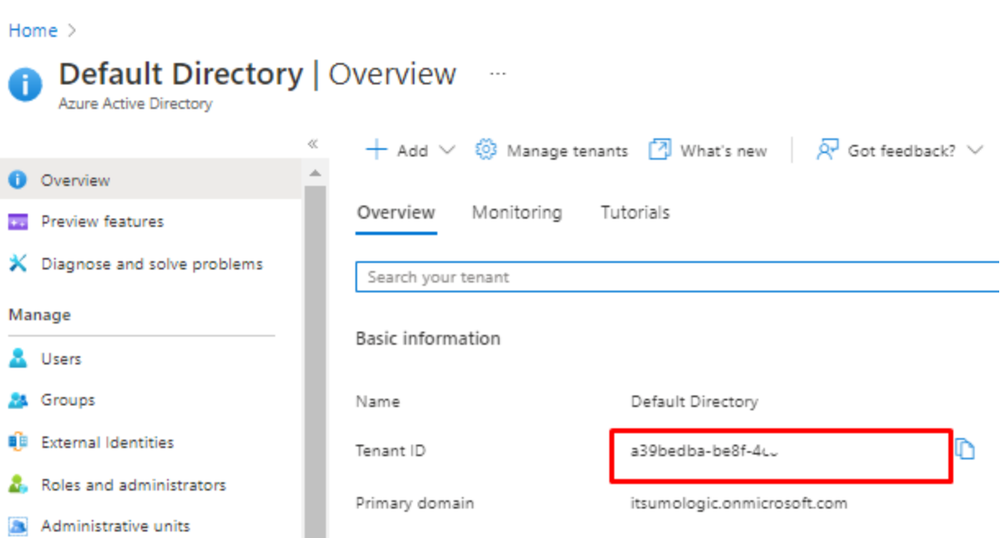
- Once the Azure AD application is configured, you will need the application's Client ID, secret, and Tenant ID.
- Assign the app the role of User Administrator. This is required to perform the Reset User Password action.
- Azure Active Directory > Roles and administrators > User Administrator > Add assignments > Your app > Add.
Delegated auth setup (one-time)
Complete this setup once to enable delegated actions such as Reset User Password With Writeback. After setup, playbooks run automatically using the stored refresh token — no repeat browser sign-in needed.
Prerequisite: The signed-in user must hold the Privileged Auth Admin role in Azure AD.
- In the integration resource, set Authentication Type to Delegated.
- Run Initiate Delegated Auth. Note the
user_codeandverification_urifrom the output. - Open the
verification_uriin a browser, enter theuser_code, and complete sign-in as the privileged user. - Run Exchange Device Code with
device_codemapped from step 2. The action polls until sign-in completes (default timeout: 90s). - Copy the
refresh_tokenfrom the Exchange Device Code output. - Paste the
refresh_tokeninto the Delegated Refresh Token field in the integration resource and save.
The integration is now ready for automated use. Re-authentication is only needed if the token is unused for 90 days or an admin explicitly revokes it.
Token reference:
| Token | Lifetime | Notes |
|---|---|---|
access_token | 60–90 minutes | Short-lived; obtained during the Exchange Device Code step |
refresh_token | 90-day sliding window | Resets on each use; survives multiple access token exchanges |
Configure Azure AD in Automation Service and Cloud SOAR
Before you can use this automation integration, you must configure its authentication settings so that the product you're integrating with can communicate with Sumo Logic. For general guidance, see Configure Authentication for Automation Integrations.
How to open the integration's configuration dialog
- Access App Central and install the integration. (You can configure at installation, or after installation with the following steps.)
- Go to the Integrations page.
Classic UI. In the main Sumo Logic menu, select Automation and then select Integrations in the left nav bar.
New UI. In the main Sumo Logic menu, select Automation > Integrations. You can also click the Go To... menu at the top of the screen and select Integrations. - Select the installed integration.
- Hover over the resource name and click the Edit button that appears.
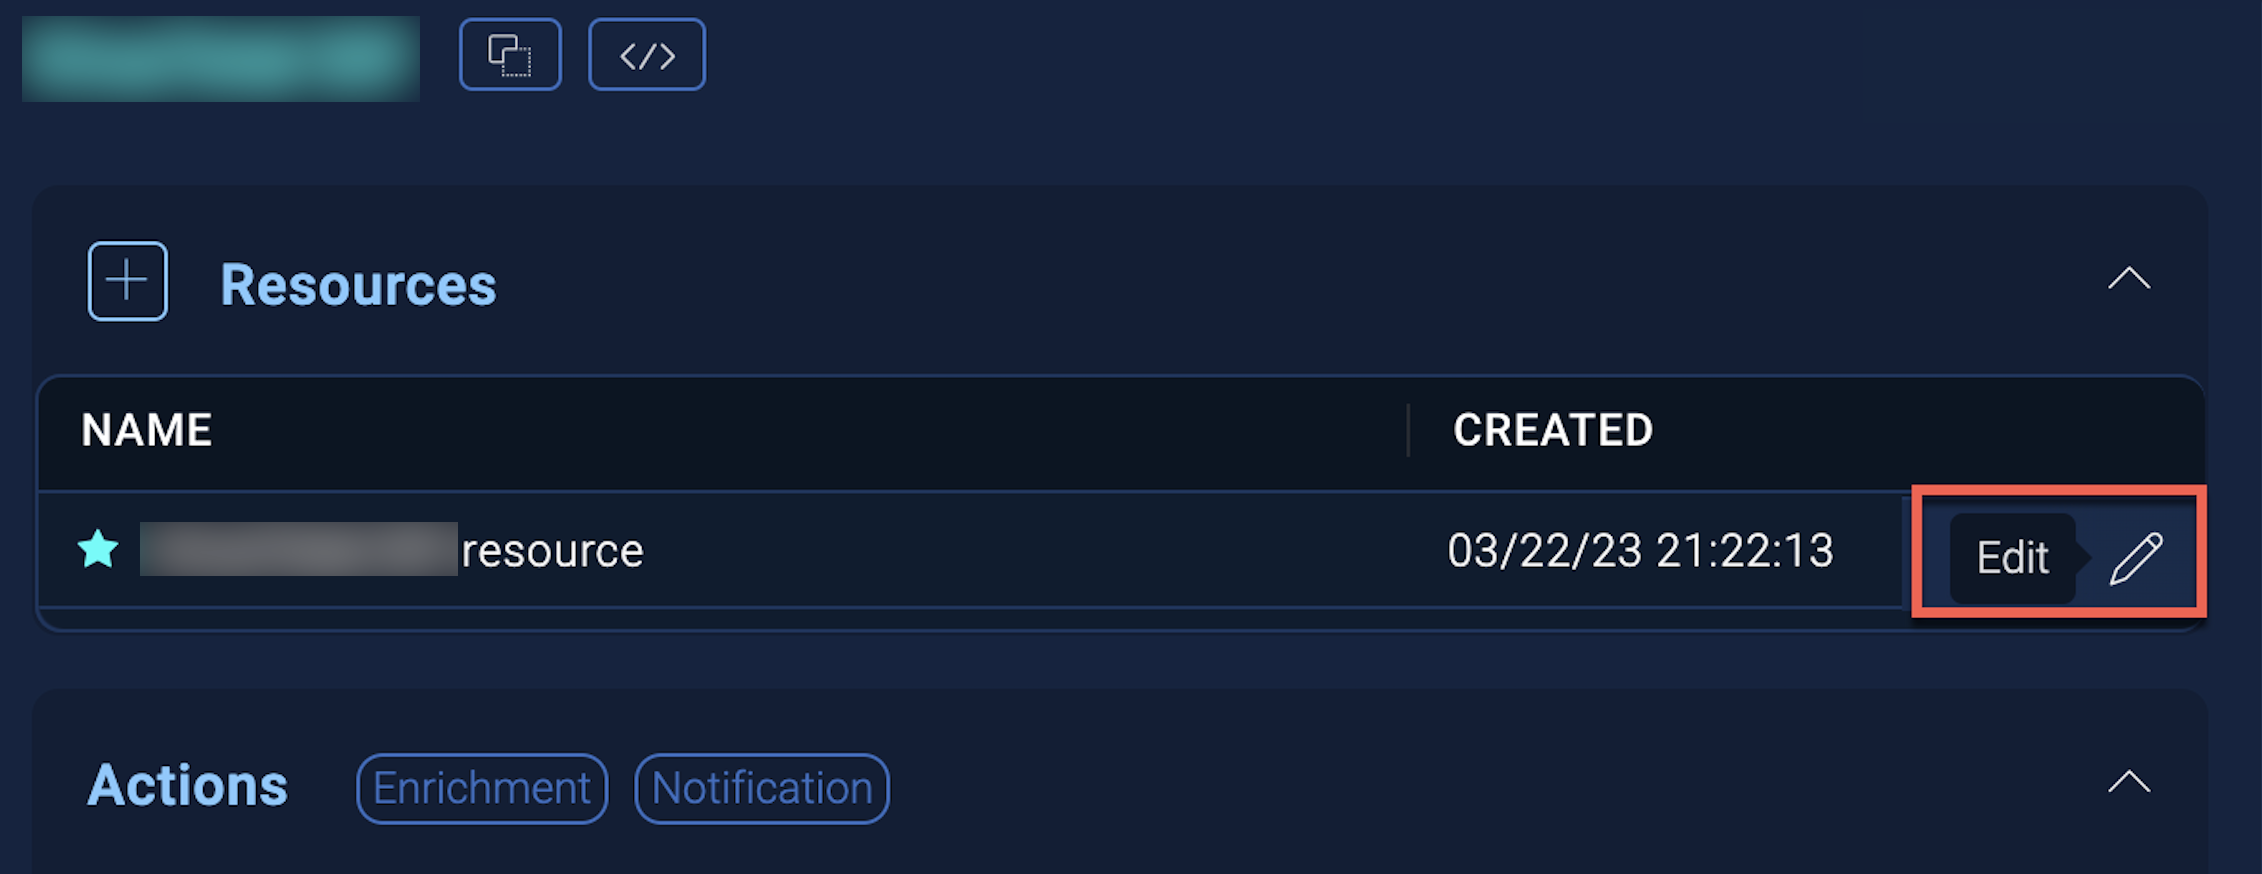
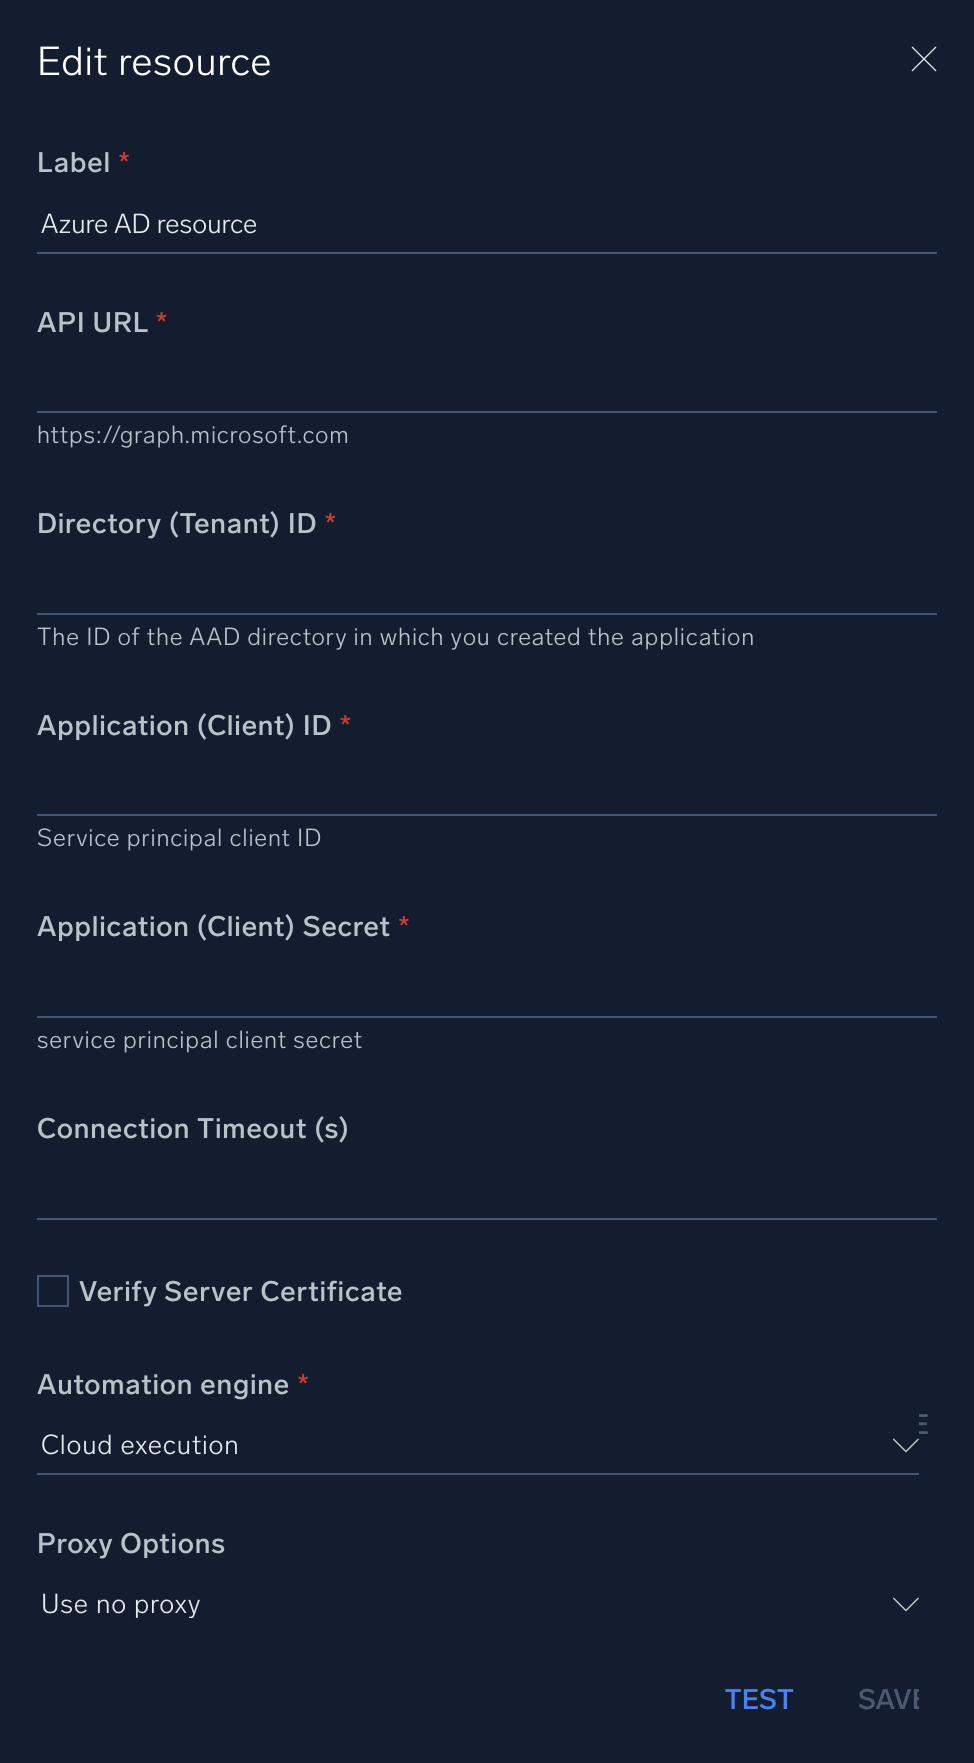
In the configuration dialog, enter information from the product you're integrating with. When done, click TEST to test the configuration, and click SAVE to save the configuration:
-
Label. Enter the name you want to use for the resource.
-
API URL. Enter the Azure AD API URL, for example,
https://graph.microsoft.com -
Directory (Tenant) ID. Enter the tenant ID located when you configured Azure AD above.
-
Application (Client) ID. Enter the client ID from your Azure Application.
-
Application (Client) Secret. Enter your client secret.
-
Authentication Type. Select
Application(default) for client credential auth, orDelegatedto enable Device Code Flow actions. -
Delegated Refresh Token. Paste the refresh token obtained during the delegated auth setup.
-
Connection Timeout (s). Set the maximum amount of time the integration will wait for a server's response before terminating the connection. Enter the connection timeout time in seconds (for example,
180). -
Verify Server Certificate. Select to validate the server’s SSL certificate.
-
Automation Engine. Select Cloud execution for this certified integration. Select a bridge option only for a custom integration. See Cloud or Bridge execution.
-
Proxy Options. Select whether to use a proxy. (Applies only if the automation engine uses a bridge instead of cloud execution.)
- Use no proxy. Communication runs on the bridge and does not use a proxy.
- Use default proxy. Use the default proxy for the bridge set up as described in Using a proxy.
- Use different proxy. Use your own proxy service. Provide the proxy URL and port number.
For information about Microsoft Entra ID (formerly Azure AD), see Entra ID documentation.
Change Log
| Version | Date | Description |
|---|---|---|
| v1.17 | September 3, 2026 |
|
| v1.15 | July 31, 2026 |
|
| v1.14 | May 7, 2026 | Fixed an issue in the Reset User Password and Remove Member From Group actions that caused errors when processing the response. |
| v1.12 | May 7, 2026 | Added a new action: Reset User MFA. |
| v1.11 | April 27, 2026 | Upgraded the python3_generic Docker image (Python 3.8) to python3_12_generic (Python 3.12) to address Python 3.8 end-of-life and improve security and performance. |
| v1.10 | January 3, 2025 | Added new actions: List Of Group Members and Remove Member From Group. |
| v1.9 | November 12, 2024 | Added a new action: Reset User Password. |
| v1.8 | January 16, 2024 | Added a new action: Get Member Groups. |
| v1.7 | September 19, 2023 | Versioning. |
| v1.6 | August 31, 2023 | Added new actions: List Devices and Disable User. |
| v1.5 | August 25, 2023 | Added a new action: Revoke Sign In Sessions. |
| v1.4 | June 26, 2023 | Changed multiline hints to single line. |
| v1.3 | April 28, 2023 |
|
| v1.2 | November 10, 2022 | Added a new action: Get Manager. |
| v1.1 | March 11, 2022 | Updated the logo in Azure AD integration. |
| v1.0 | October 7, 2021 | Initial release of the Azure AD integration. |
Additional resources
For Azure AD, Sumo Logic provides the following sources for collecting data and corresponding apps for visualizing it:
- Use the Microsoft Azure AD Inventory source to collect Azure AD Inventory data and the Microsoft Azure AD Inventory app to visualize it.
- Use the Microsoft Graph Azure AD Reporting source to collect Azure AD reporting data and the Microsoft Graph Azure AD Reporting app to visualize it.