Google Cloud Composer

Version: 1.2
Updated: Jun 16, 2026
Google Cloud Composer is a fully managed workflow orchestration service built on Apache Airflow that helps you author, schedule, and monitor pipelines spanning hybrid and multi-cloud environments.
Actions
- Add Member to IAM Role (Containment) - Adds a new member to the specified IAM role for the Cloud Composer environment.
- Get DAG (Enrichment) - Retrieves details of a specific DAG from a Cloud Composer environment.
- Get Environment (Enrichment) - Retrieves details of a specific Cloud Composer environment.
- List DAGs (Enrichment) - Lists all DAGs in a Cloud Composer environment.
- List Environments (Enrichment) - Lists all Cloud Composer environments in the specified project and region.
- Pause DAG (Containment) - Pauses a DAG in a Cloud Composer environment to stop scheduled runs.
- Remove Member from IAM Role (Containment) - Removes a member from the specified IAM role for the Cloud Composer environment.
- Unpause DAG (Containment) - Unpauses a previously paused DAG in a Cloud Composer environment to resume scheduled runs.
- Update Project IAM Policy (Containment) - Updates the IAM policy for the project associated with the Cloud Composer environment.
Required IAM roles
The following table lists the required IAM roles for each action:
| Action | Required Role | Permission |
|---|---|---|
| Add Member to IAM Role | Project IAM Admin (roles/resourcemanager.projectIamAdmin) | resourcemanager.projects.setIamPolicy |
| Get DAG | Composer User (roles/composer.user) | composer.dags.get |
| Get Environment | Composer User (roles/composer.user) | composer.environments.get |
| List DAGs | Composer User (roles/composer.user) | composer.dags.list |
| List Environments | Composer User (roles/composer.user) | composer.environments.list |
| Pause DAG | Composer Admin (roles/composer.admin) | composer.dags.update |
| Remove Member from IAM Role | Project IAM Admin (roles/resourcemanager.projectIamAdmin) | resourcemanager.projects.setIamPolicy |
| Unpause DAG | Composer Admin (roles/composer.admin) | composer.dags.update |
| Update Project IAM Policy | Project IAM Admin (roles/resourcemanager.projectIamAdmin) | resourcemanager.projects.setIamPolicy |
Google Cloud Composer configuration
The Google Cloud Composer integration supports two types of authentication:
- Service Account
- WIF (Workload Identity Federation)
We recommend using WIF since it is more secure and easier to manage. For more information, see Workload Identity Federation.
Required AWS details from Sumo Logic
To configure the Google Cloud Composer integration using WIF authentication, you need the following AWS details from Sumo Logic. These details are essential for setting up the Workload Identity Federation (WIF) credentials in Google Workspace:
- Deployment name is the unique name of your Sumo Logic deployment, for example,
dub,fra, etc. - Sumo Logic AWS account ID:
926226587429 - Sumo Logic AWS role:
<deployment_name>-csoar-automation-gcpcomposer - Sumo Logic AWS Lambda function:
<deployment_name>-csoar-automation-gcpcomposer - Full ARN:
arn:aws:sts::926226587429:assumed-role/<deployment_name>-csoar-automation-gcpcomposer/<deployment_name>-csoar-automation-gcpcomposer
Workload Identity Federation (WIF) authentication
Follow the steps below to create WIF credentials in Google Workspace, which are required to configure the Google Cloud Composer integration:
- Log in to the Google Cloud portal.
- Select a Google Cloud project (or create a new one).
- Navigate to API & Services.
- On the same page, click ENABLED API AND SERVICES and search for Cloud Composer API, Cloud Resource Manager API, IAM Service Account Credentials API, Identity and Access Management (IAM) API, Security Token Service API, and enable them all.
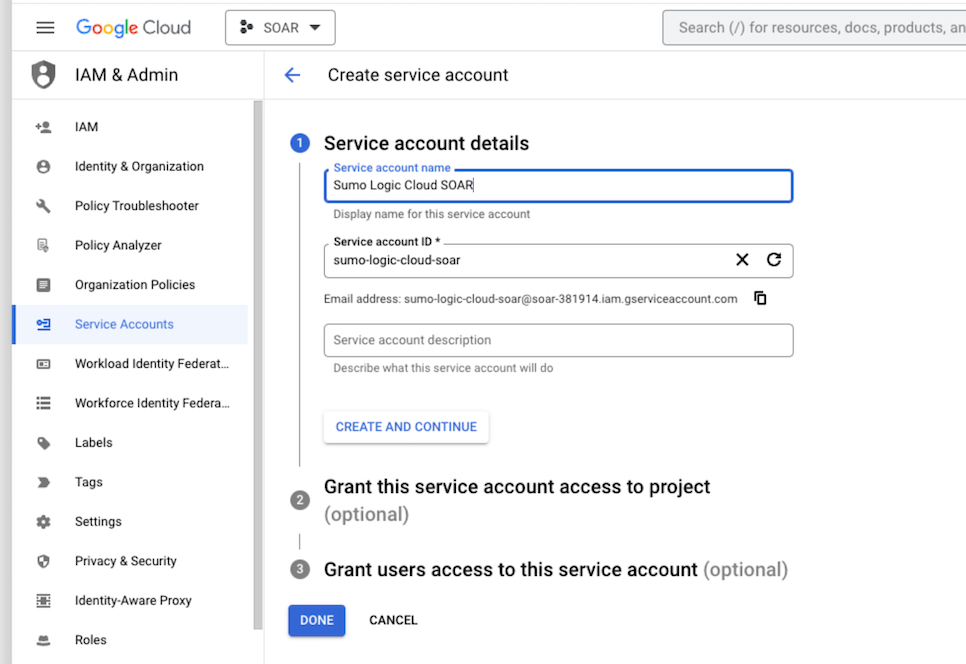
- Navigate to IAM & Admin > Service Accounts page.
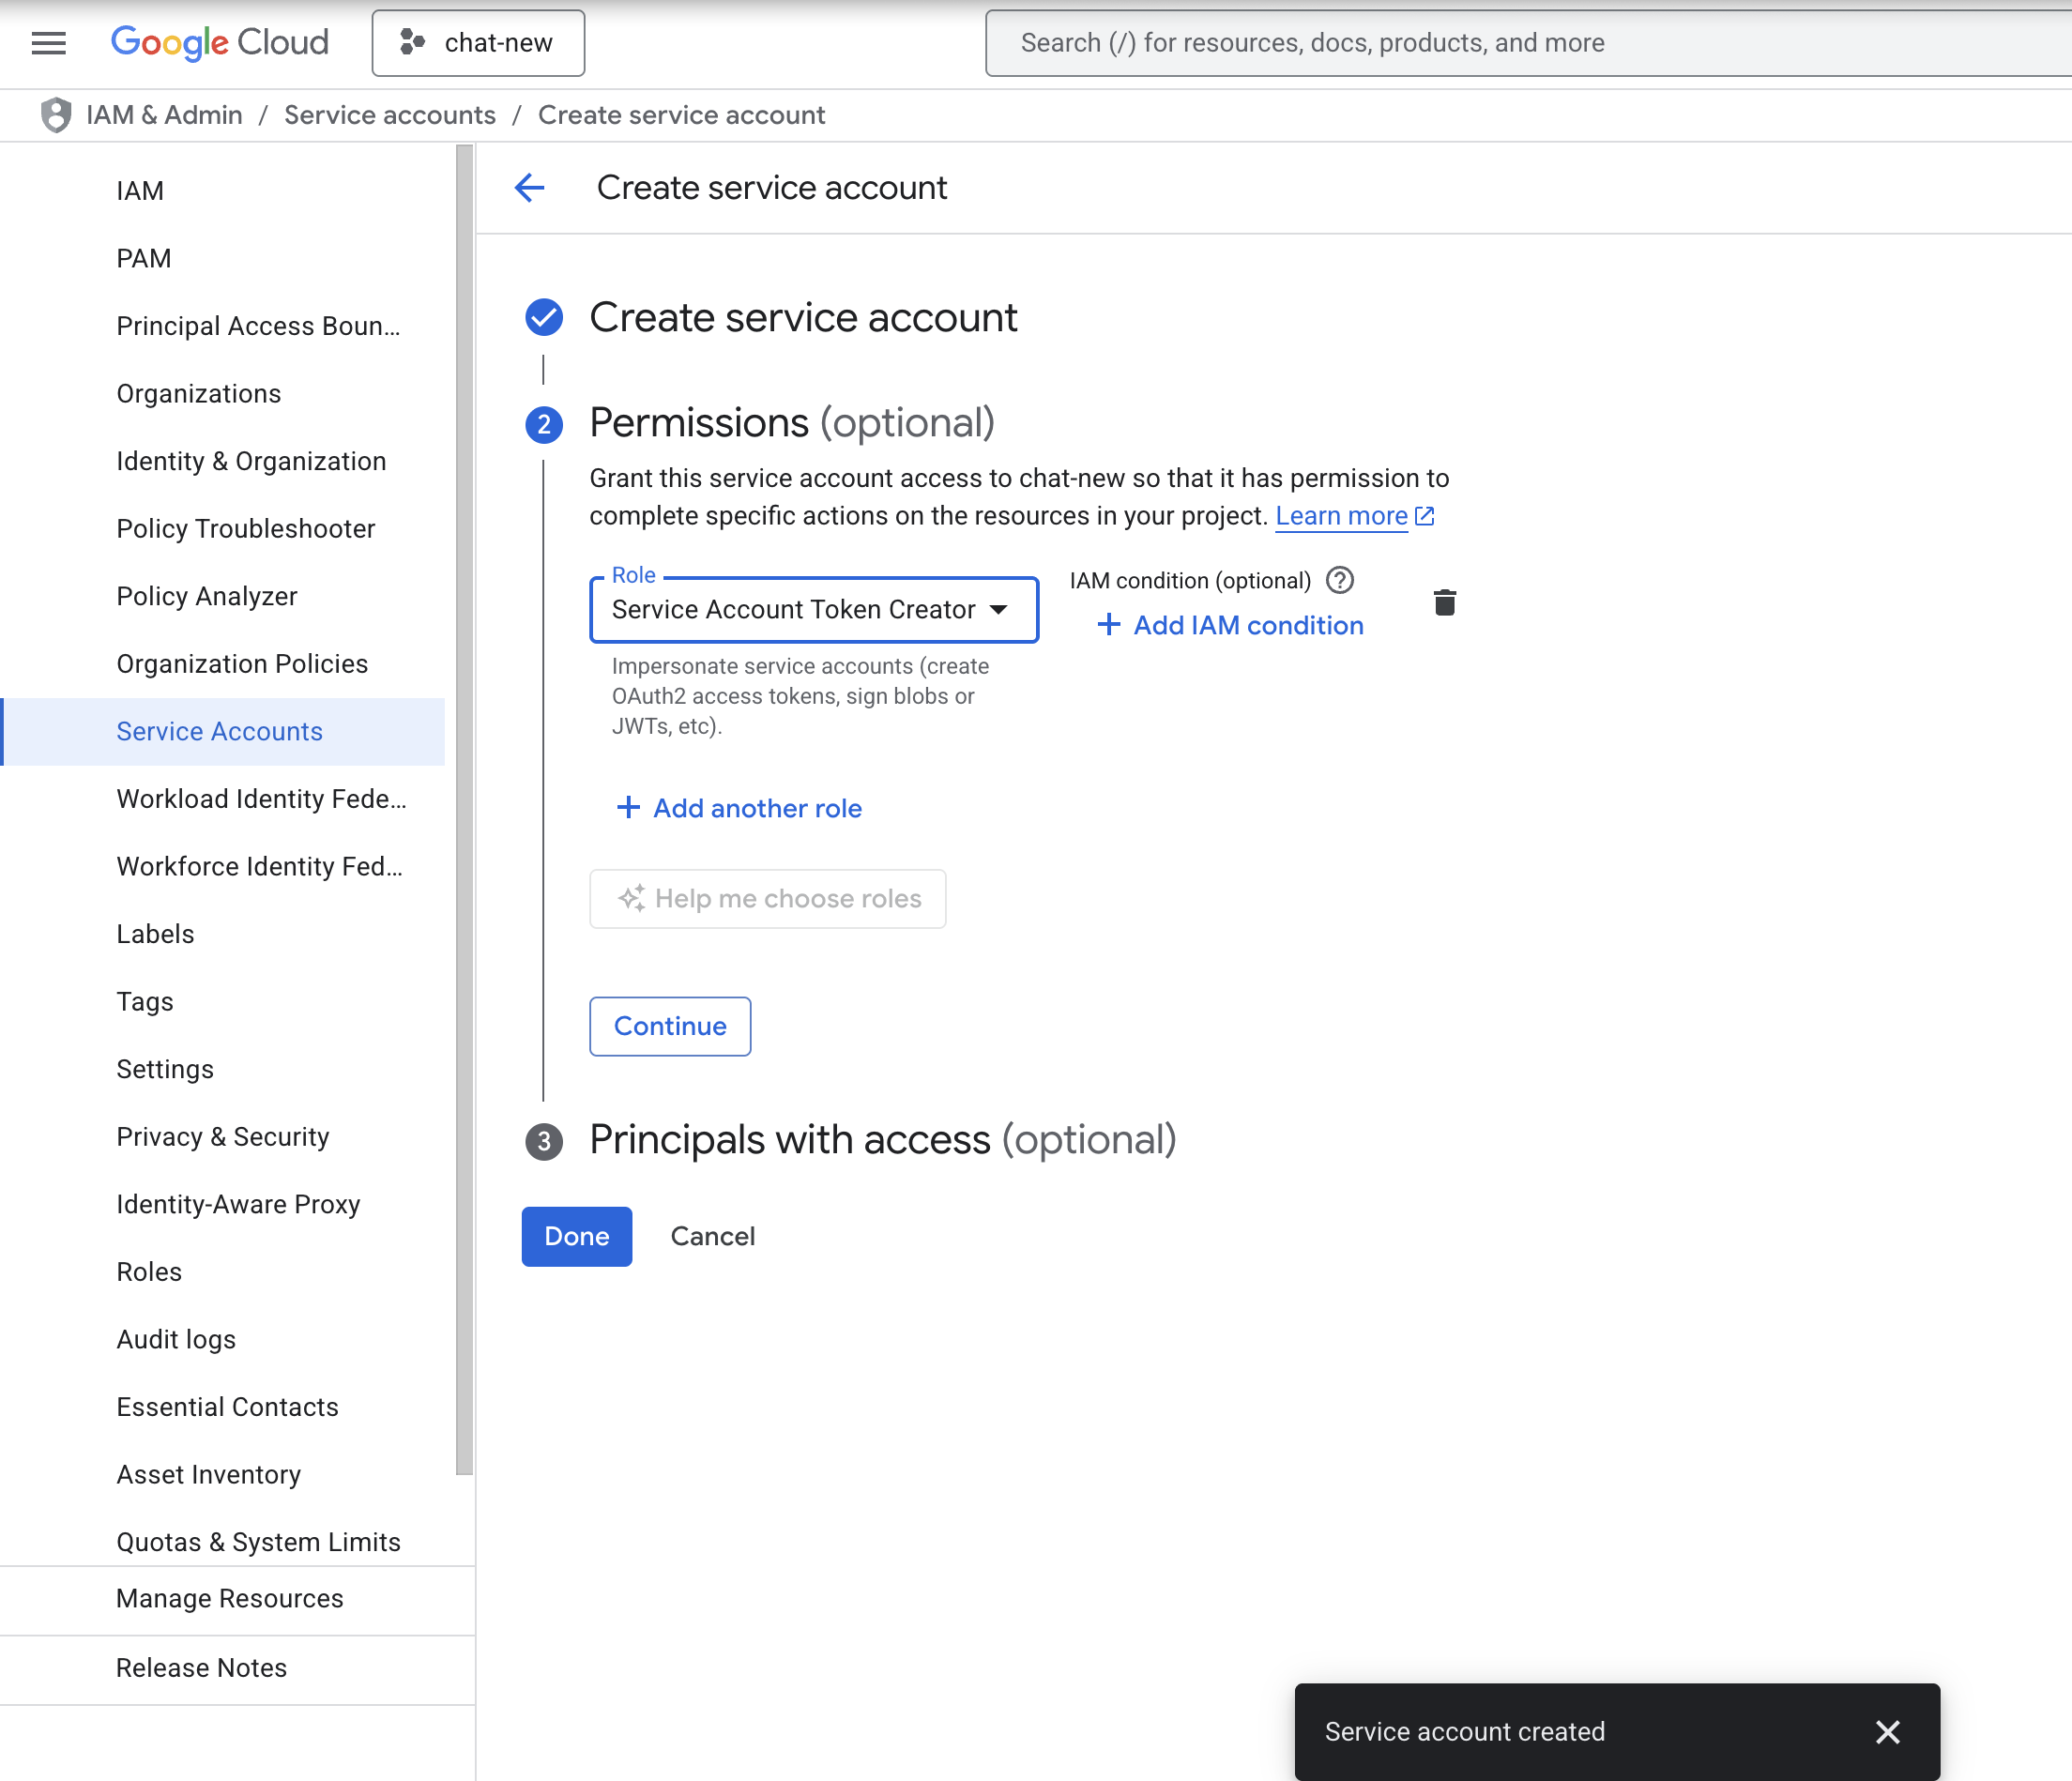
- Click CREATE SERVICE ACCOUNT. A Service Account is required to access Google Cloud Composer.
- While creating the service account, under Permissions, set the role as Service Account Token Creator and then click DONE.
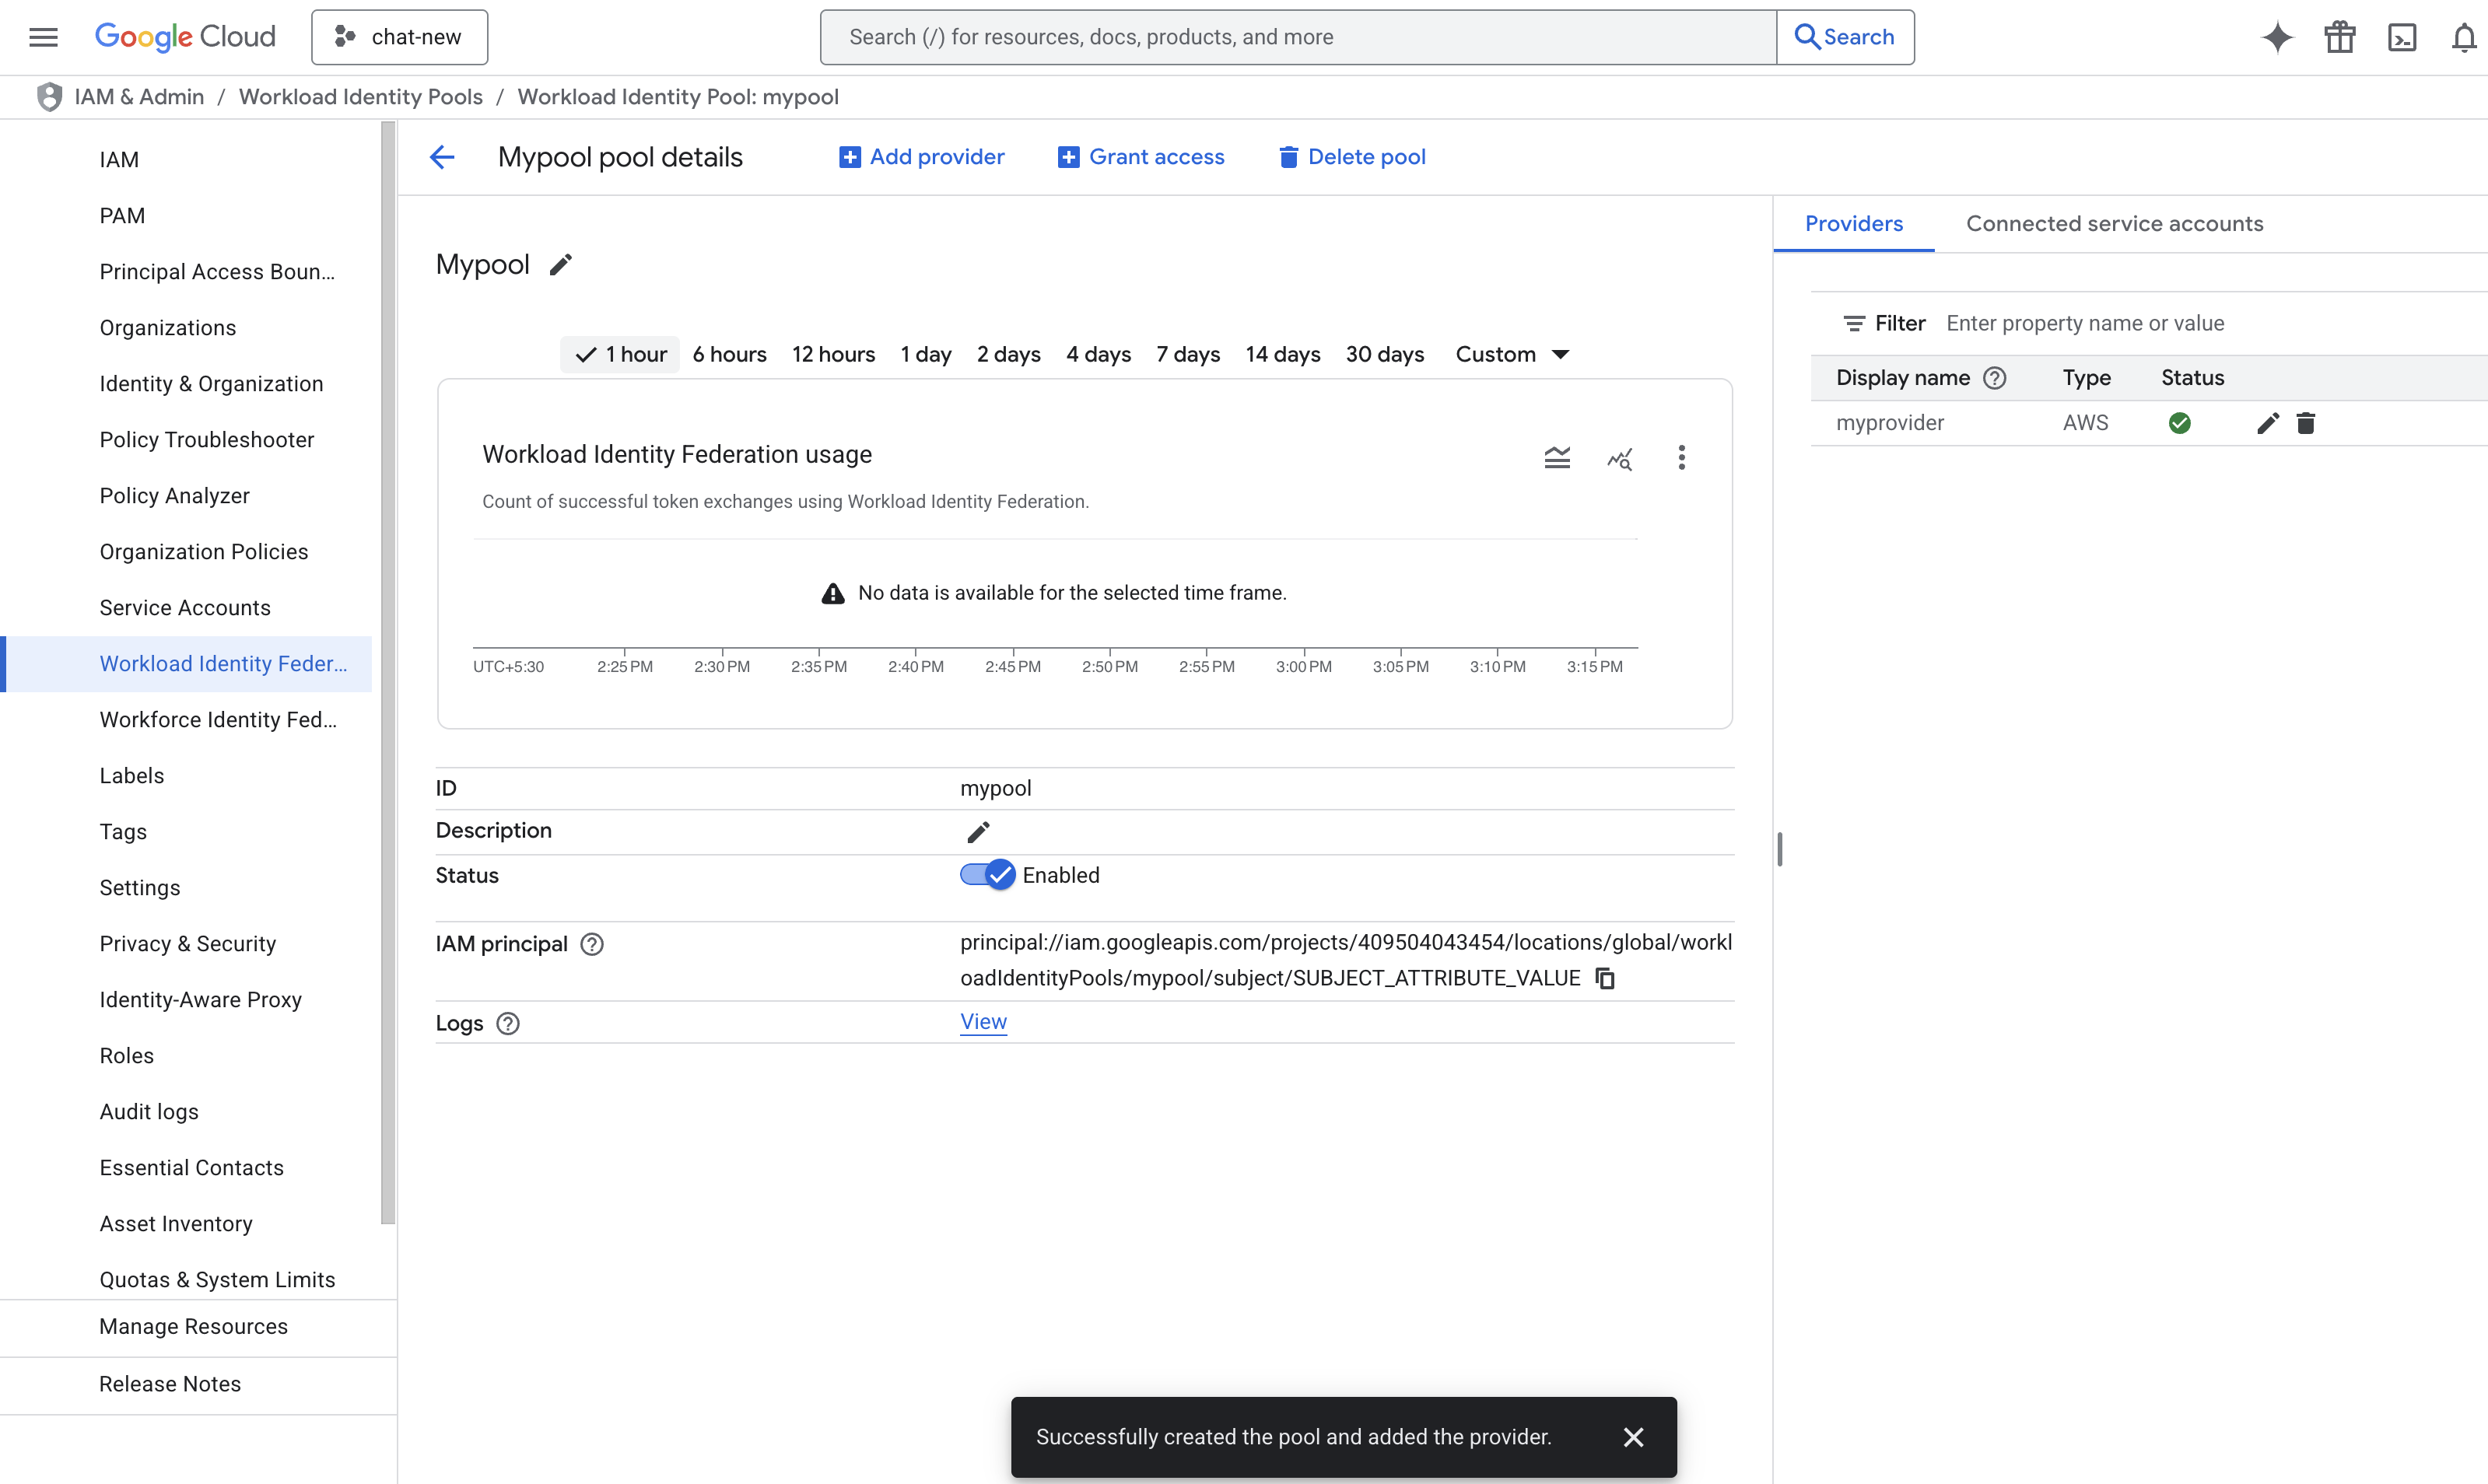
- Navigate to IAM & Admin > Workload Identity Federation.
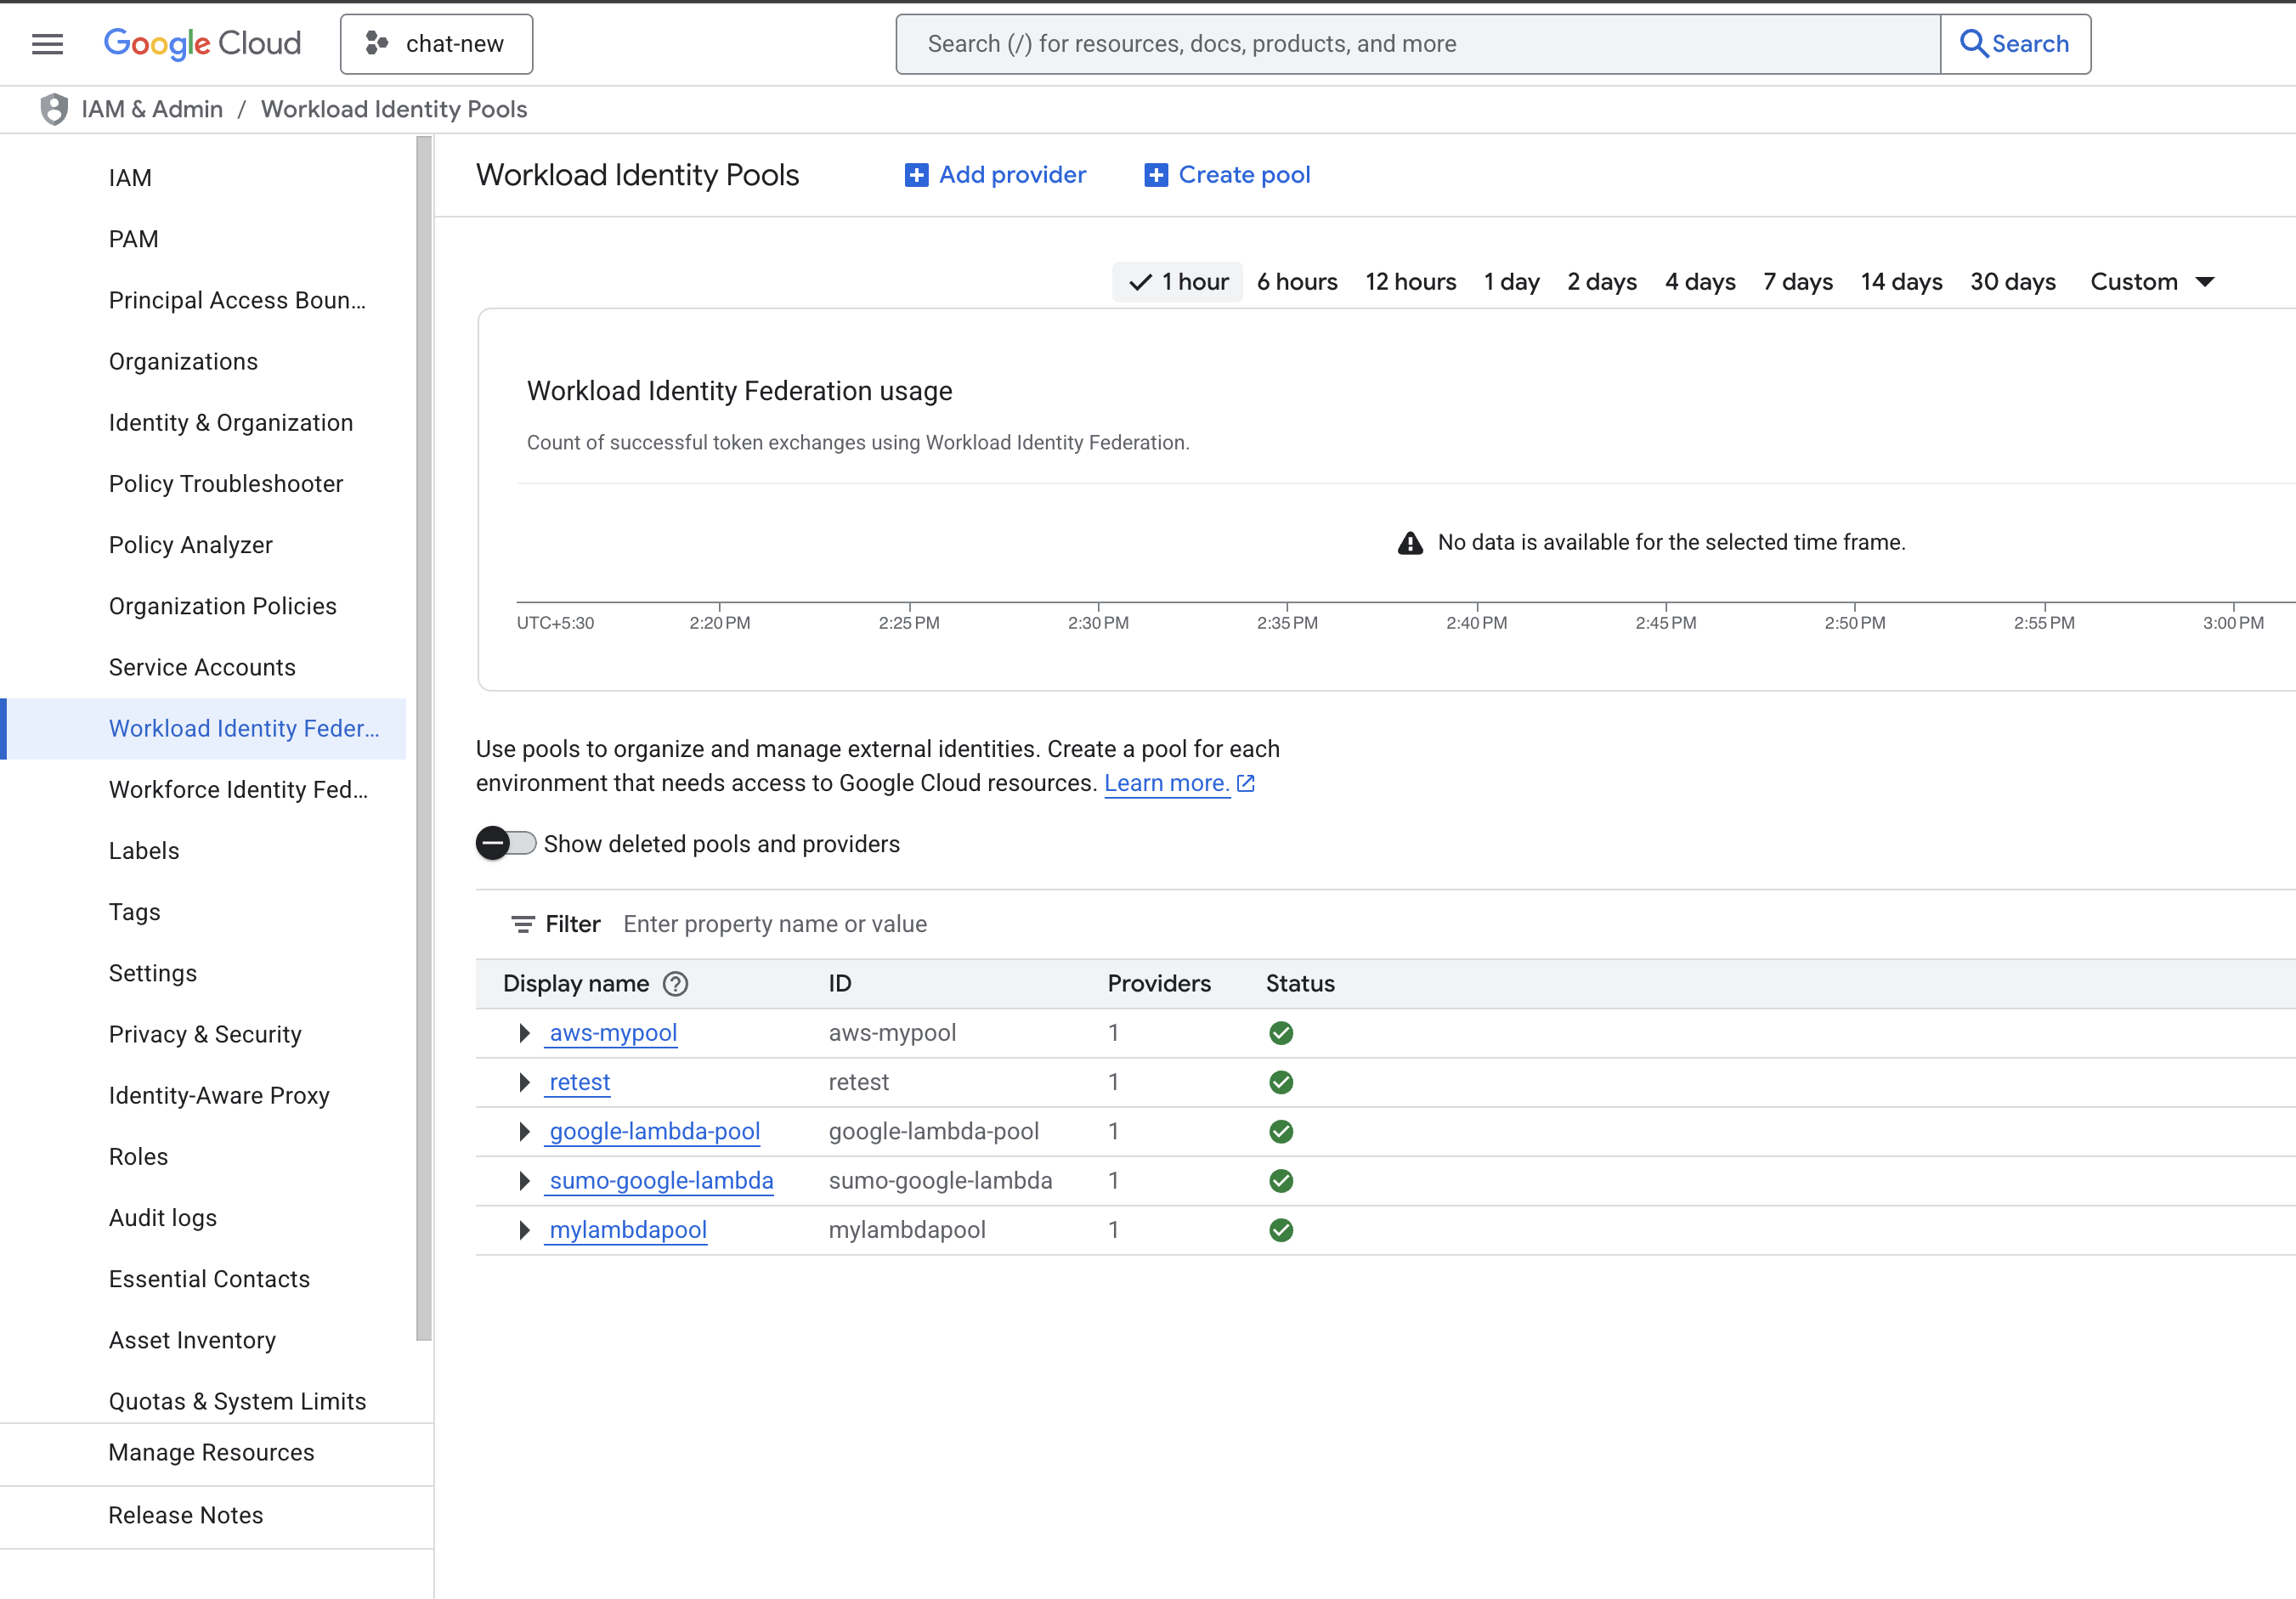
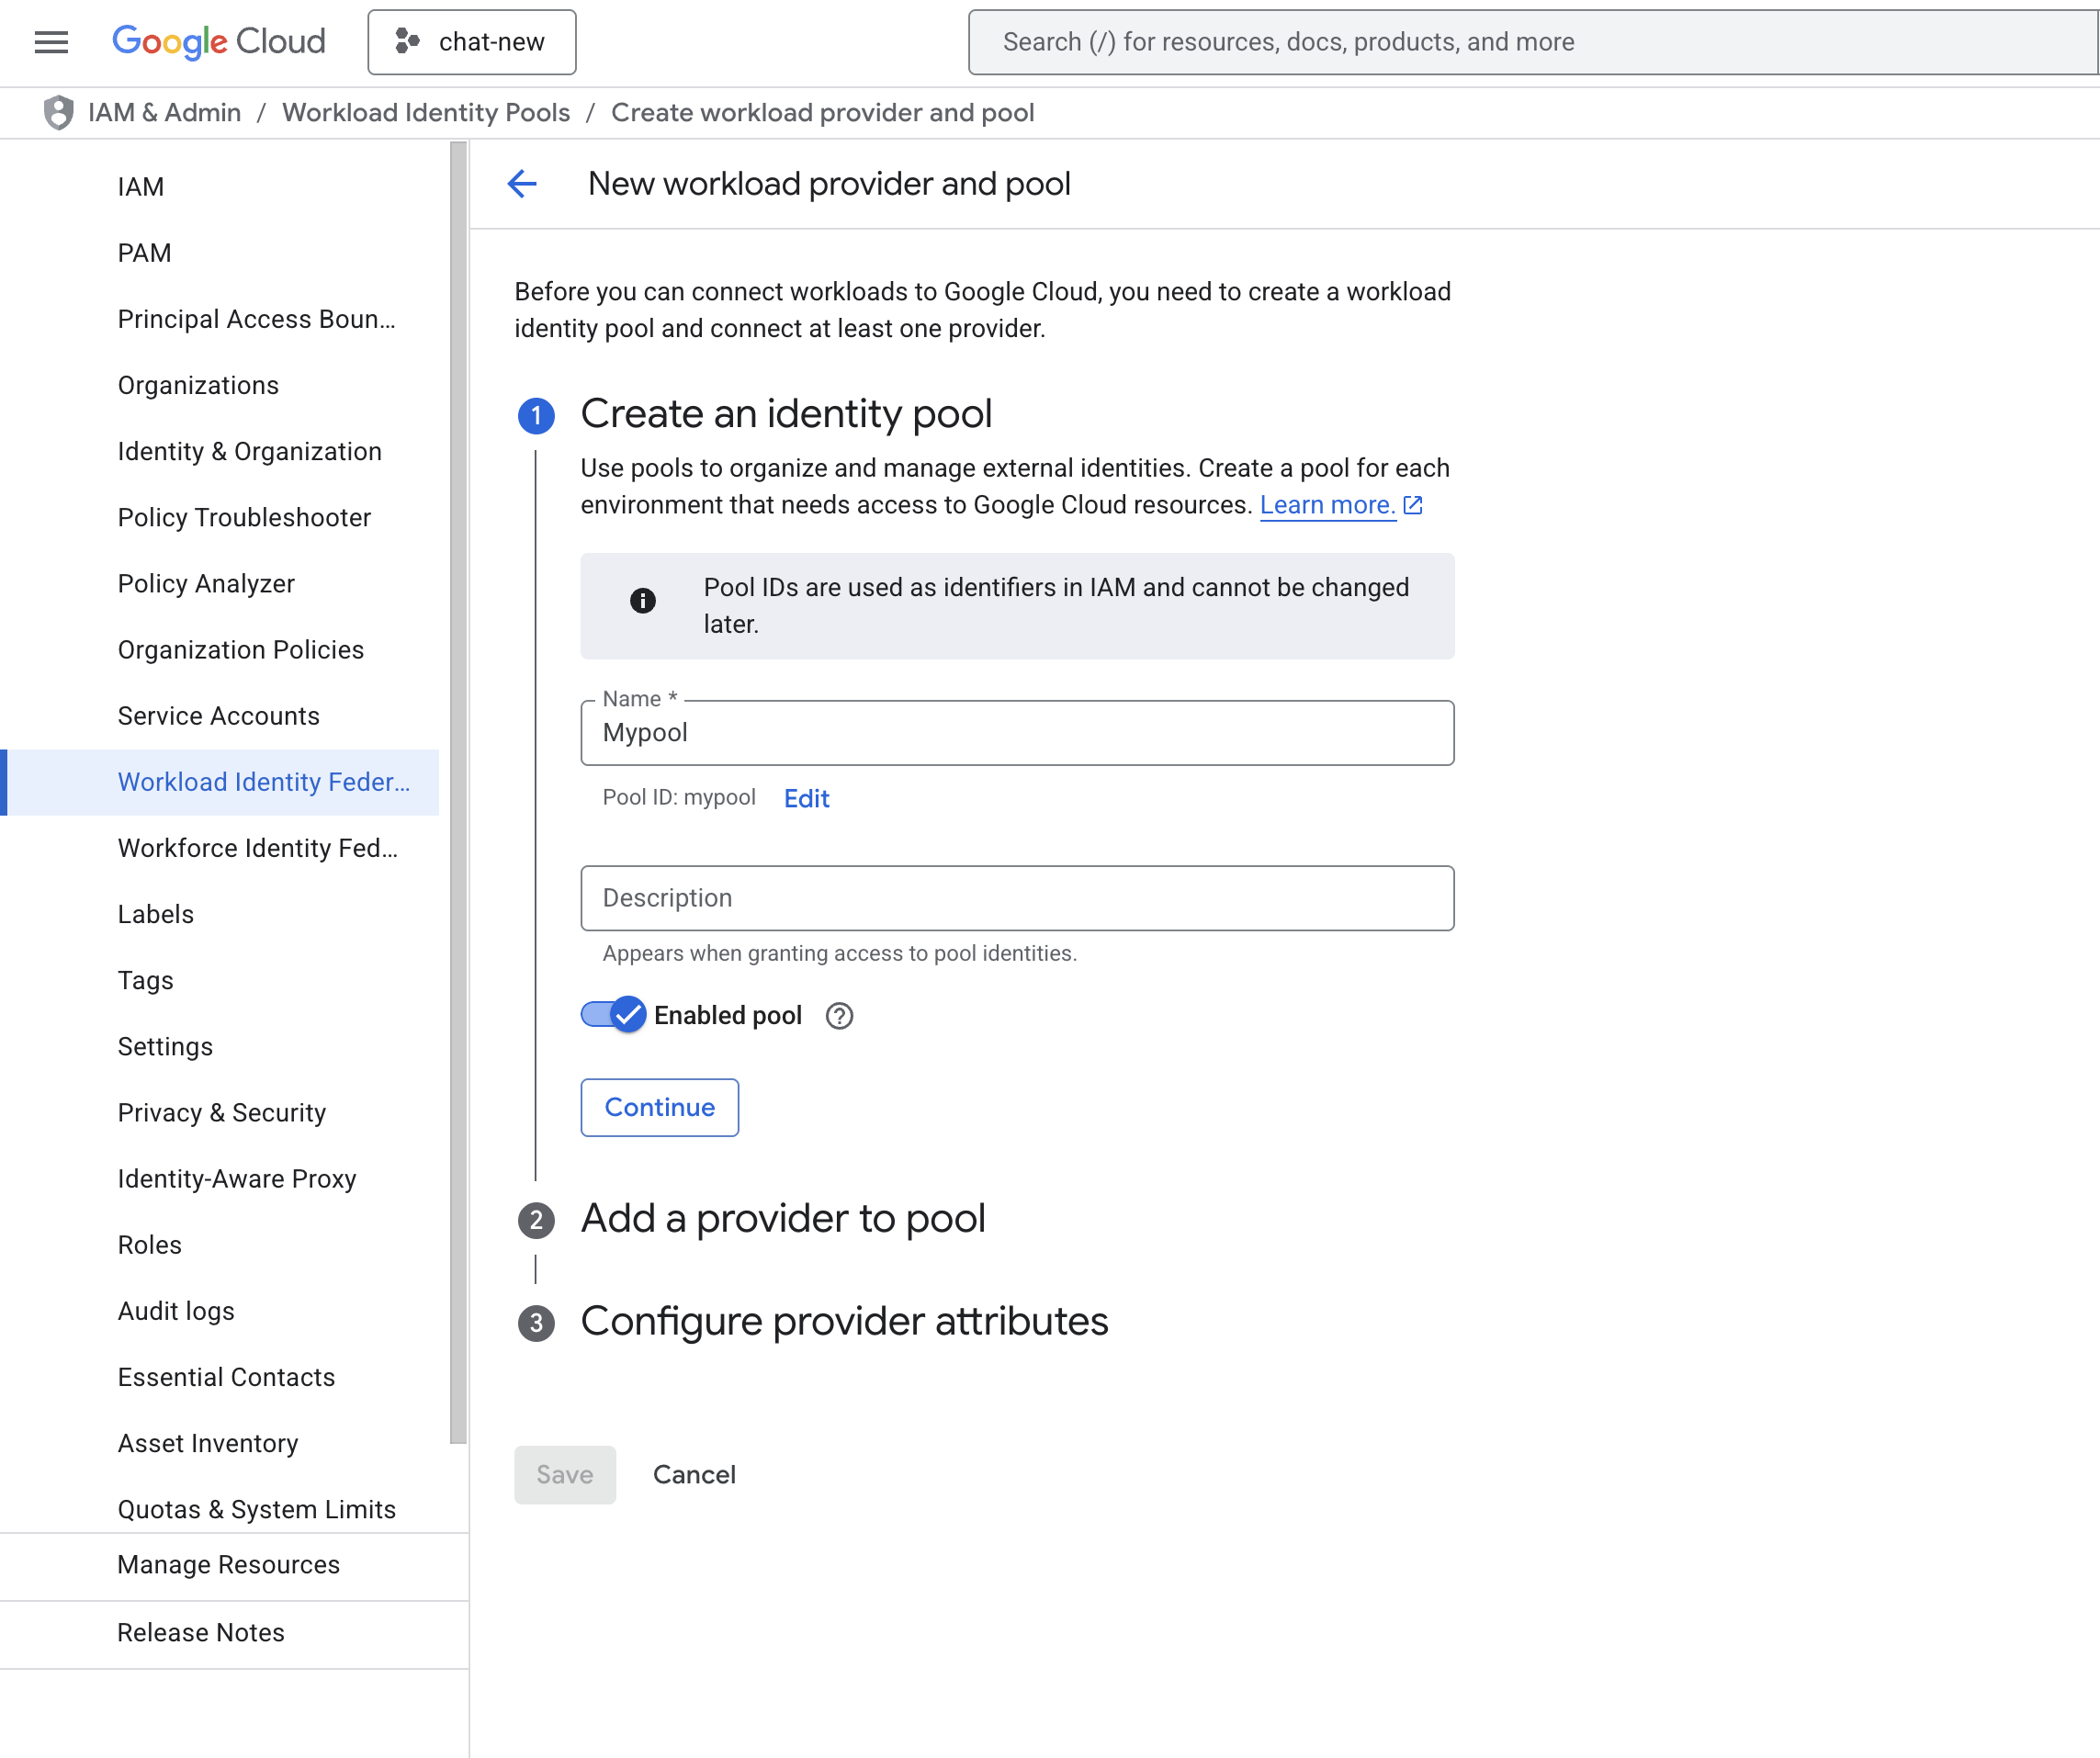
- Click CREATE POOL, provide the details, and click CONTINUE.
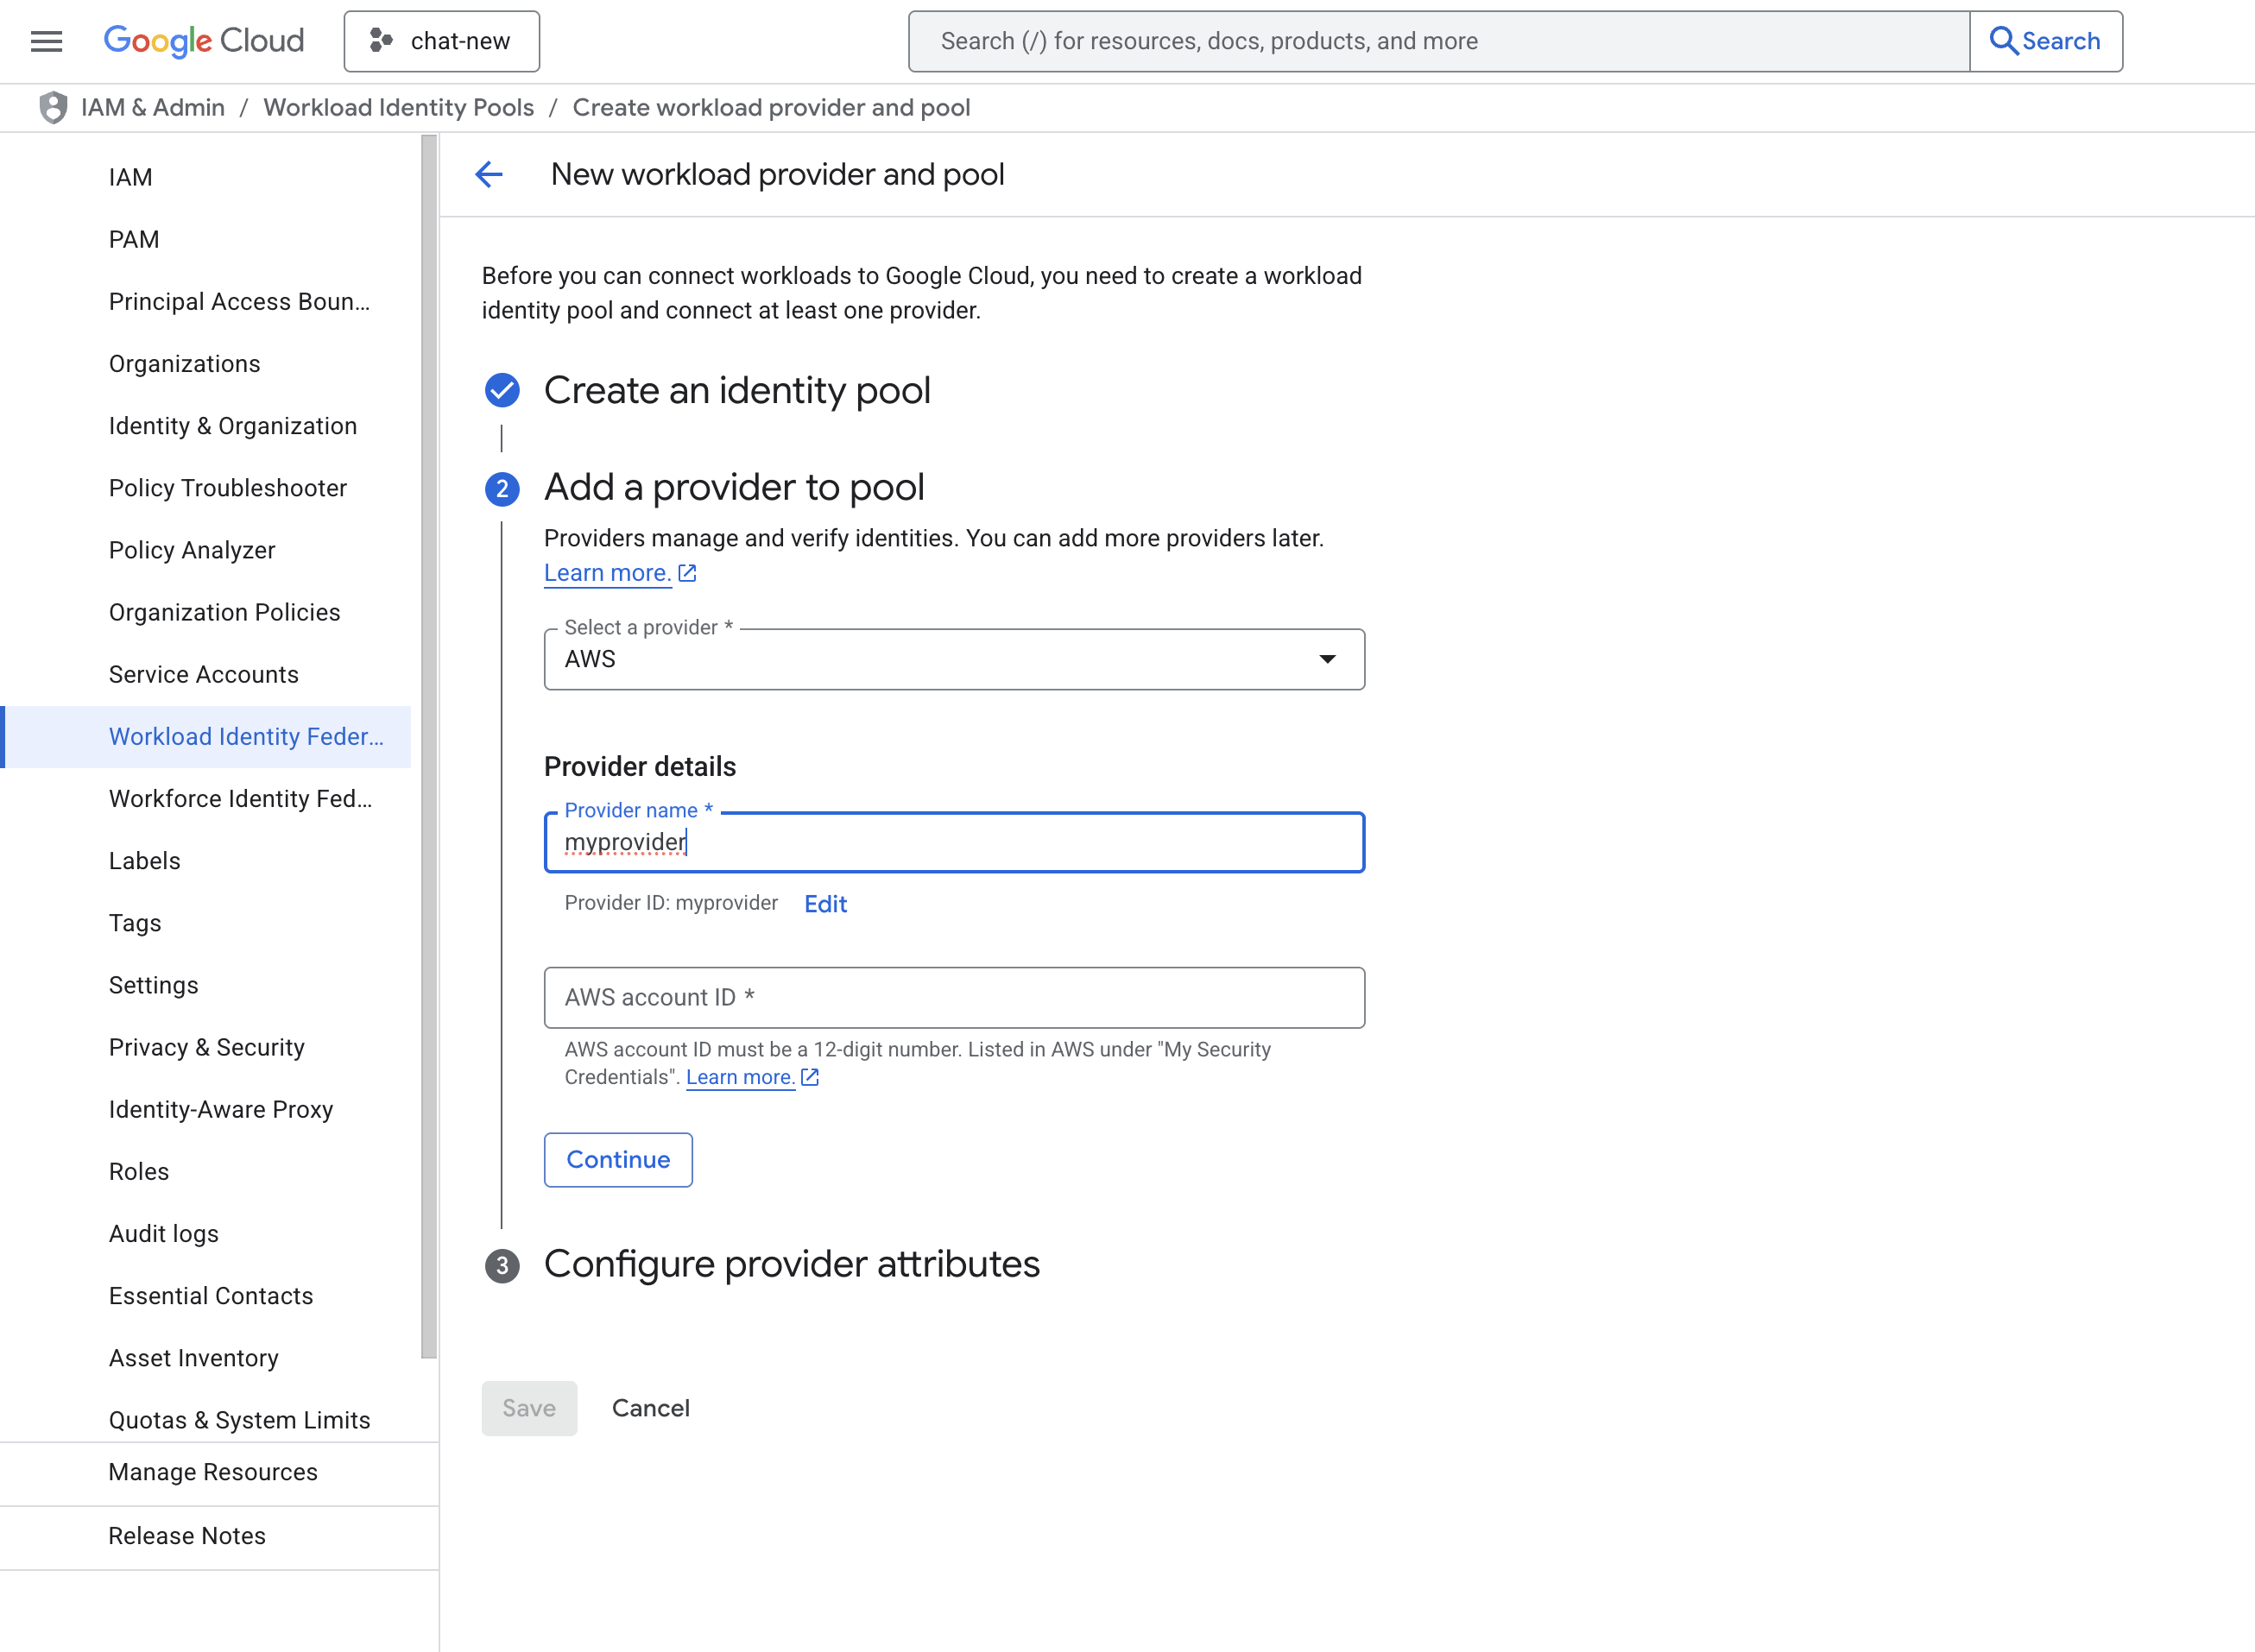
- Add the Provider details. Select AWS as the provider type and enter the AWS Account ID provided by Sumo Logic. Click CONTINUE and SAVE.
- Now you will see the created pool and provider.
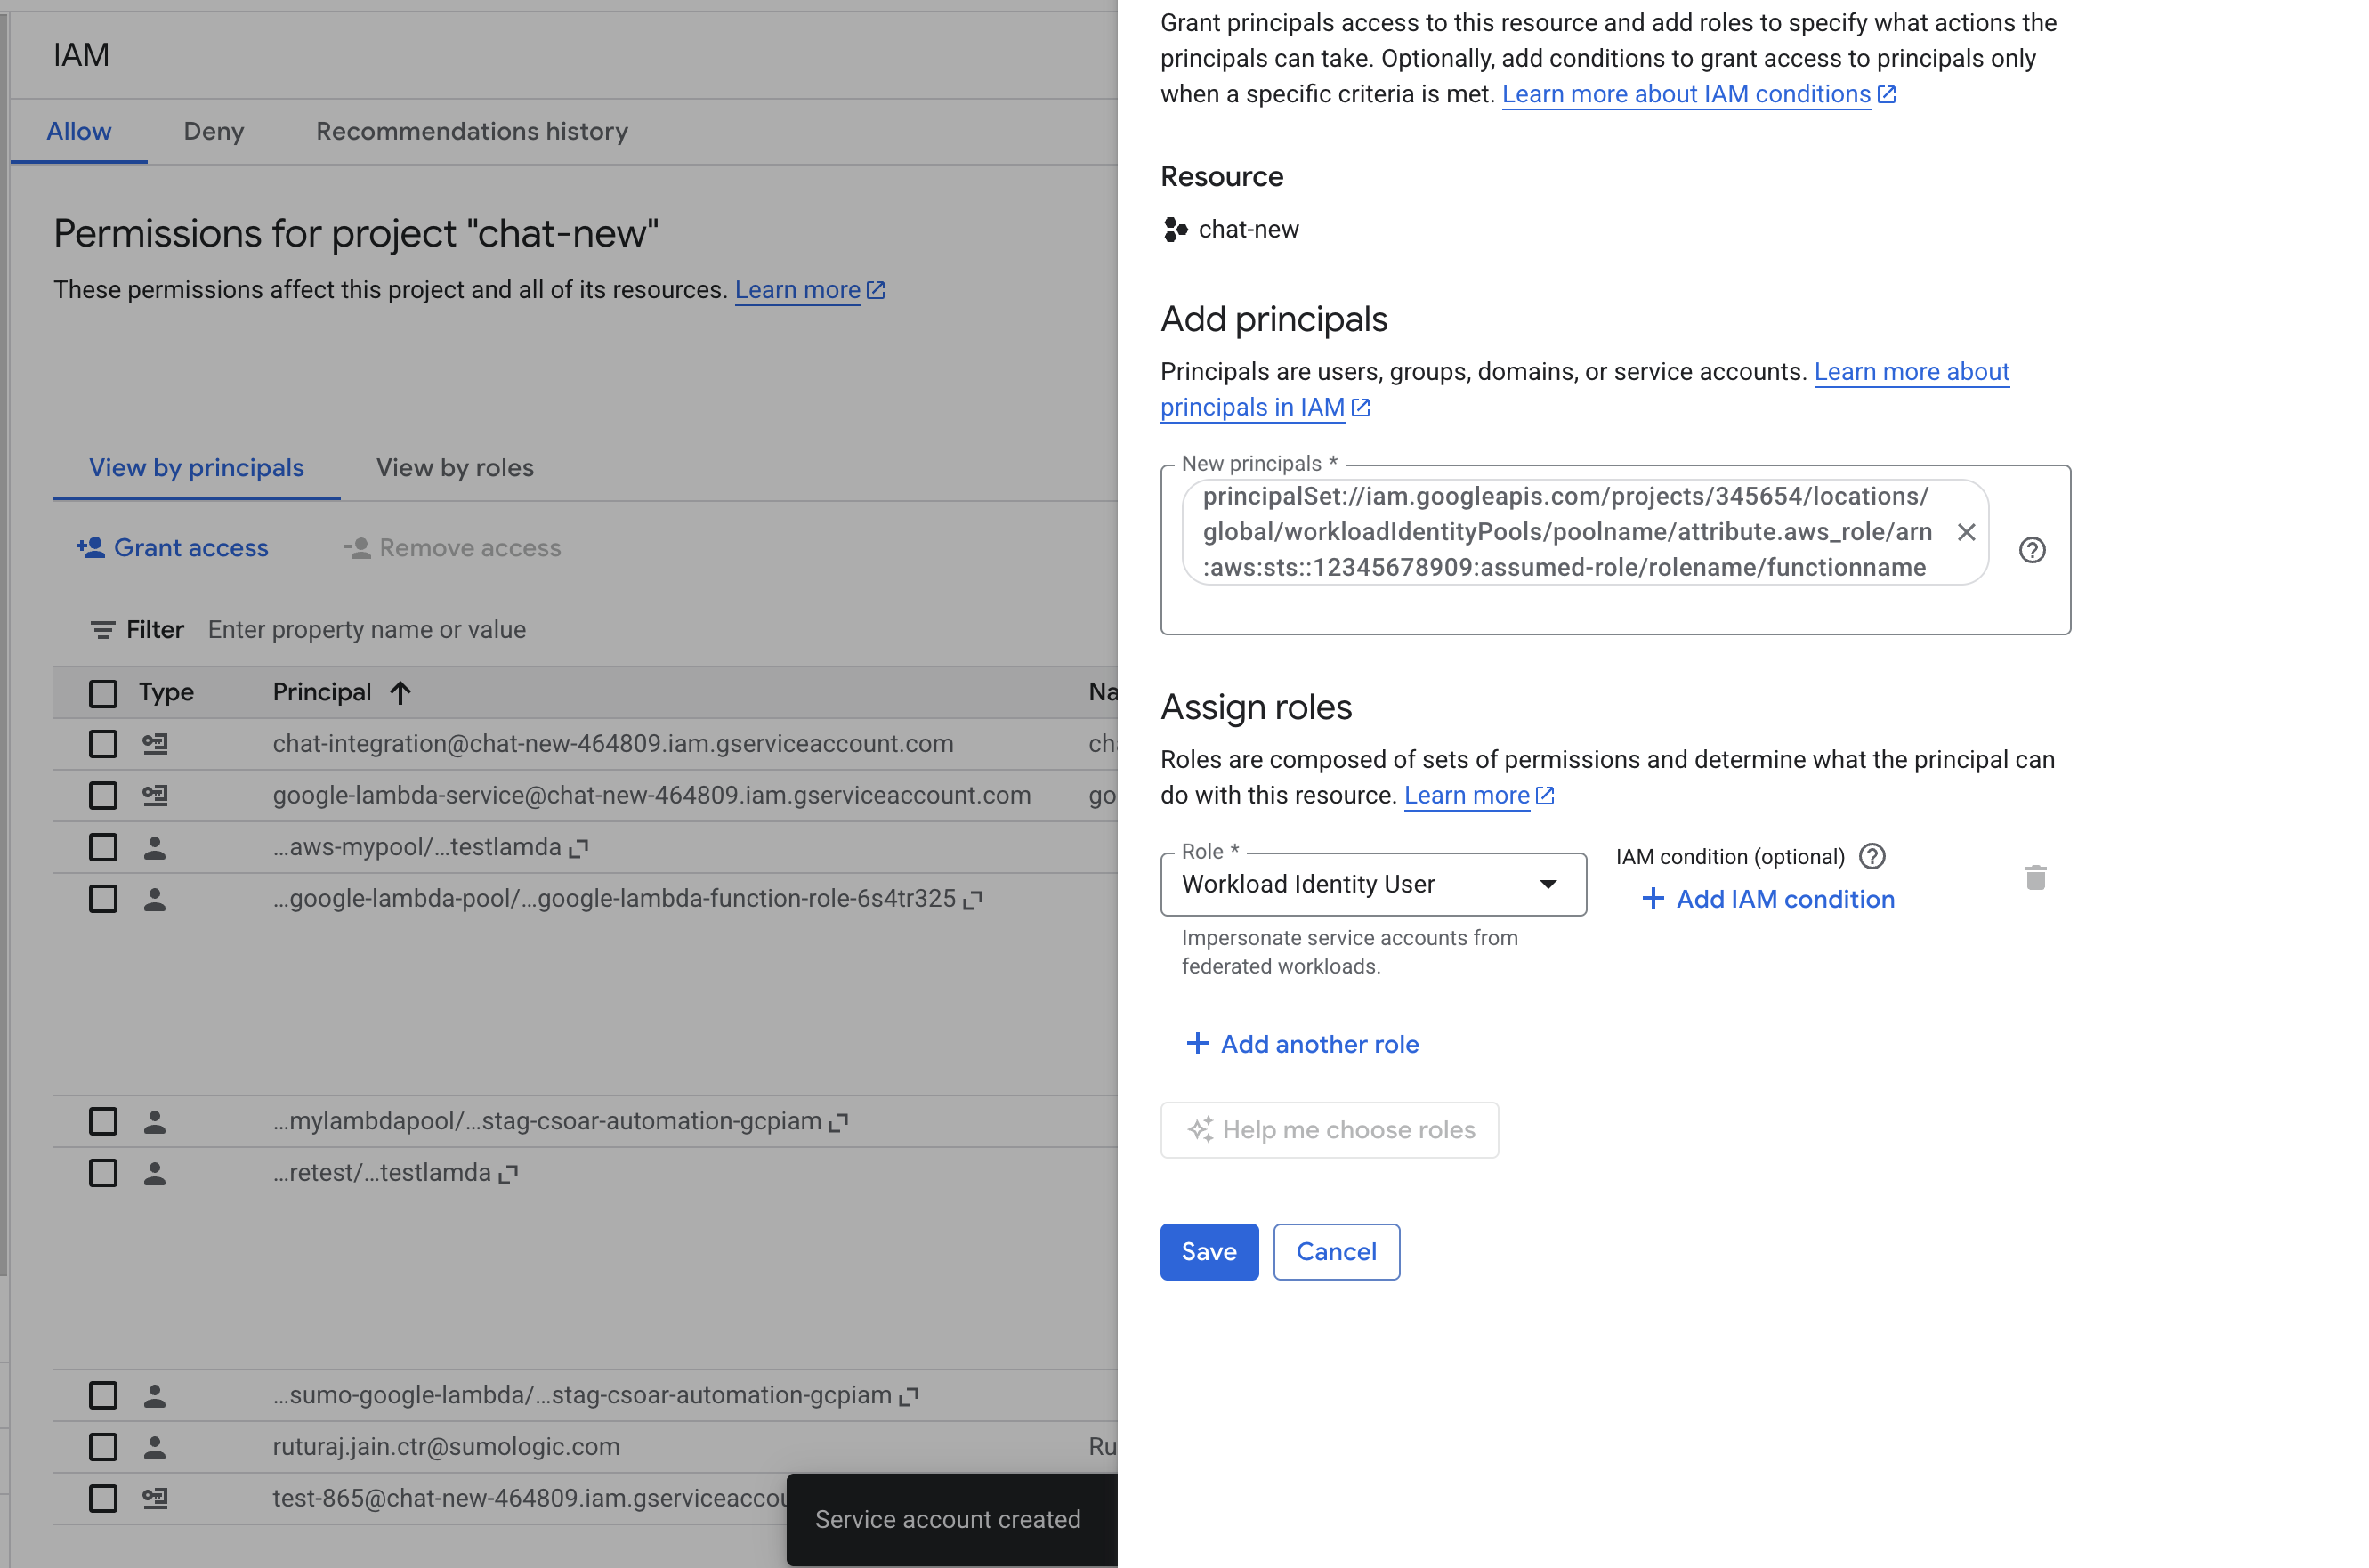
- Build a principal name to configure in Sumo Logic. The format of the principal name is:
principalSet://iam.googleapis.com/projects/{YourProjectID}/locations/global/workloadIdentityPools/{YourPoolName}/attribute.aws_role/arn:aws:sts::{SumoAWSAccountID}:assumed-role/{SumoAWSRole}/{SumoAWSLambdaFunction}. - Navigate to IAM & Admin > IAM and click Grant Access to add a new principal.
- In the New principals field, provide the principal name created in step 12 and select the role as Workload Identity User. Click SAVE.
- Go to the IAM & Admin > Workload Identity Federation and select the pool created in step 9.
- Click Grant Access > Grant access using service account impersonation.
- Select the service account created in the previous step. Set the principal type as
aws_roleand the ARN asarn:aws:sts::{SumoAWSAccountID}:assumed-role/{SumoAWSRole}and then click SAVE.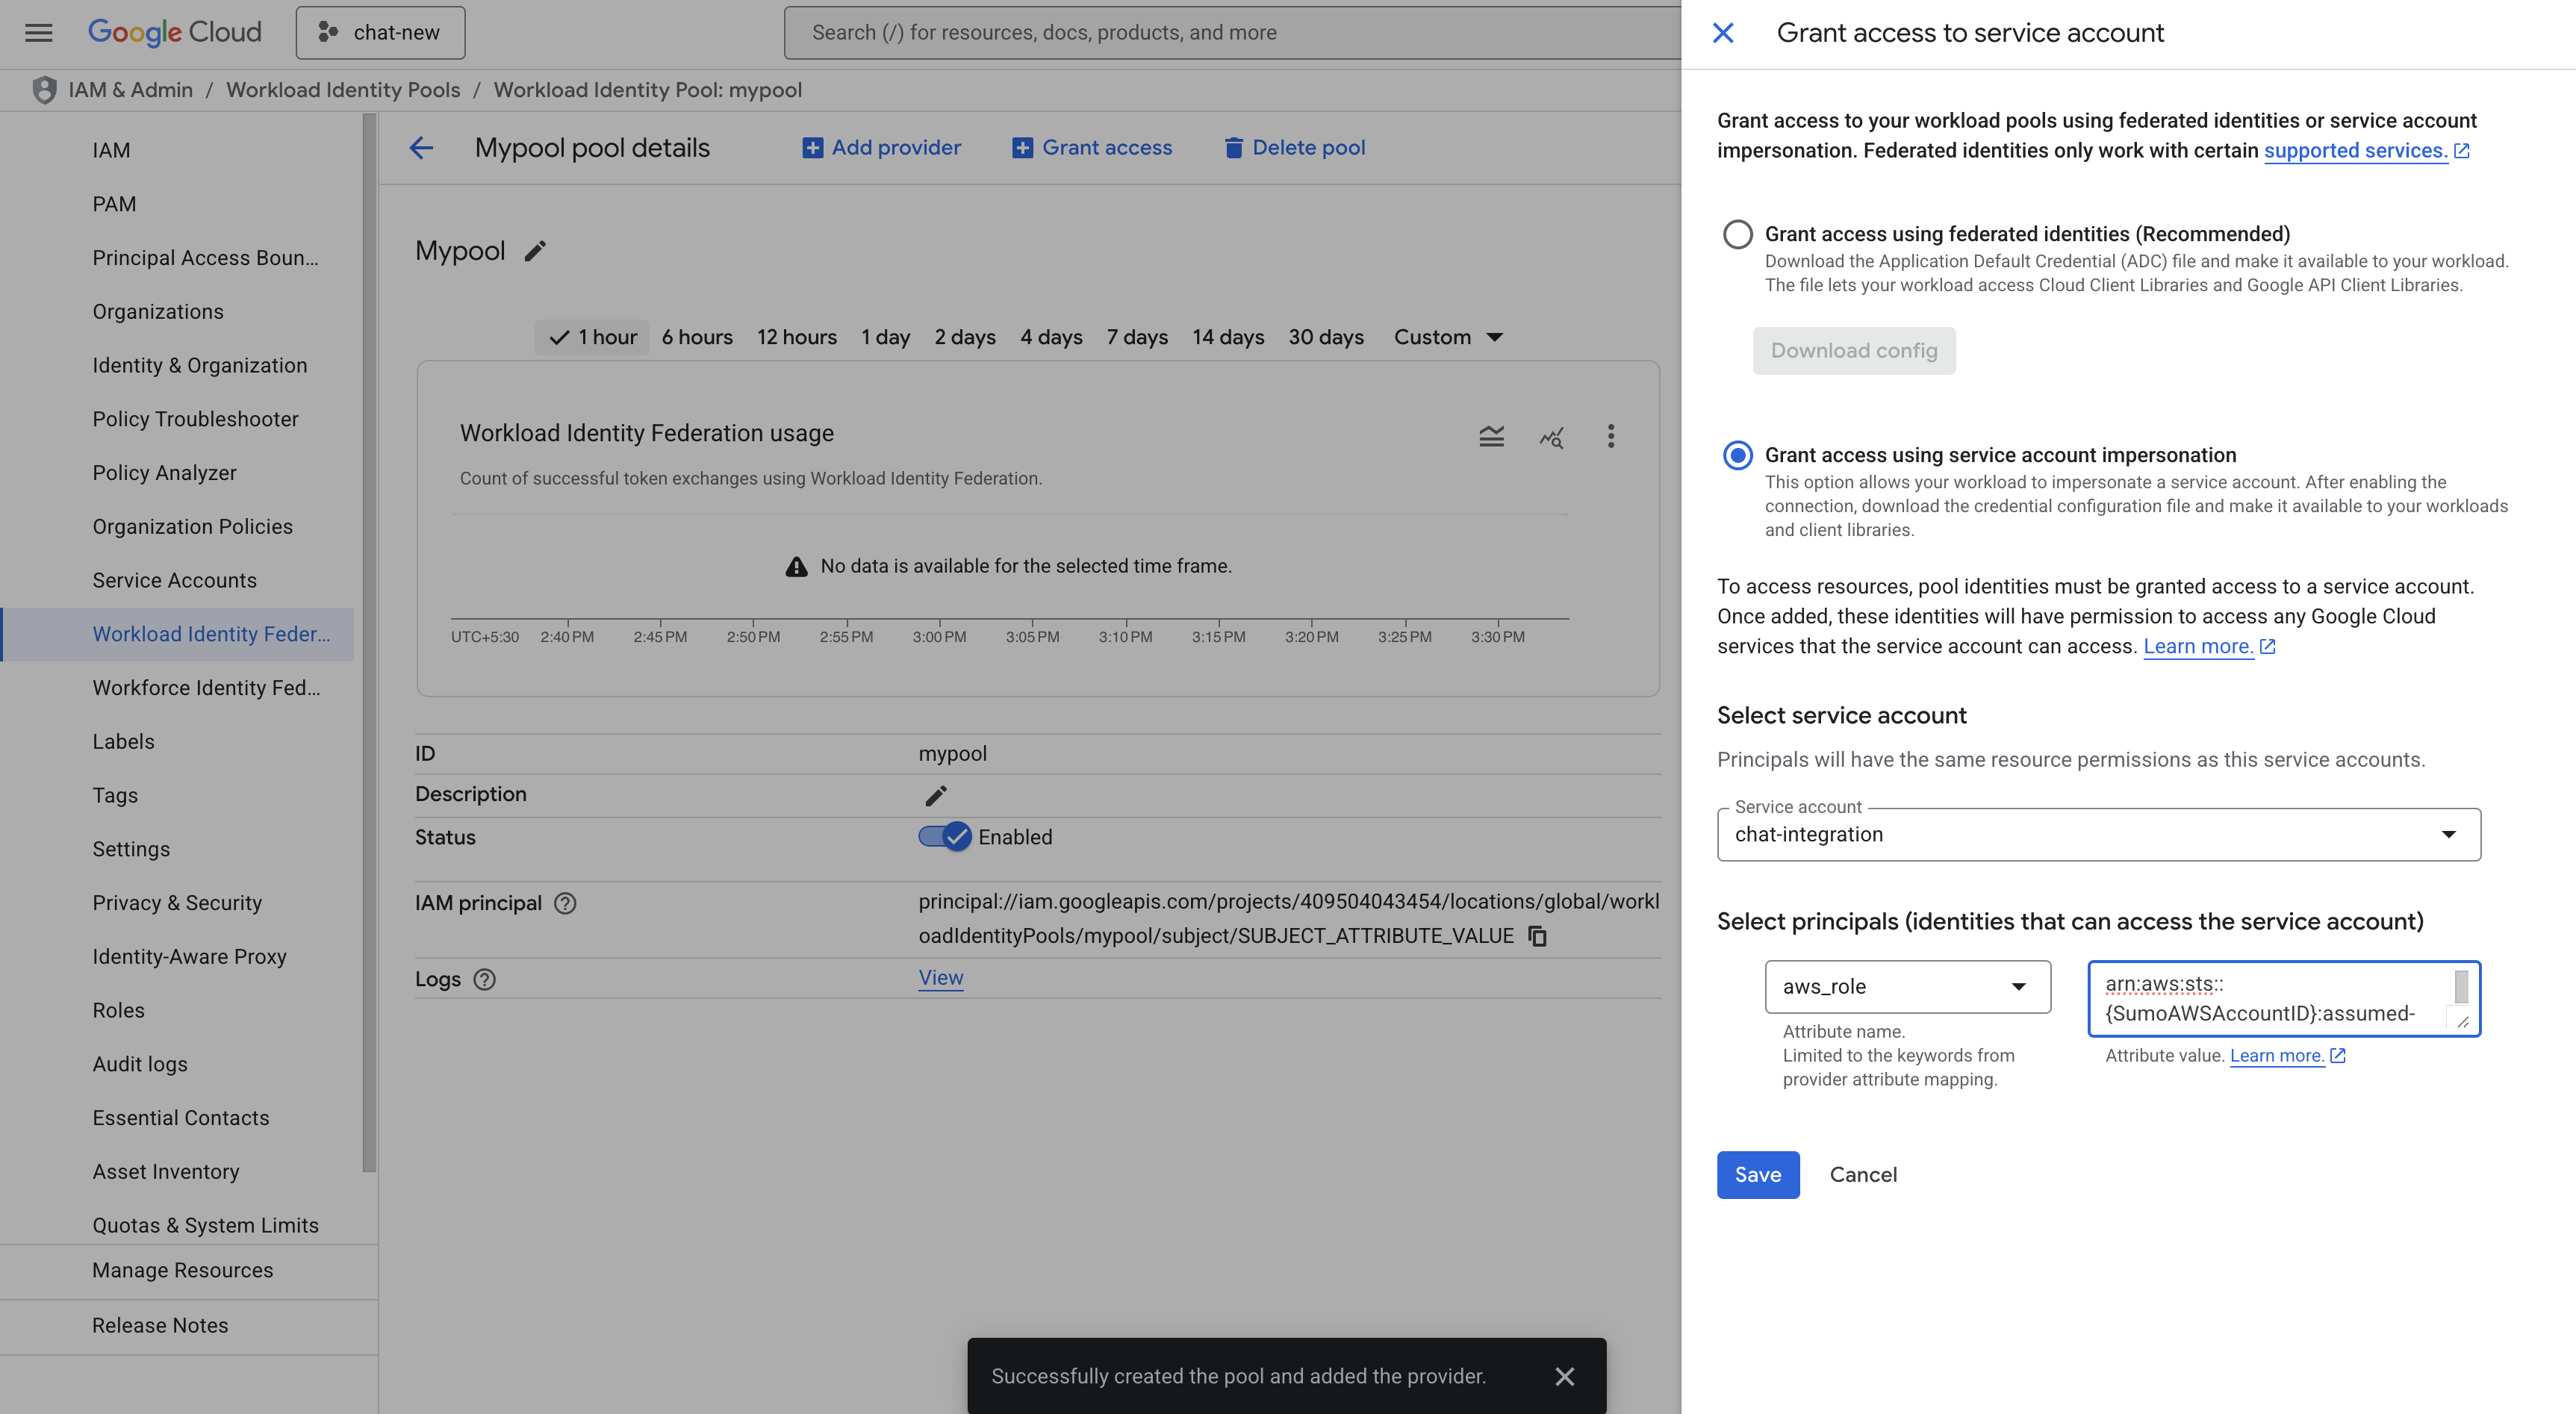
- Navigate to Grant Access > Grant access using service account impersonation. Select the service account created in step 6. Select the principal as
aws_roleand provide the ARN asarn:aws:sts::{SumoAWSAccountID}:assumed-role/{SumoAWSRole}/{SumoAWSLambdaFunction}. Click SAVE. - Download the WIF
conf.jsonfile. Ensure you save it in a safe place. Use the JSON content to configure the Google Cloud Composer integration to use WIF authentication in Automation Service and Cloud SOAR.
Service Account authentication
To create service account credentials in Google Workspace, needed to configure the Google Cloud Composer integration, follow these steps:
- Log in to the Google Cloud portal.
- Select a Google Cloud project (or create a new one).
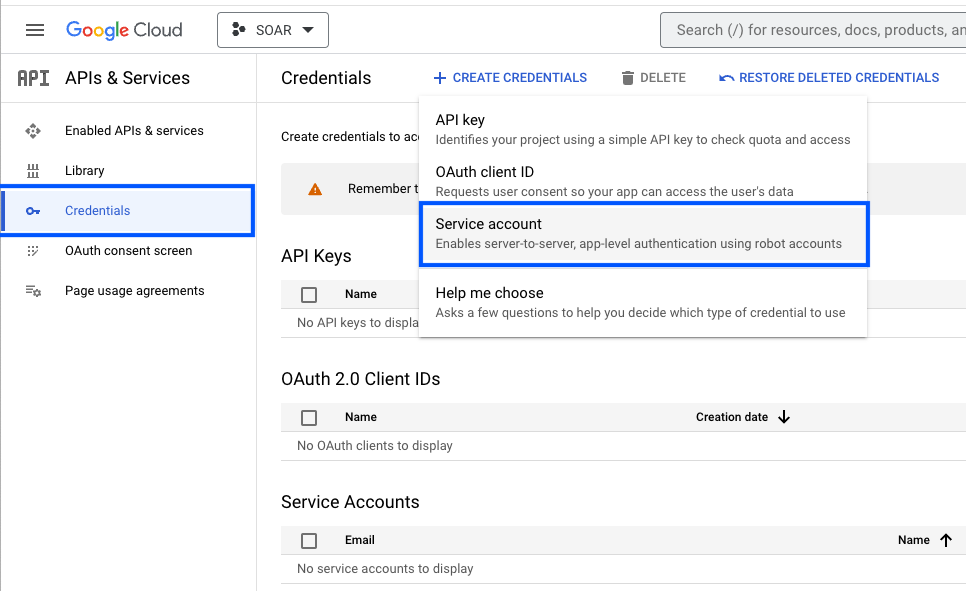
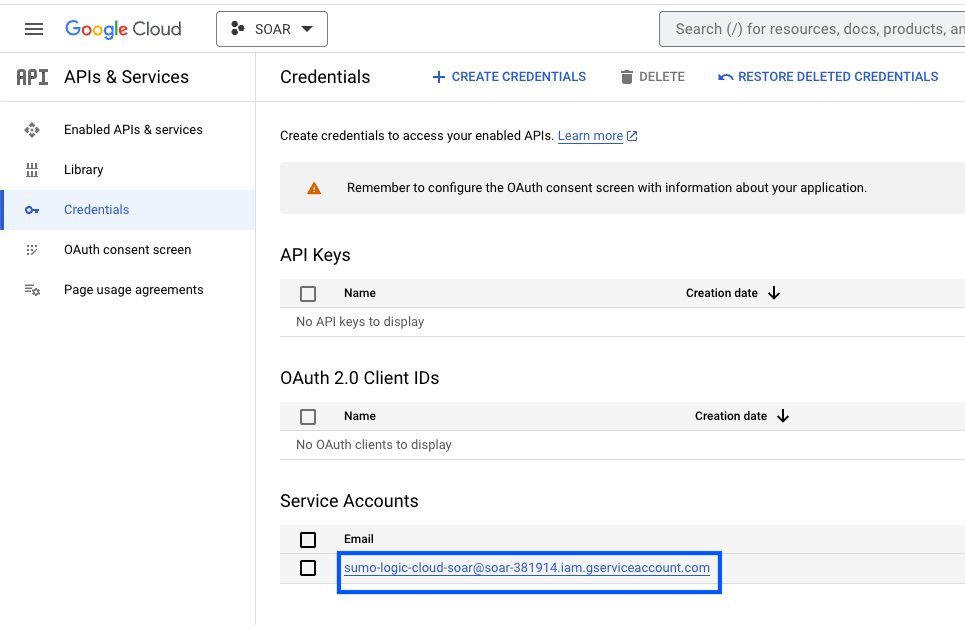
- Navigate to API & Services > Credentials.
- On the same page, click ENABLED API AND SERVICES and search for Cloud Composer API, Cloud Resource Manager API, IAM Service Account Credentials API, Identity and Access Management (IAM) API, Security Token Service API, and enable them.
- Click CREATE CREDENTIALS and select Service Account.
- Enter a service account name to display in the Google Cloud console. The Google Cloud console generates a service account ID based on this name.
- (Optional) Enter a description of the service account.
- Skip two optional grant permissions steps and click Done to complete the service account creation.
- Click the generated service account to open the details.
- Under the KEYS tab, click ADD KEY and select Create new key.

- Click CREATE (make sure JSON is selected).
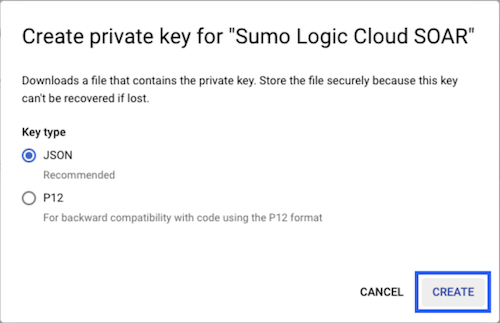
- The JSON file is downloaded. Ensure you save it in a safe place.
Configure Google Cloud Composer in Automation Service and Cloud SOAR
Before you can use this automation integration, you must configure its authentication settings so that the product you're integrating with can communicate with Sumo Logic. For general guidance, see Configure Authentication for Automation Integrations.
How to open the integration's configuration dialog
- Access App Central and install the integration. (You can configure at installation, or after installation with the following steps.)
- Go to the Integrations page.
Classic UI. In the main Sumo Logic menu, select Automation and then select Integrations in the left nav bar.
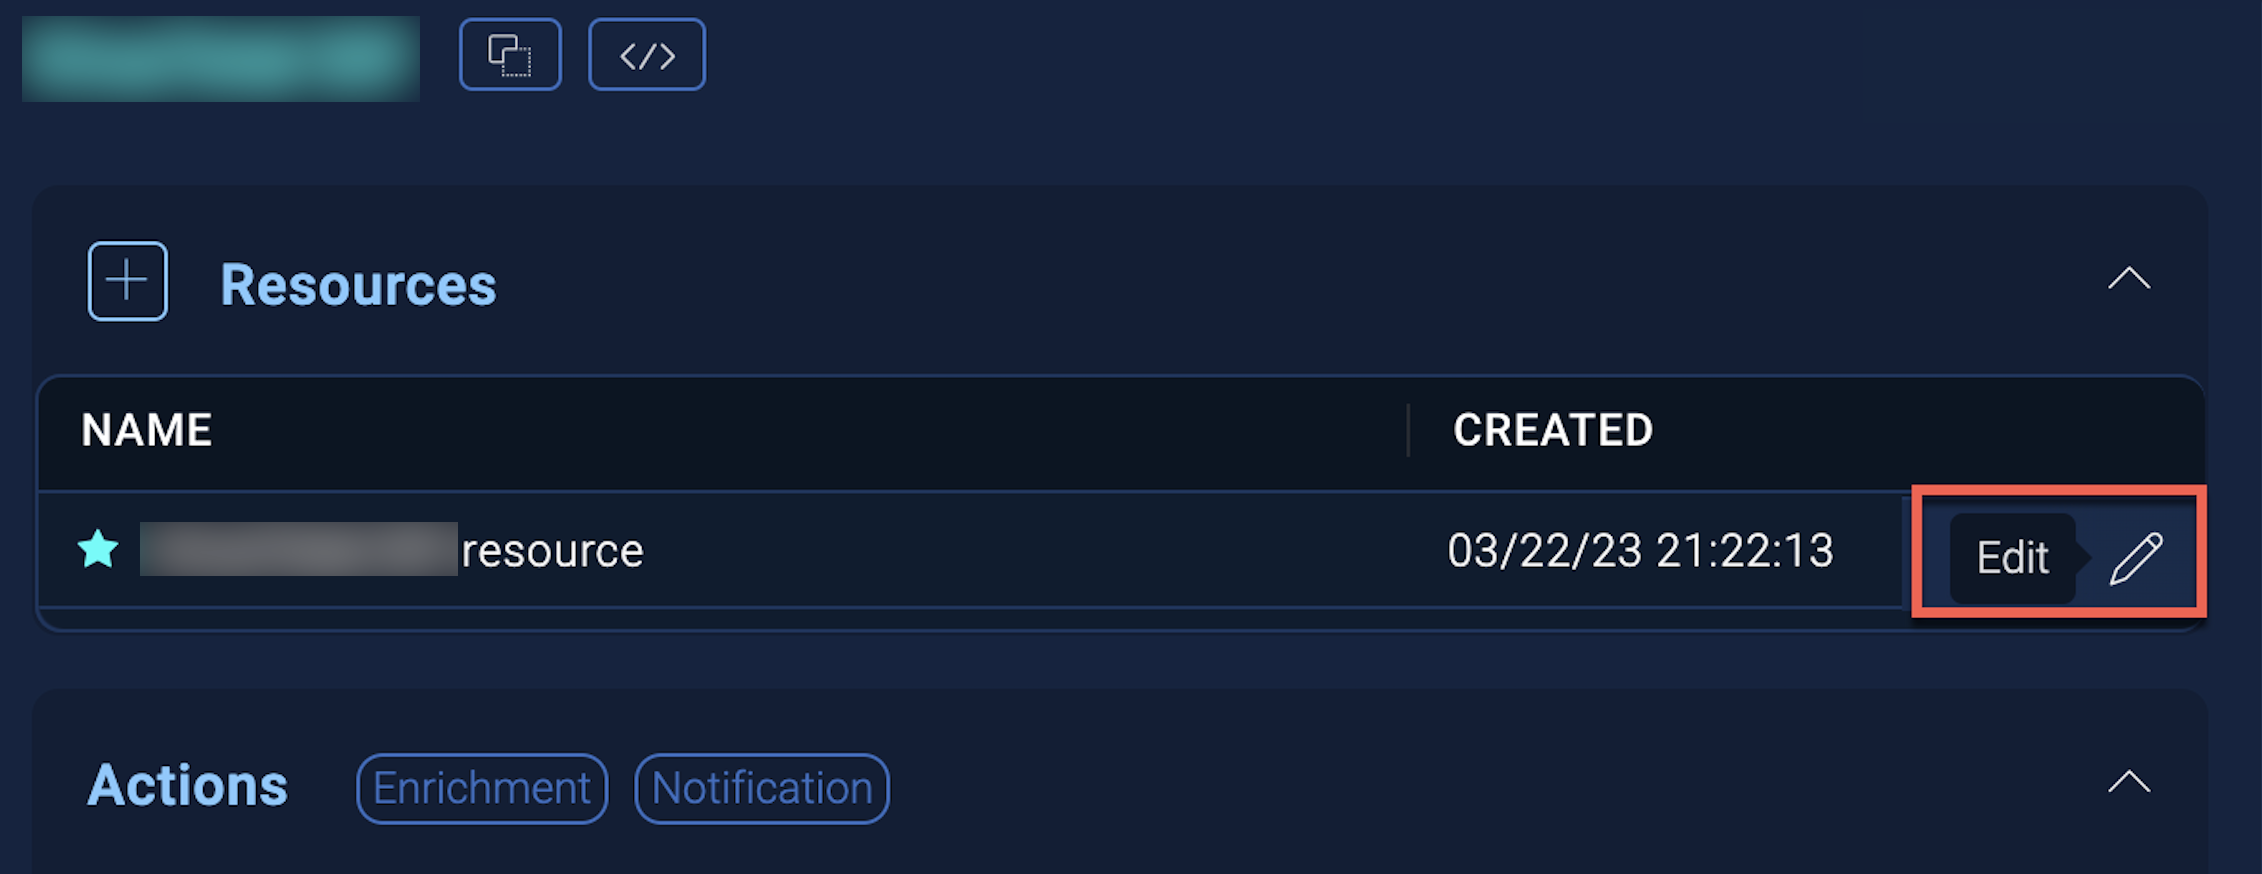
New UI. In the main Sumo Logic menu, select Automation > Integrations. You can also click the Go To... menu at the top of the screen and select Integrations. - Select the installed integration.
- Hover over the resource name and click the Edit button that appears.
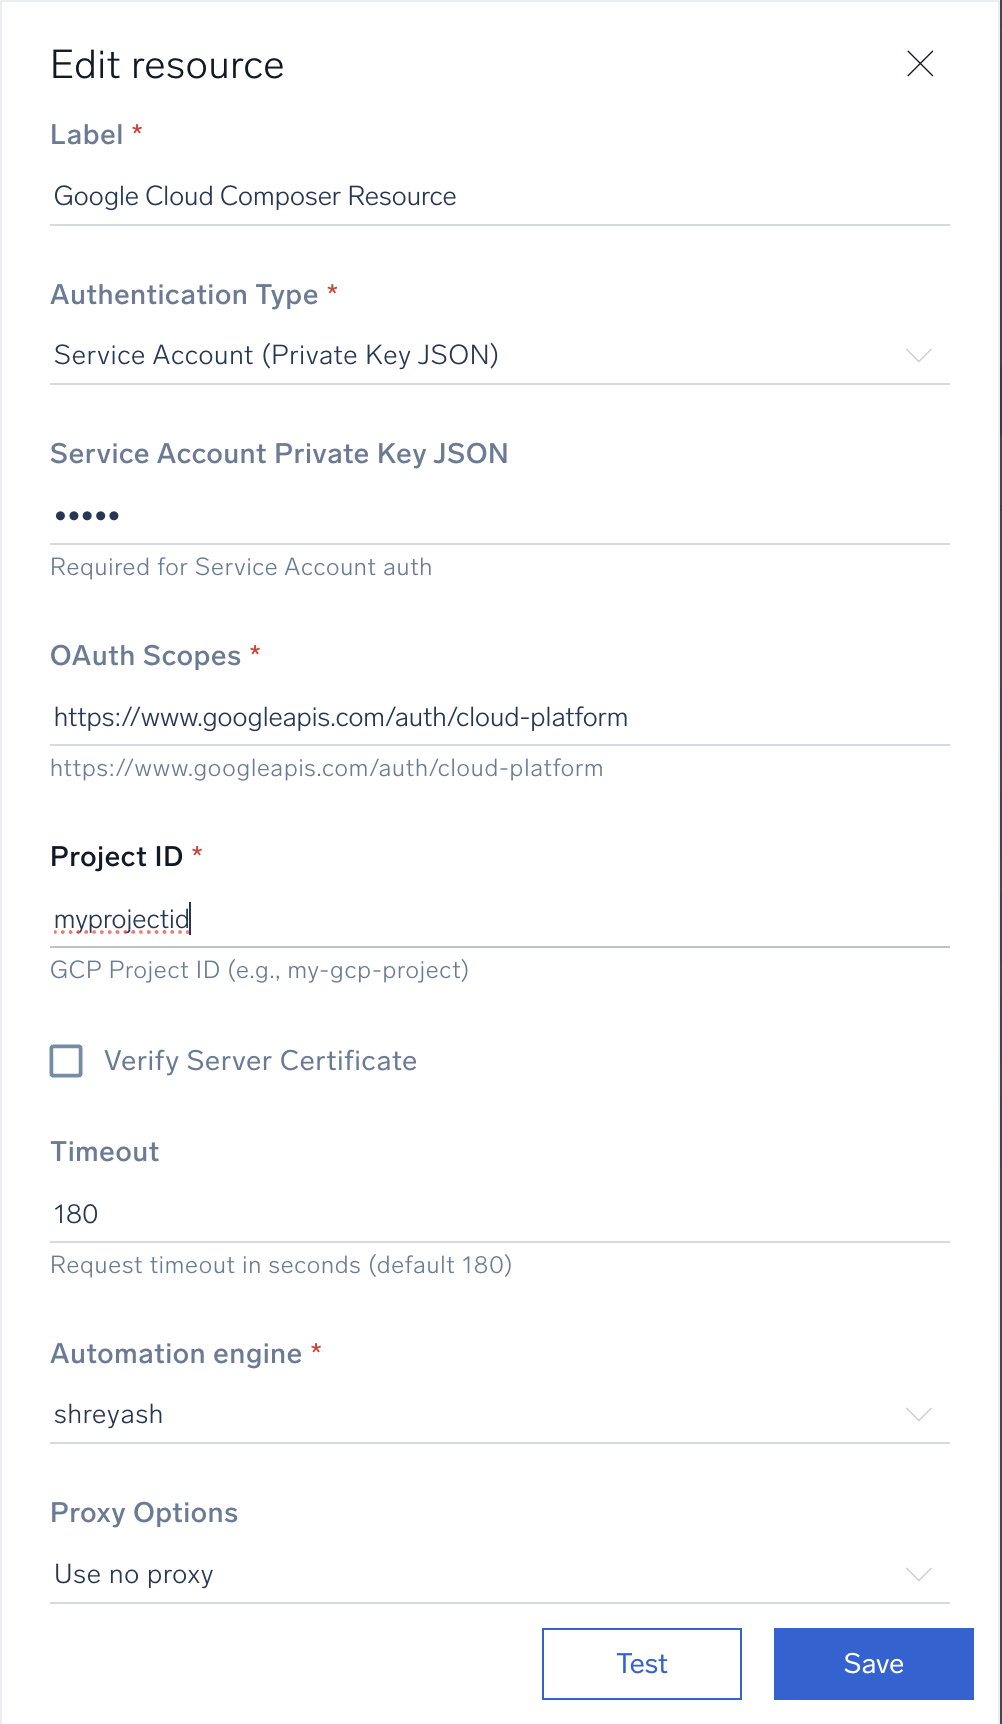
In the configuration dialog, enter information from the product you're integrating with. When done, click TEST to test the configuration, and click SAVE to save the configuration:
-
Label. Enter the name you want to use for the resource.
- Authentication Type. Select the authentication type: Service Account Private Key Json or Workload Identity Federation Private Key Json and provide the selected type JSON content.
- Scopes. Default scope is
https://www.googleapis.com/auth/cloud-platform. If not already present, add this scope. - Project ID. Provide the Google Cloud Project ID where the Composer environments are located.
-
Automation Engine. Select Cloud execution for this certified integration. Select a bridge option only for a custom integration. See Cloud or Bridge execution.
-
Proxy Options. Select whether to use a proxy. (Applies only if the automation engine uses a bridge instead of cloud execution.)
- Use no proxy. Communication runs on the bridge and does not use a proxy.
- Use default proxy. Use the default proxy for the bridge set up as described in Using a proxy.
- Use different proxy. Use your own proxy service. Provide the proxy URL and port number.
For more information on Google Cloud Composer, see Google Cloud Composer documentation.
Change Log
- June 16, 2026 (v1.2) - First upload