 Meet the new
 Microsoft Azure Security Center

Version: 1.3
Updated: April 30, 2026
Work with Alerts, Policies, Tasks, and other resources with Microsoft Azure Security Center.
Actions
- Get Security Alert (Enrichment) - Get information from a security alert.
- List Security Alerts (Enrichment) - Get a list of security alerts.
- List Security Policies (Enrichment) - Get a list of security policies.
- Get Security Policy (Enrichment) - Get information regarding a security policy.
- List Security Statuses (Enrichment) - Get a list of current security statuses.
- Get Security Task (Enrichment) - Get information regarding a security task.
- List Security Tasks (Enrichment) - Get a list of security tasks.
- List Locations (Enrichment) - List all locations.
- List Resource Groups (Enrichment) - List all resource group information.
- Update Alert Status (Containment) - Update the status of a security alert.
- Update Security Policy (Containment) - Update security policy information.
- Update Task Status (Containment) - Update the status of a security task.
Microsoft Azure Security Center configuration
The following steps show how to create a Microsoft Azure Security Center Application to work with Sumo Logic automation.
- Log in to the Azure portal with the user who has administrator privileges.
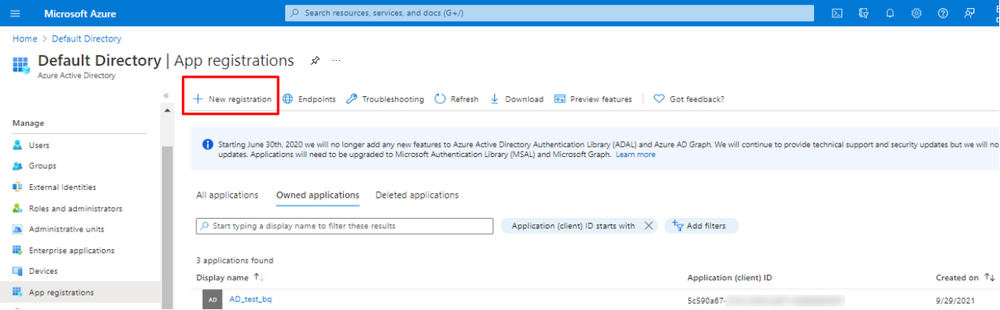
- From Azure Services click App registrations > New registration.
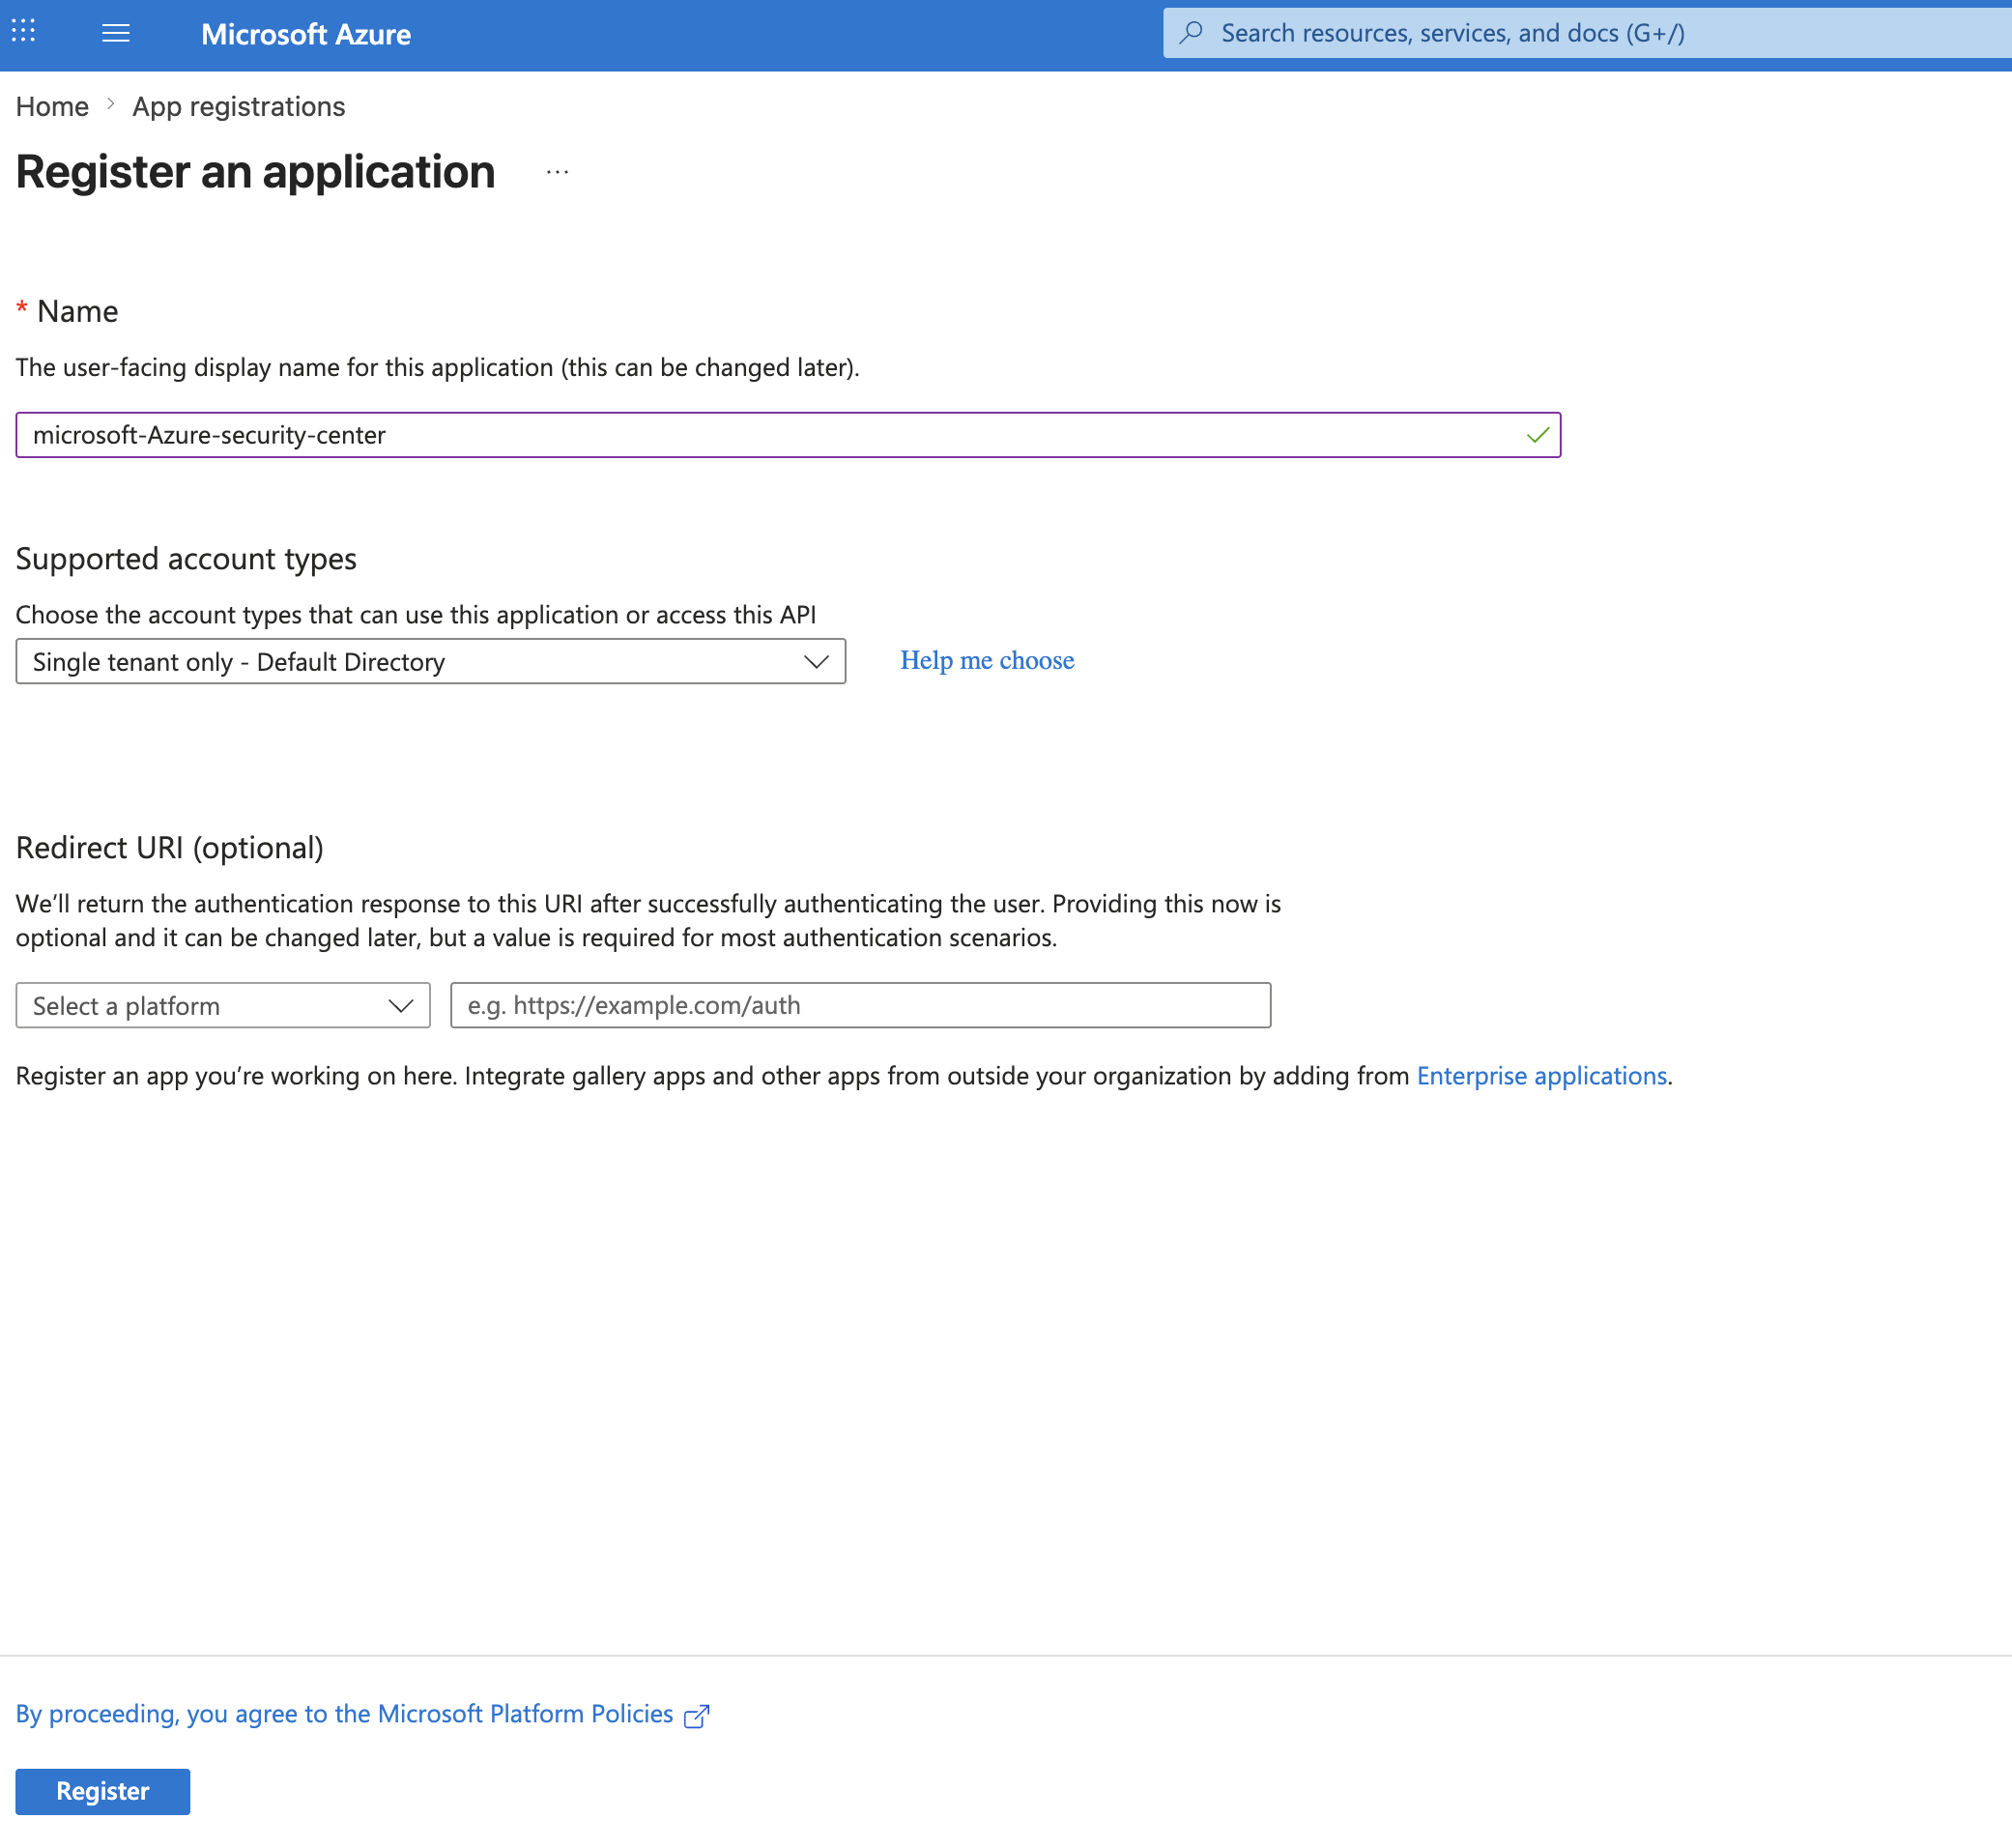
- In the registration form, choose a name for your application and then click Register.
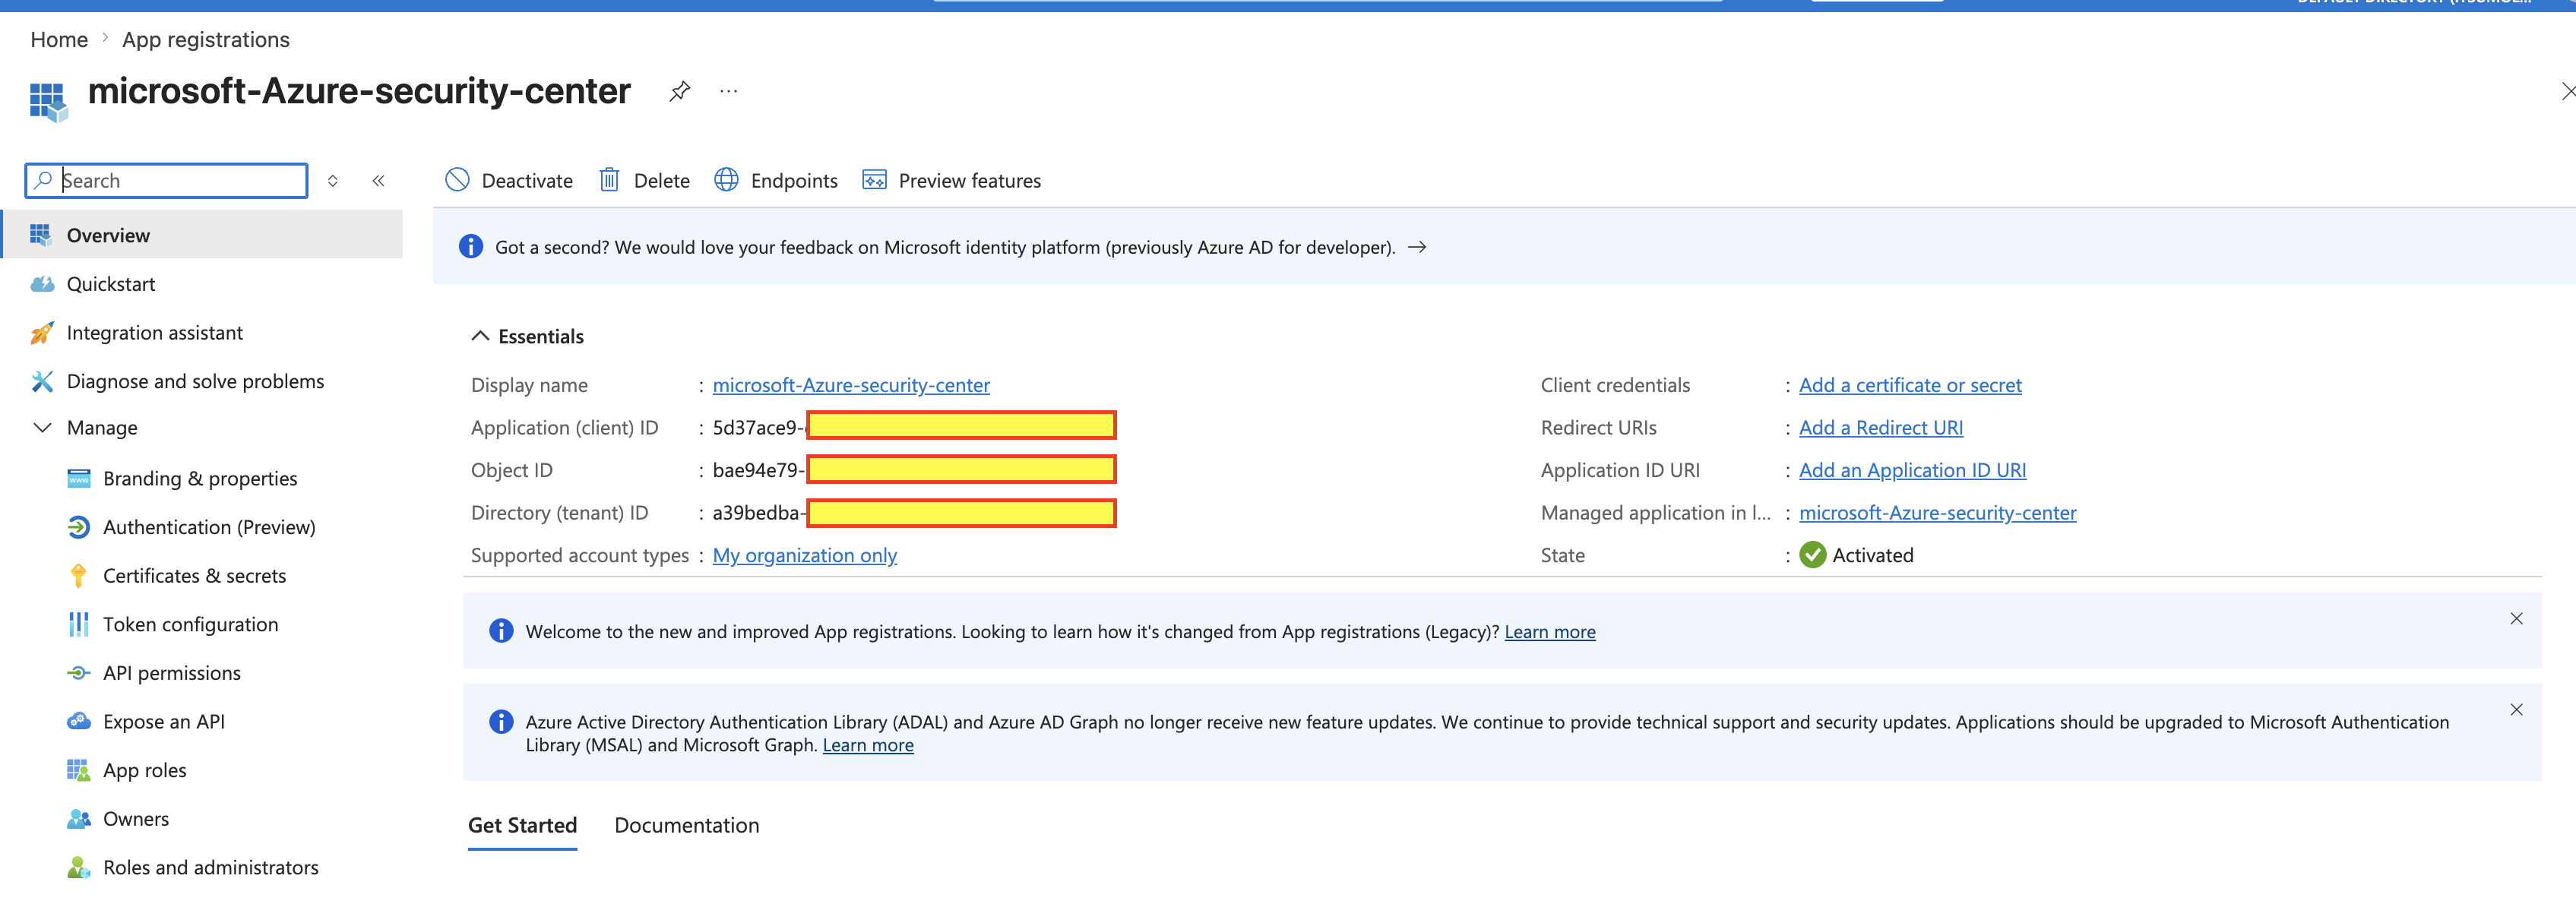
- Write down the Application ID and Directory ID and secure them. You will need them later for the integration configuration.
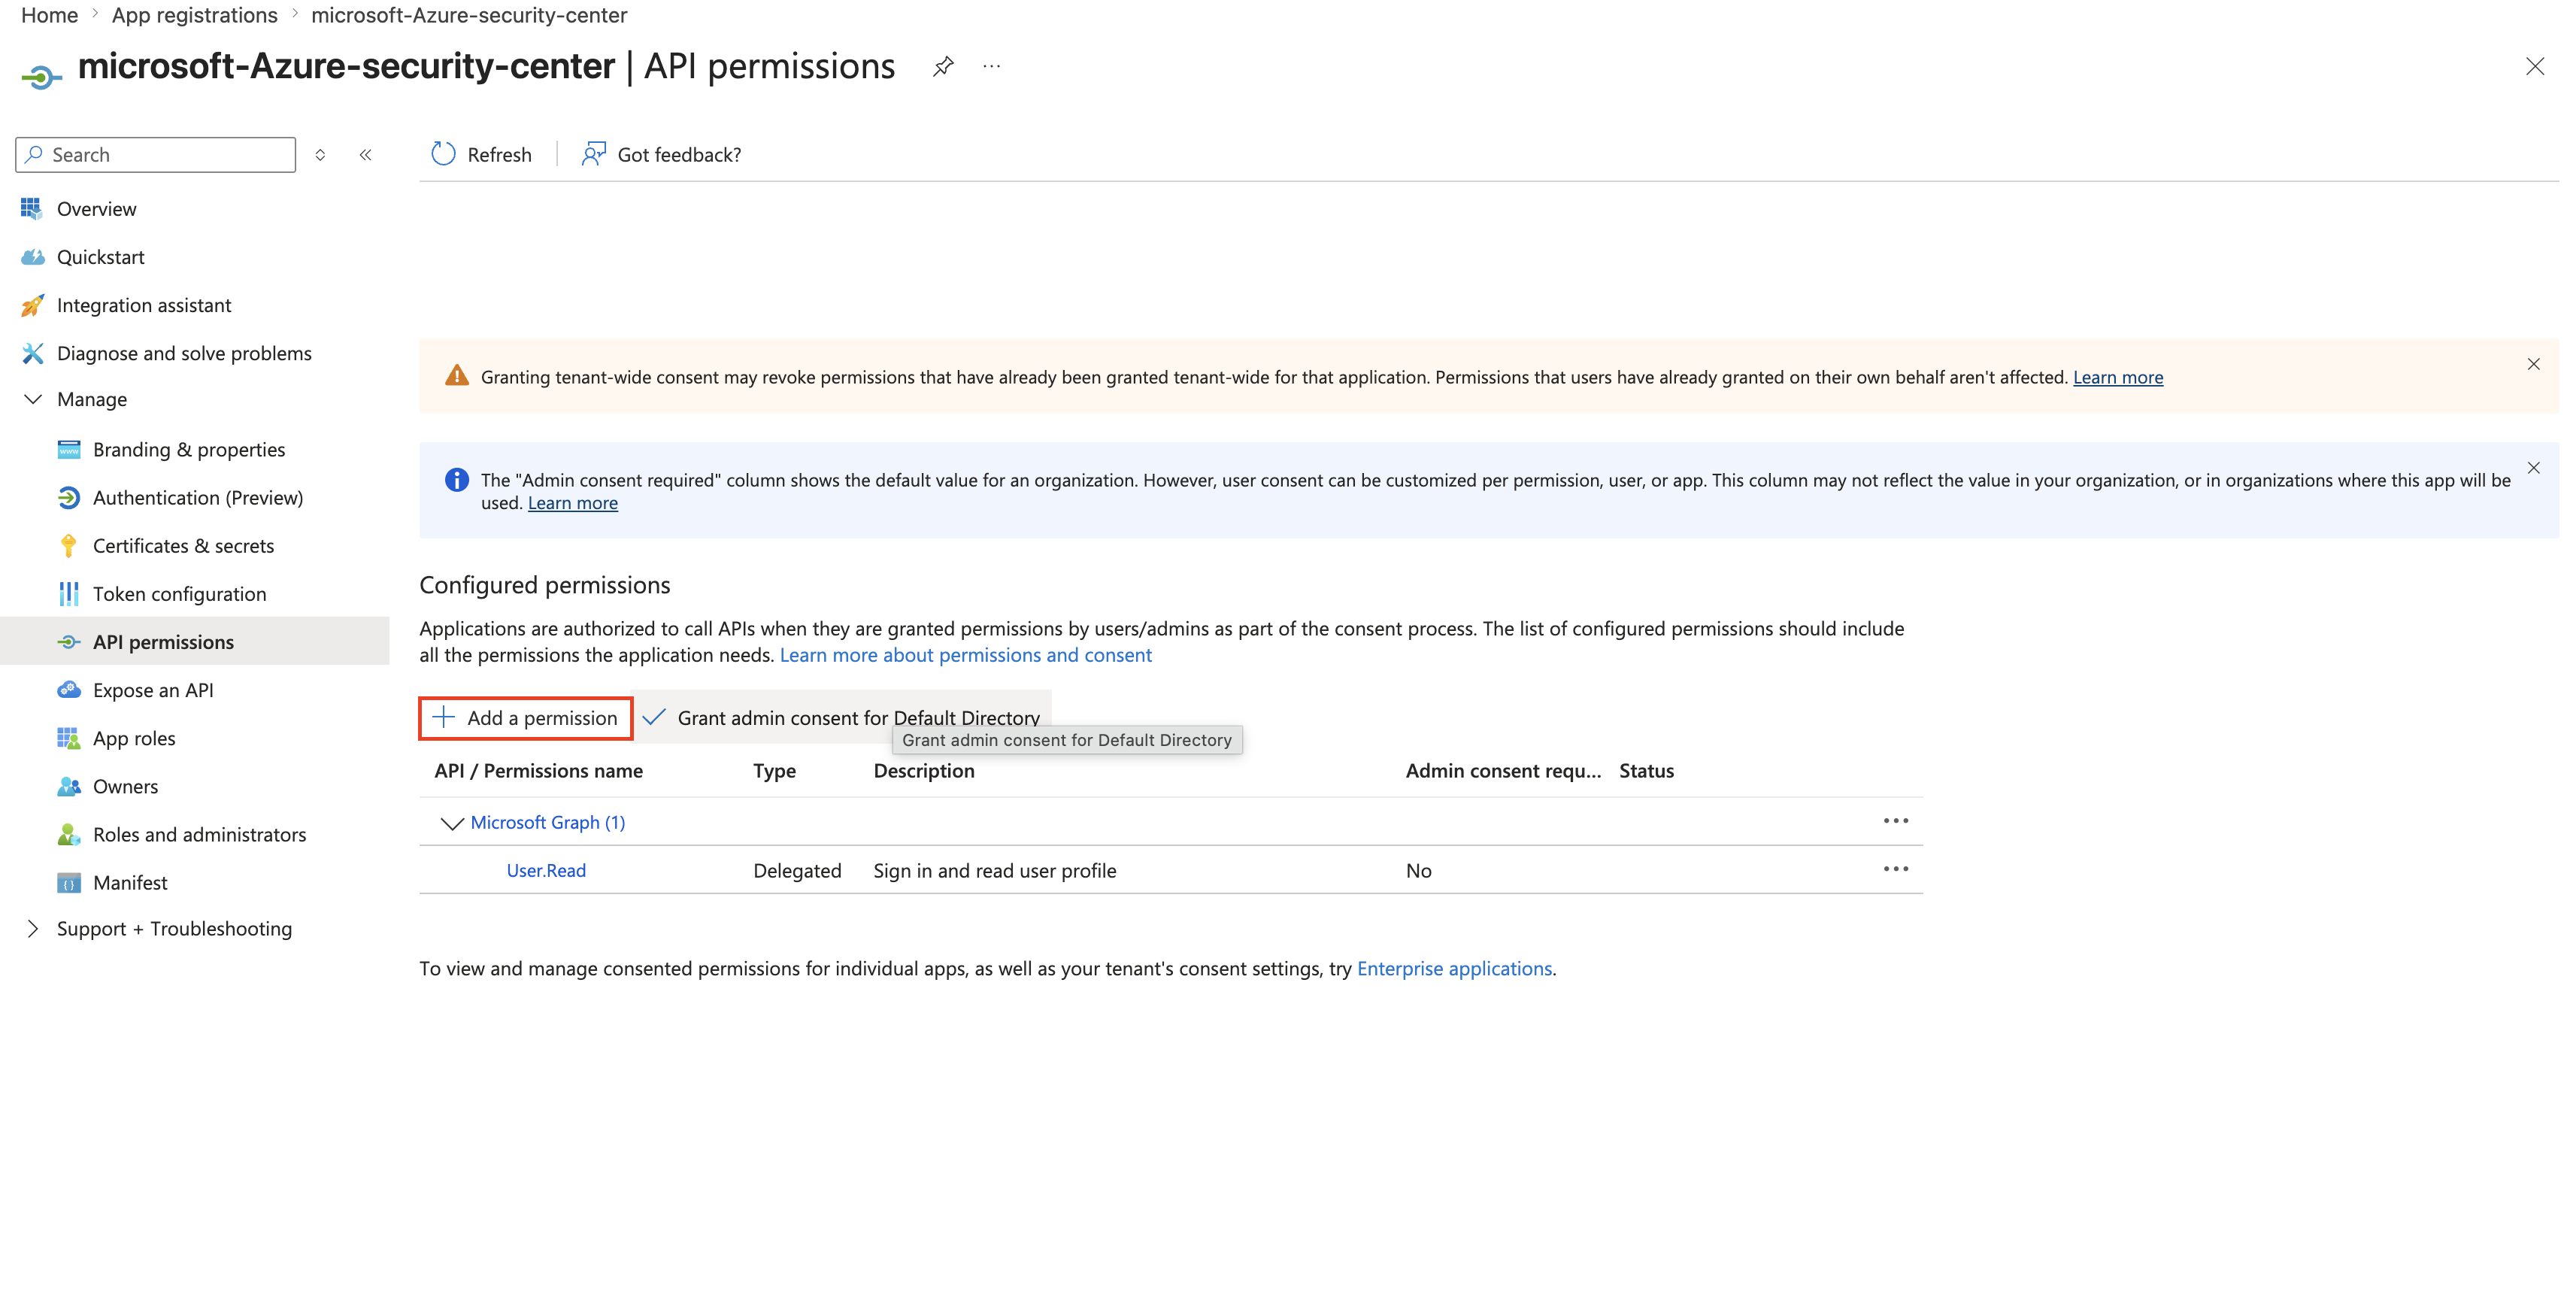
- To configure Microsoft Azure Security Center Application permissions, on the left, choose API permissions.
- Click the Add a permission button.
- Select your application in App registrations in the Azure portal.
- Click on APIs my organization uses and search for Windows Azure Service Management API.
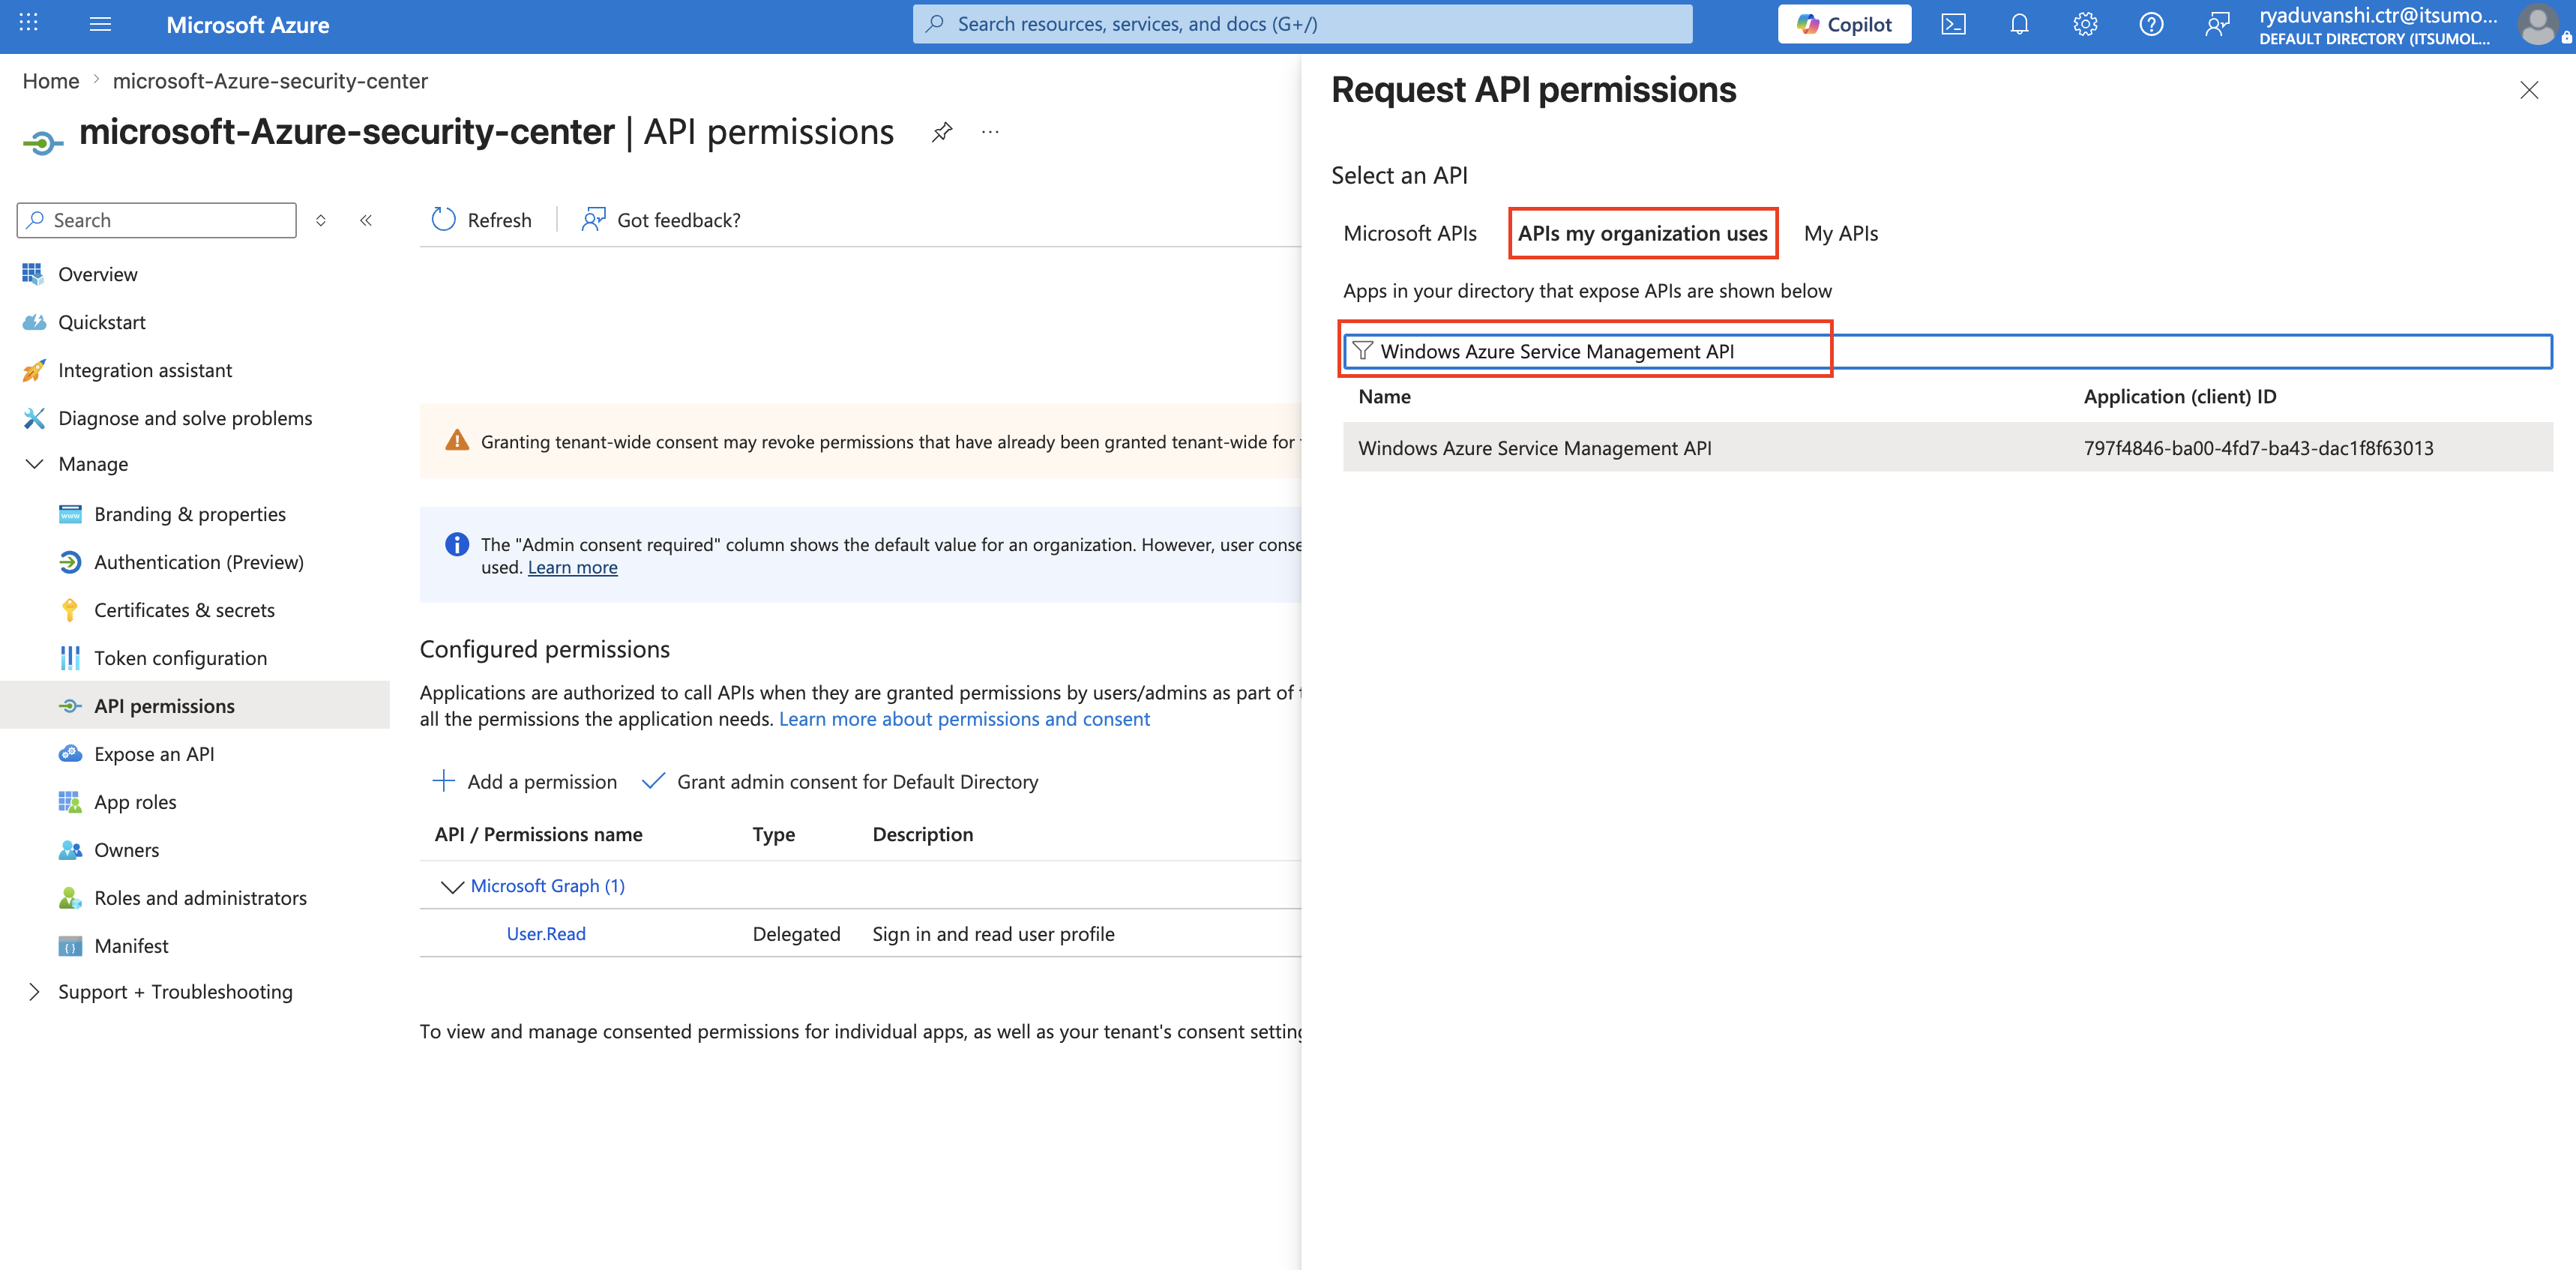
- Select Windows Azure Service Management API.
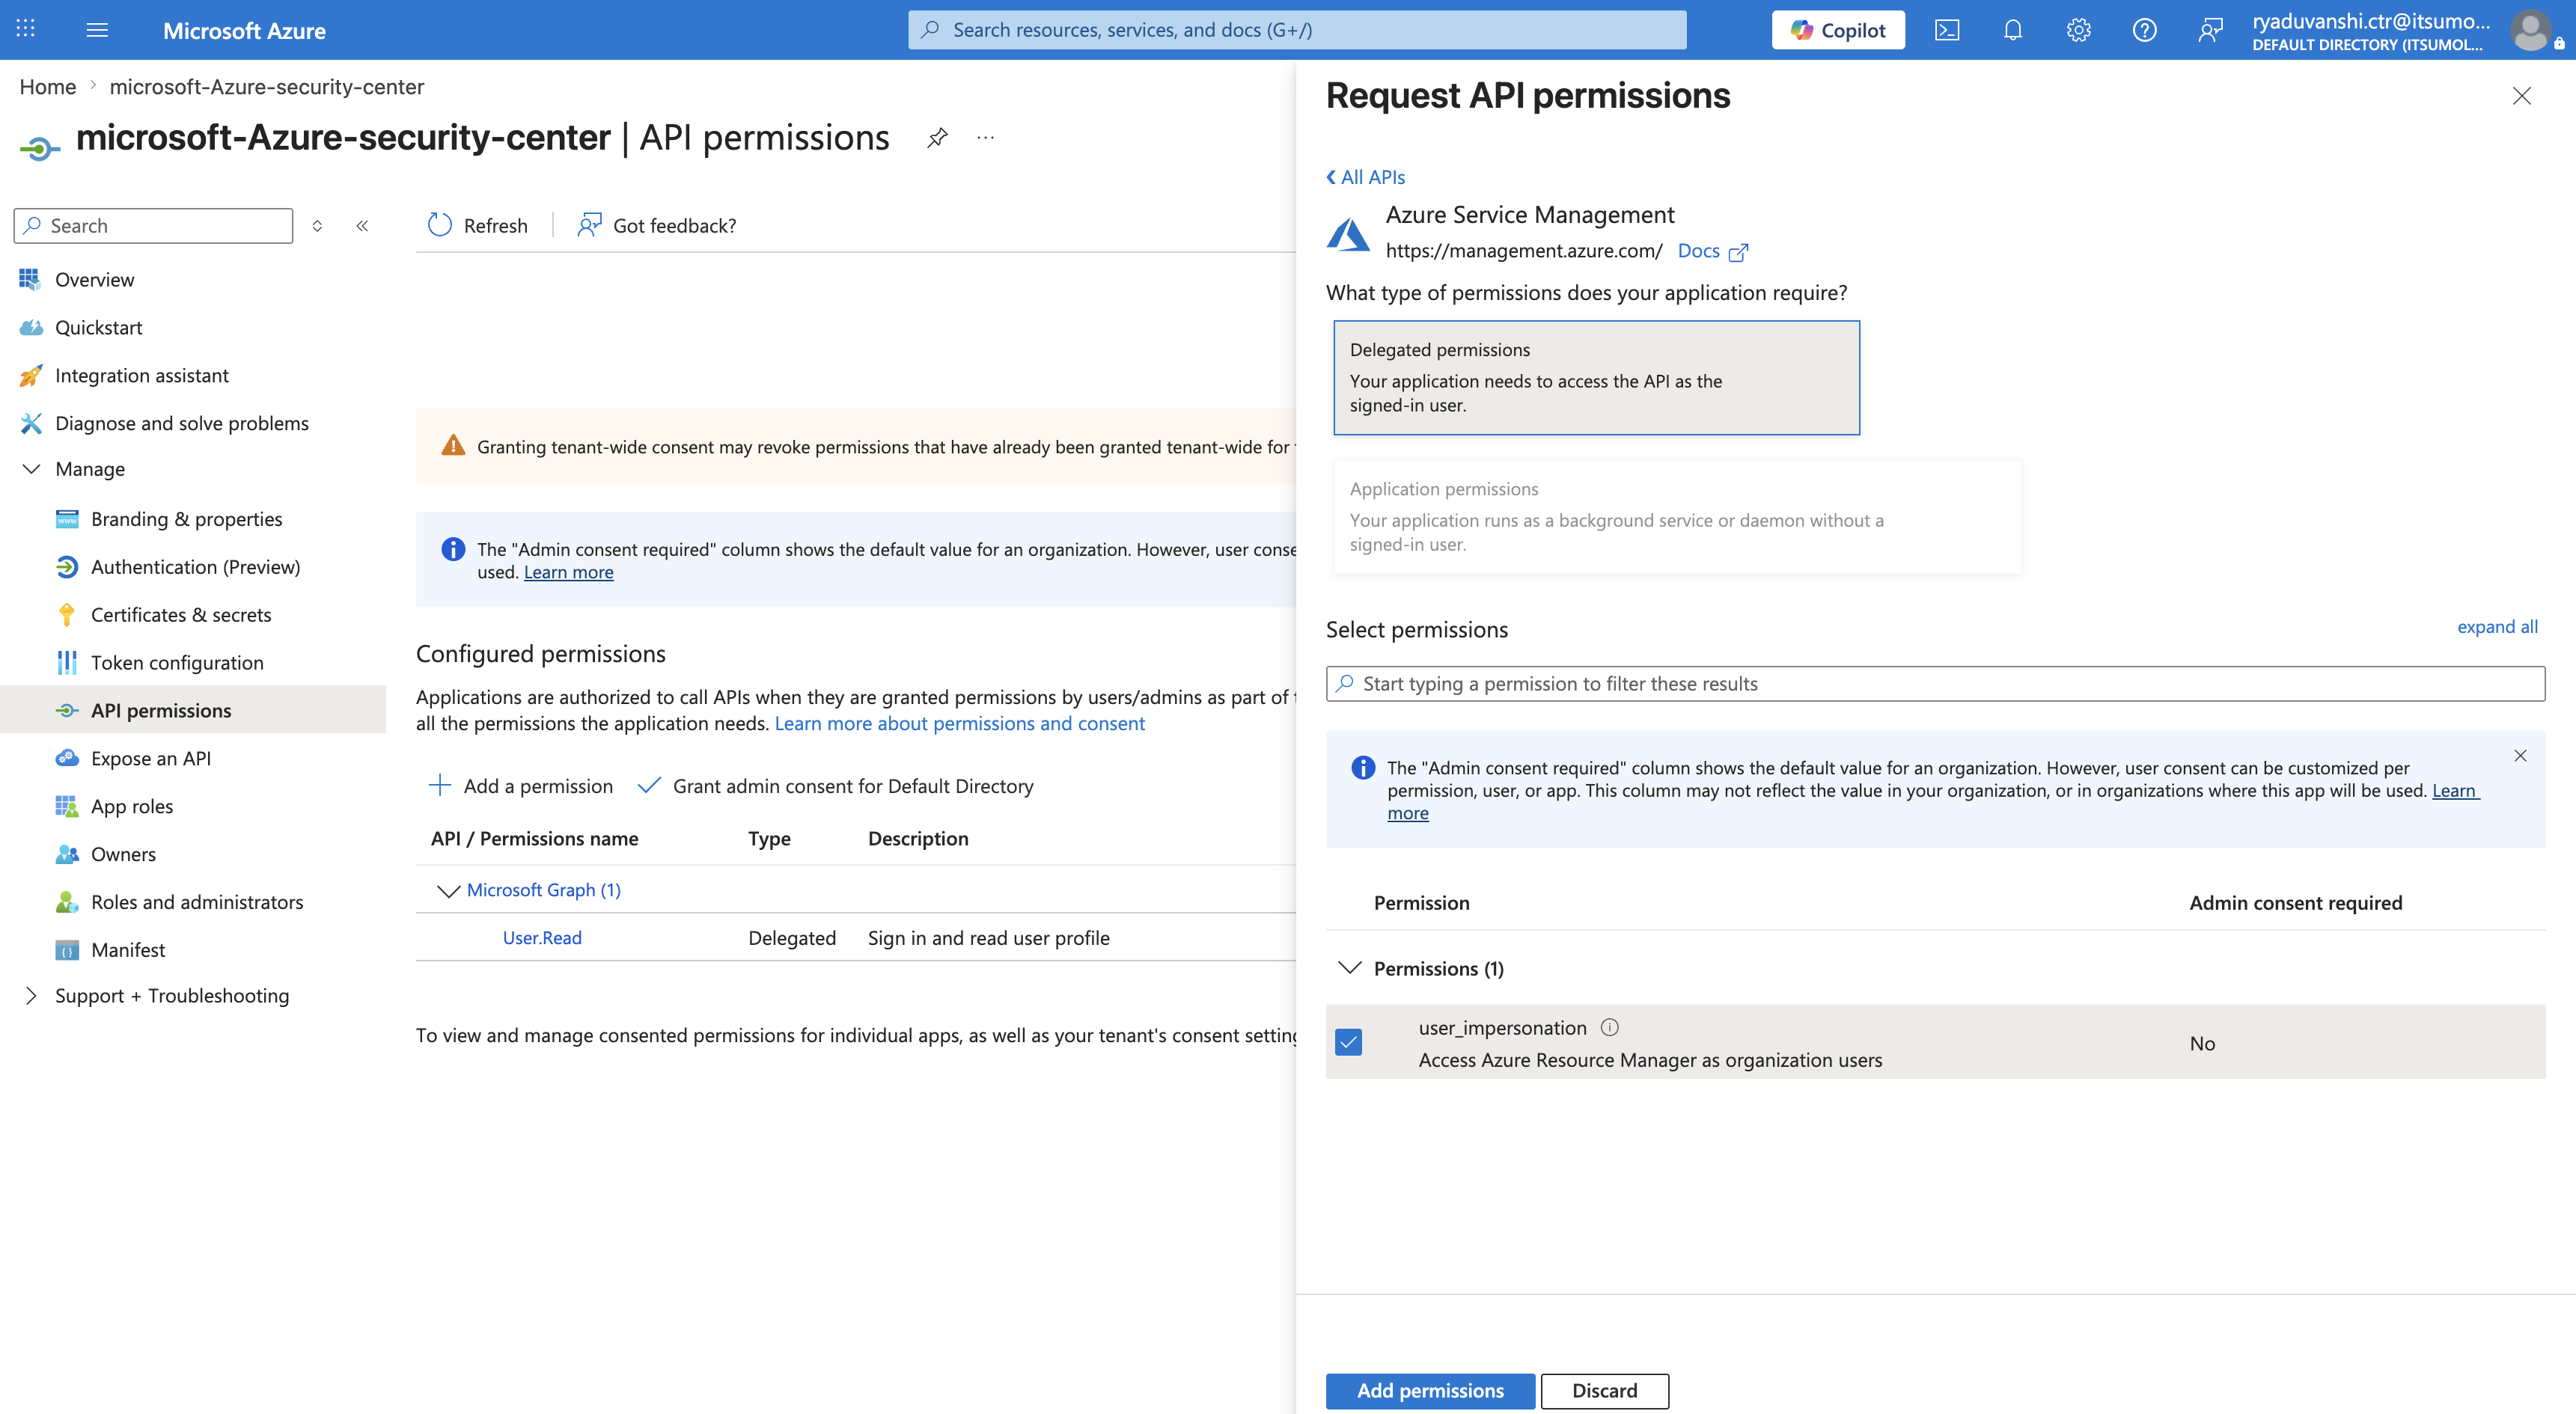
- Delegated.
user_impersonation. - Client Credentials. All required permissions are managed through Azure RBAC role assignments on the subscription or resource group. Learn more about RBAC scope.

- Click on APIs my organization uses and search for Windows Azure Service Management API.
- Add the Client secret for authentication, along with the Client ID and Directory ID. To add a client secret, go to Certificates and secrets, and click New client secret.
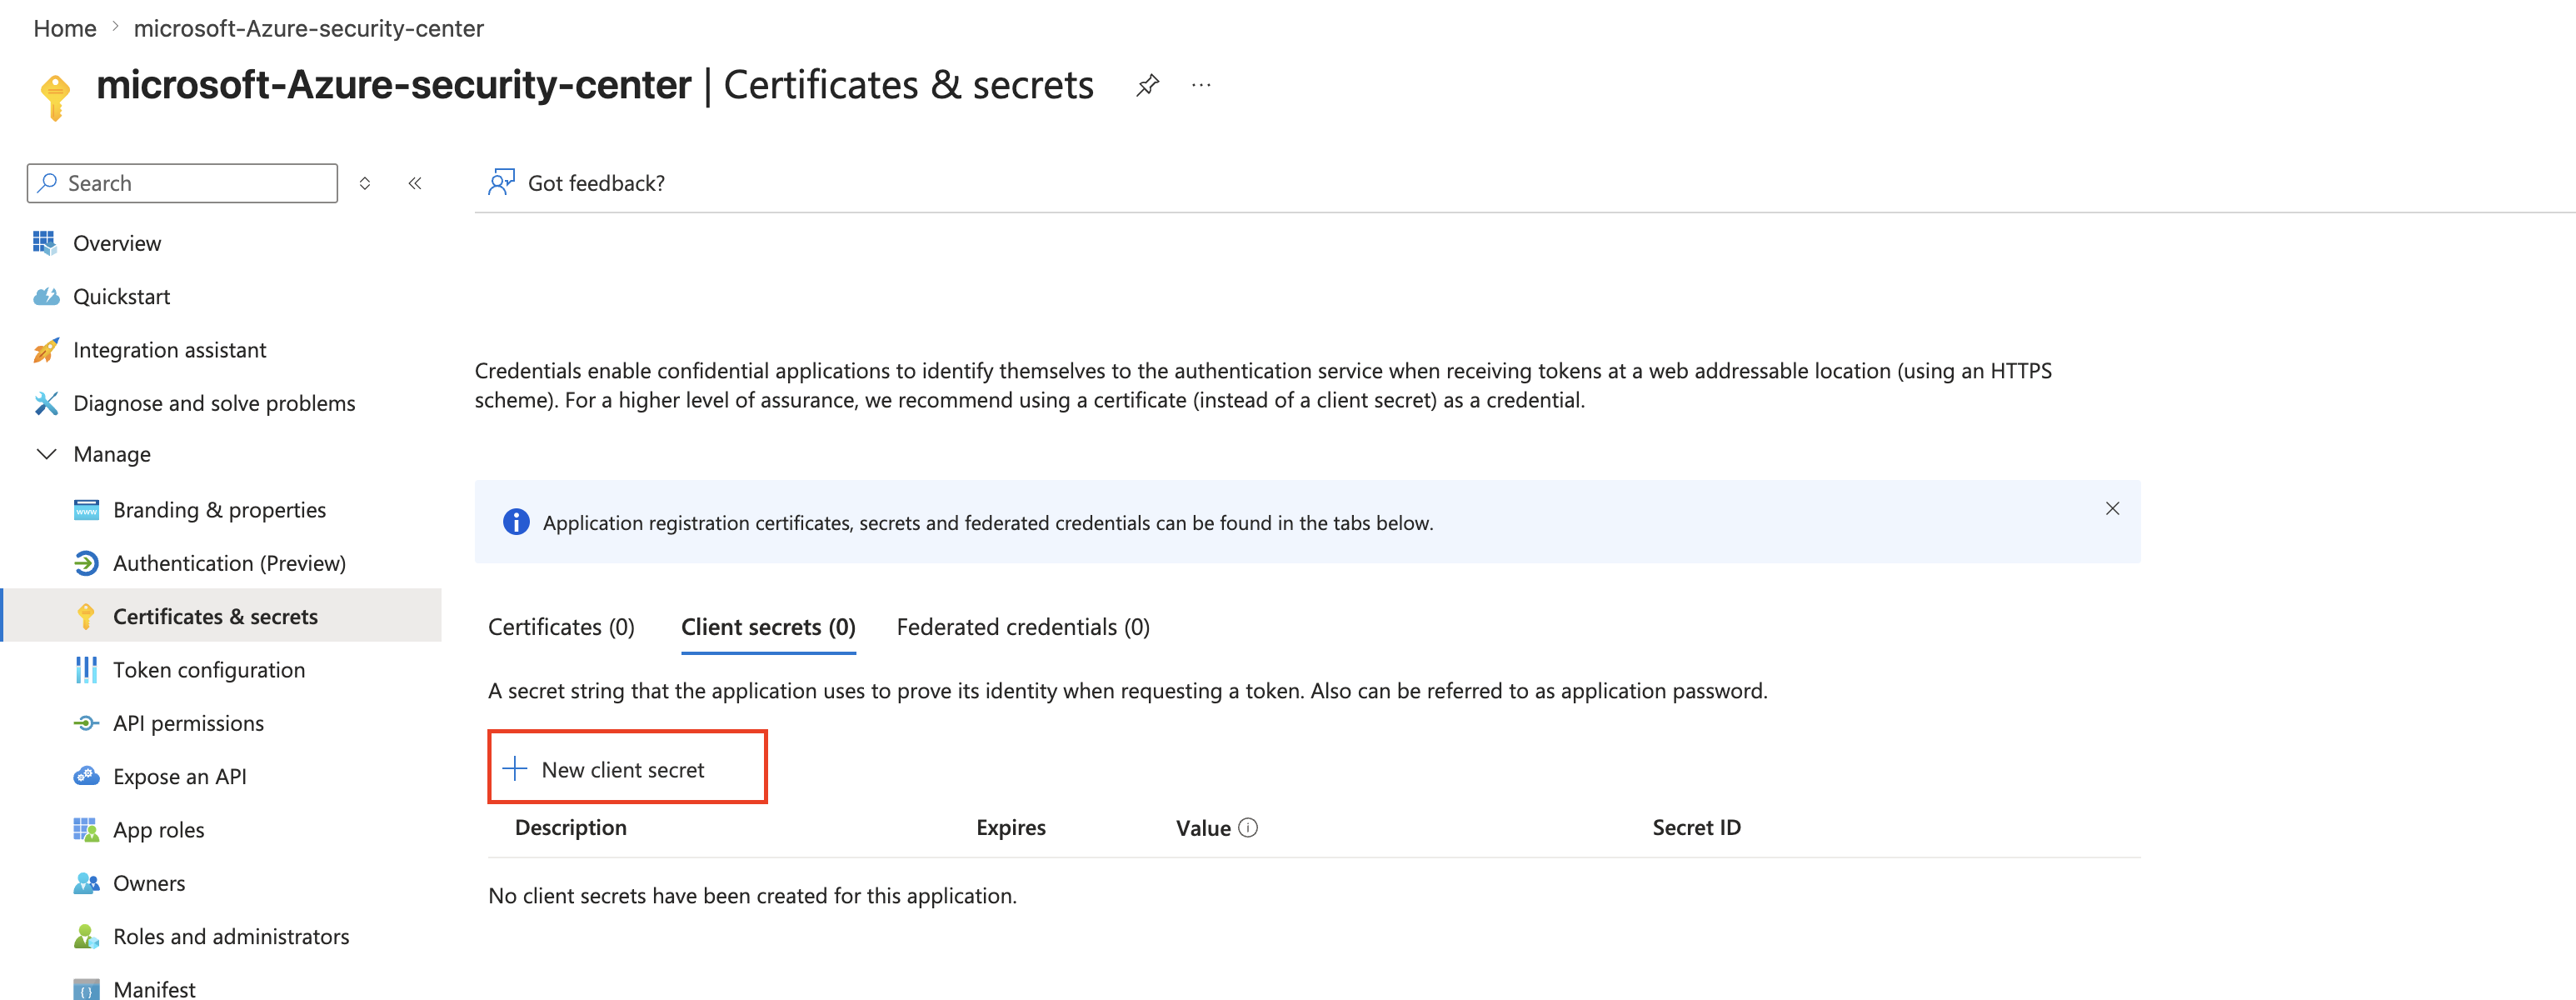
- Select the description and expiry period for the created secret and create it.
- Once it's created, ensure to save its value, since it's only displayed once.
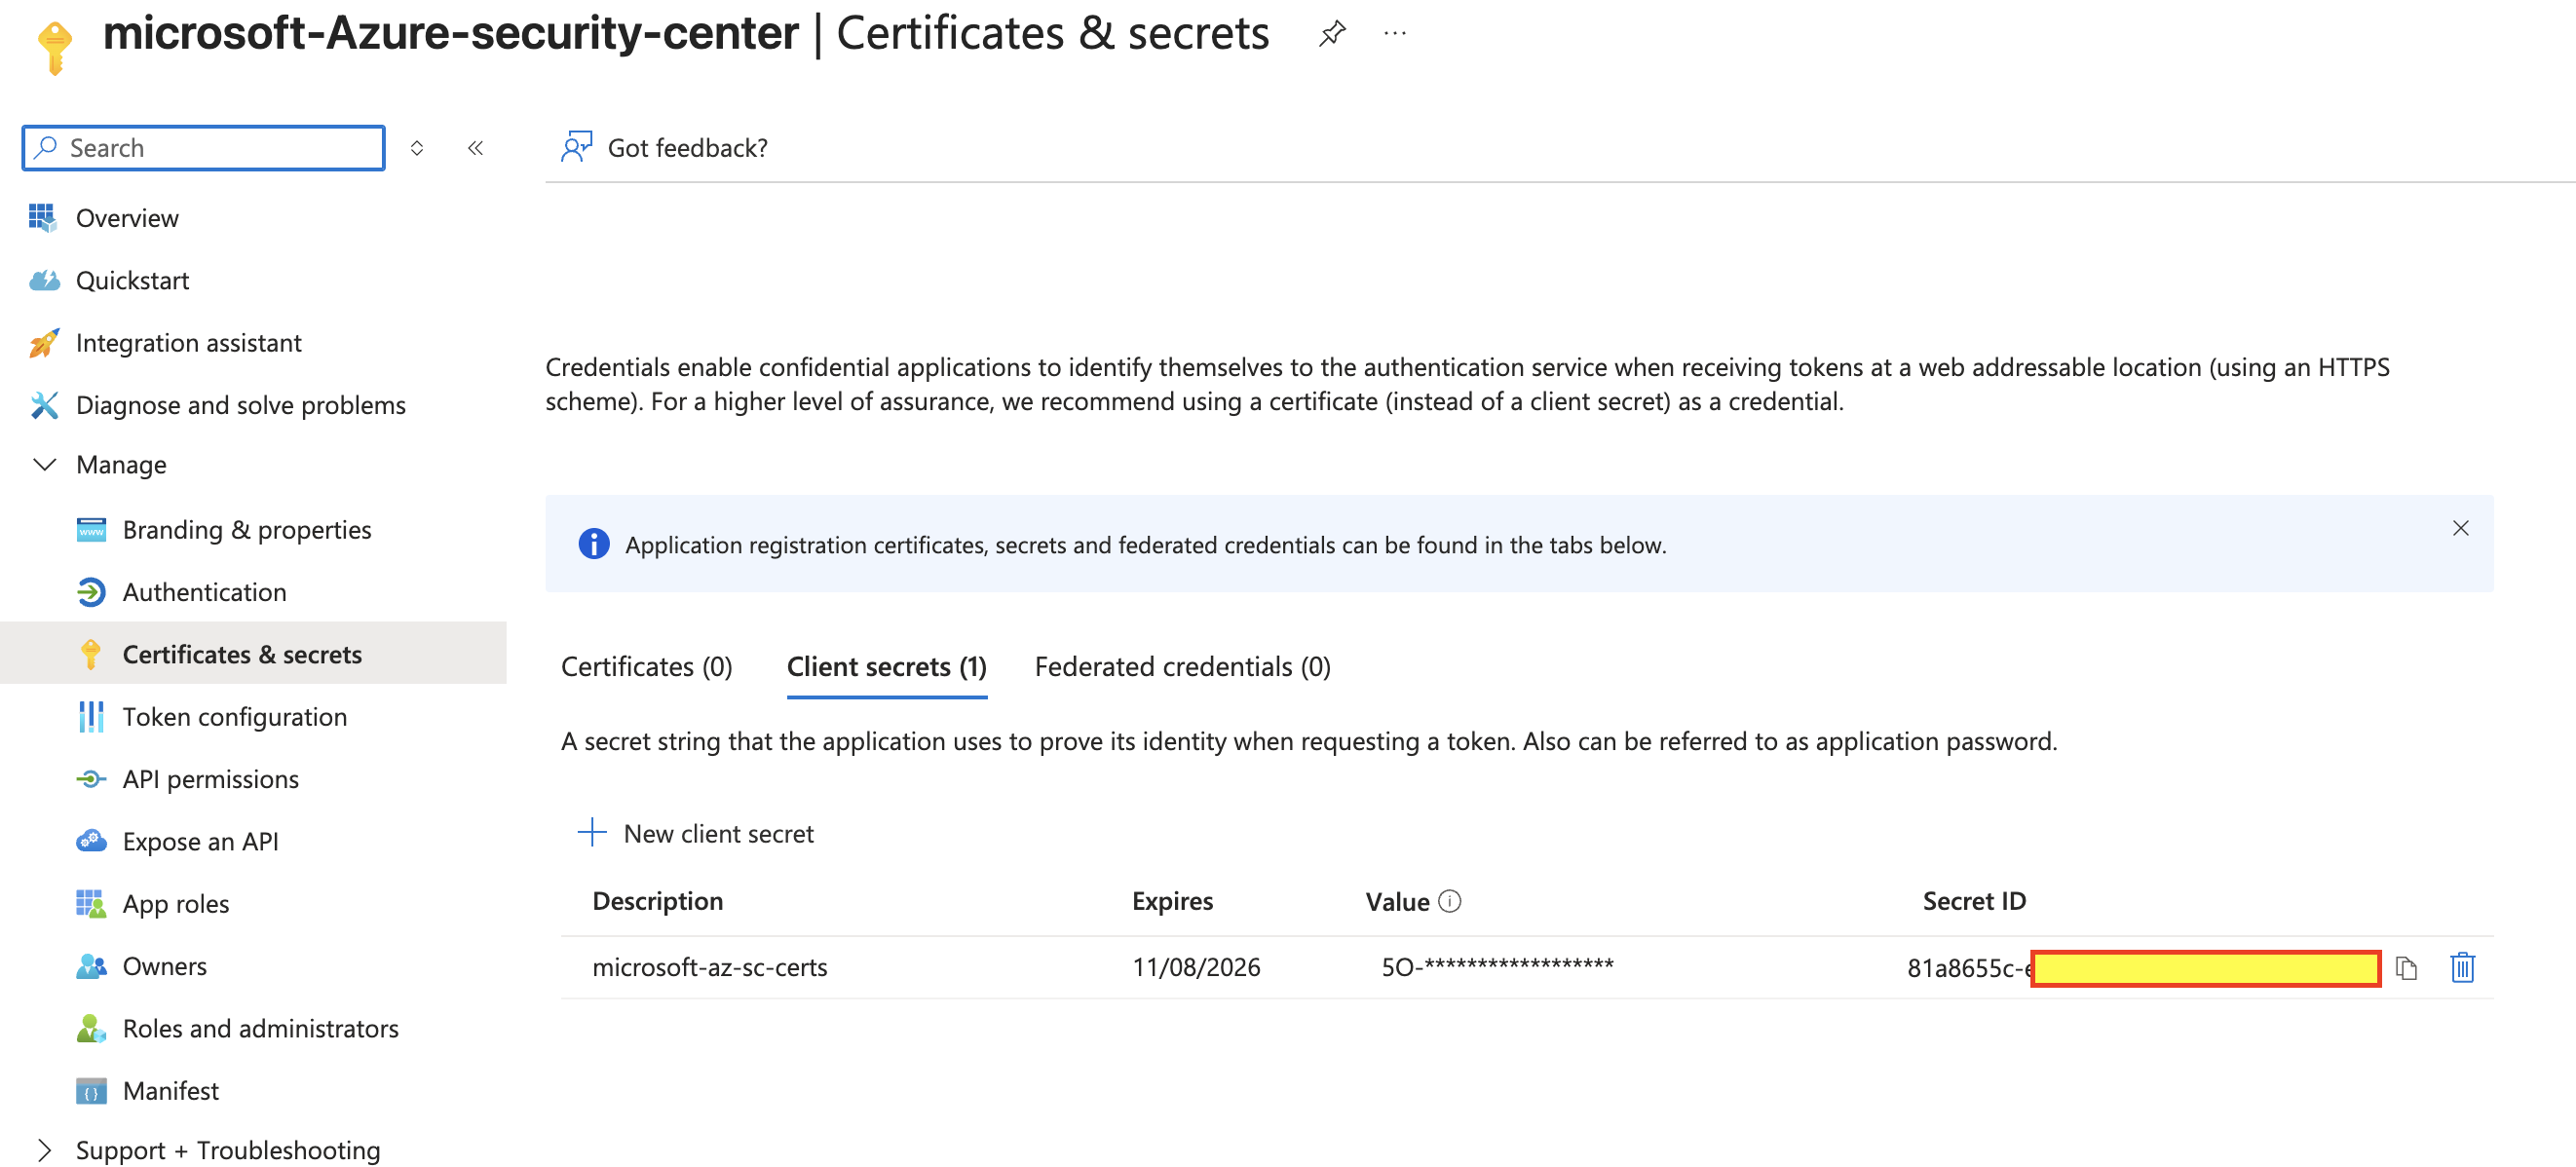
- Once the Microsoft Azure Security Center application is configured, you will need the application’s Client ID, secret, and Tenant ID.
Assign RBAC roles
After registering the application, assign the required Azure RBAC roles to grant it access to Security Center resources.
- In the Azure portal, navigate to your Subscription.
- Click Access Control (IAM).
- Click Add > Add role assignment.
- Select the Security Admin role and click Next.
- Under Assign access to, select User, group, or service principal.
- Click Select members, search for your app registration, and select it.
- Click Review + assign.
- Repeat the steps above to assign the Reader role.
For more information, see Assign Azure roles using the Azure portal.
Alternatively, if you prefer to follow the principle of least privilege, you can create a custom role with only the permissions required by this integration.
Create a custom RBAC role (optional)
- In the Azure portal, navigate to your Subscription.
- Click Access Control (IAM).
- Click Roles, then click Add > Add custom role.
- Enter a Role name and Description, and select Start from scratch.
- Click Next to go to the Permissions tab, then click Add permissions and add the following:
Microsoft.Security/alerts/readMicrosoft.Security/alerts/writeMicrosoft.Security/policies/readMicrosoft.Security/policies/writeMicrosoft.Security/tasks/readMicrosoft.Security/tasks/writeMicrosoft.Security/*/readMicrosoft.Resources/subscriptions/readMicrosoft.Resources/subscriptions/locations/readMicrosoft.Resources/subscriptions/resourceGroups/read
- Under Assignable scopes, select your target subscription.
- Click Review + create.
- Once the custom role is created, assign it to your app registration by following the steps in Assign RBAC roles above, selecting your custom role instead of Security Admin.
Configure Microsoft Azure Security Center in Automation Service and Cloud SOAR
Before you can use this automation integration, you must configure its authentication settings so that the product you're integrating with can communicate with Sumo Logic. For general guidance, see Configure Authentication for Automation Integrations.
How to open the integration's configuration dialog
- Access App Central and install the integration. (You can configure at installation, or after installation with the following steps.)
- Go to the Integrations page.
Classic UI. In the main Sumo Logic menu, select Automation and then select Integrations in the left nav bar.
New UI. In the main Sumo Logic menu, select Automation > Integrations. You can also click the Go To... menu at the top of the screen and select Integrations. - Select the installed integration.
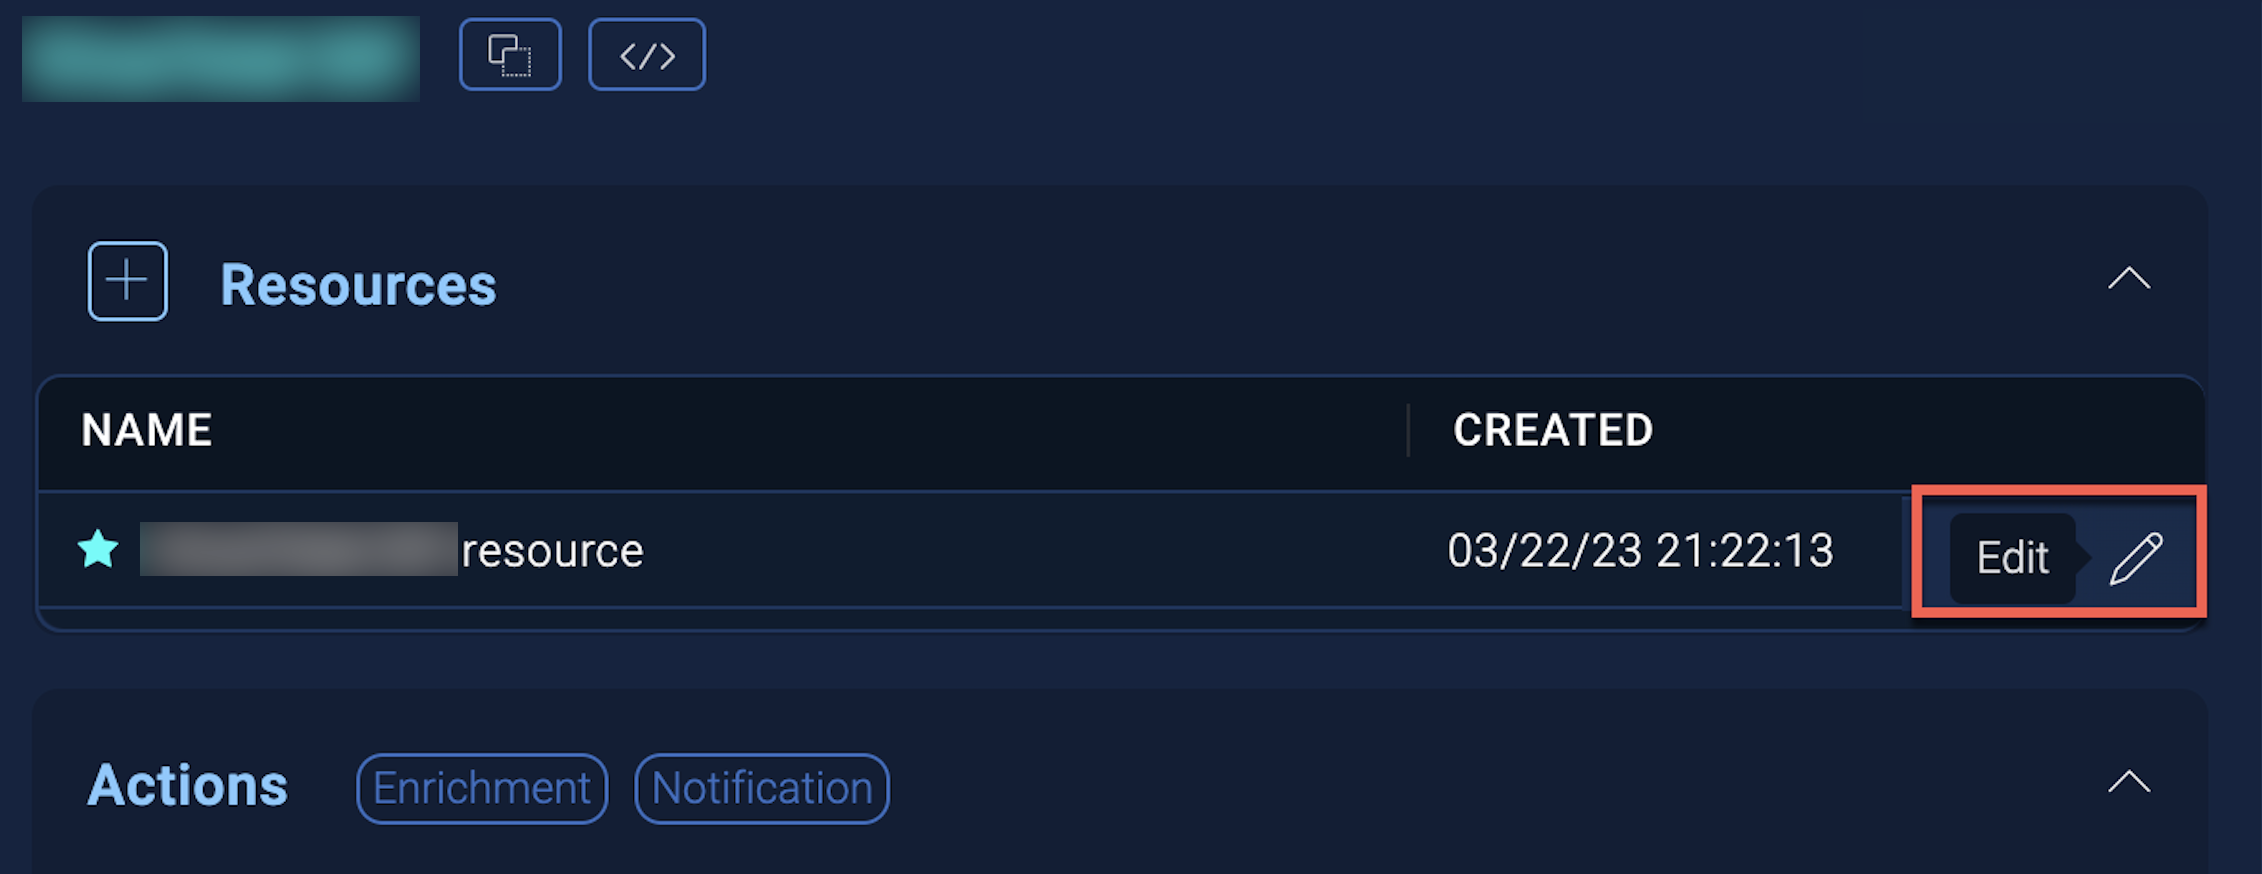
- Hover over the resource name and click the Edit button that appears.
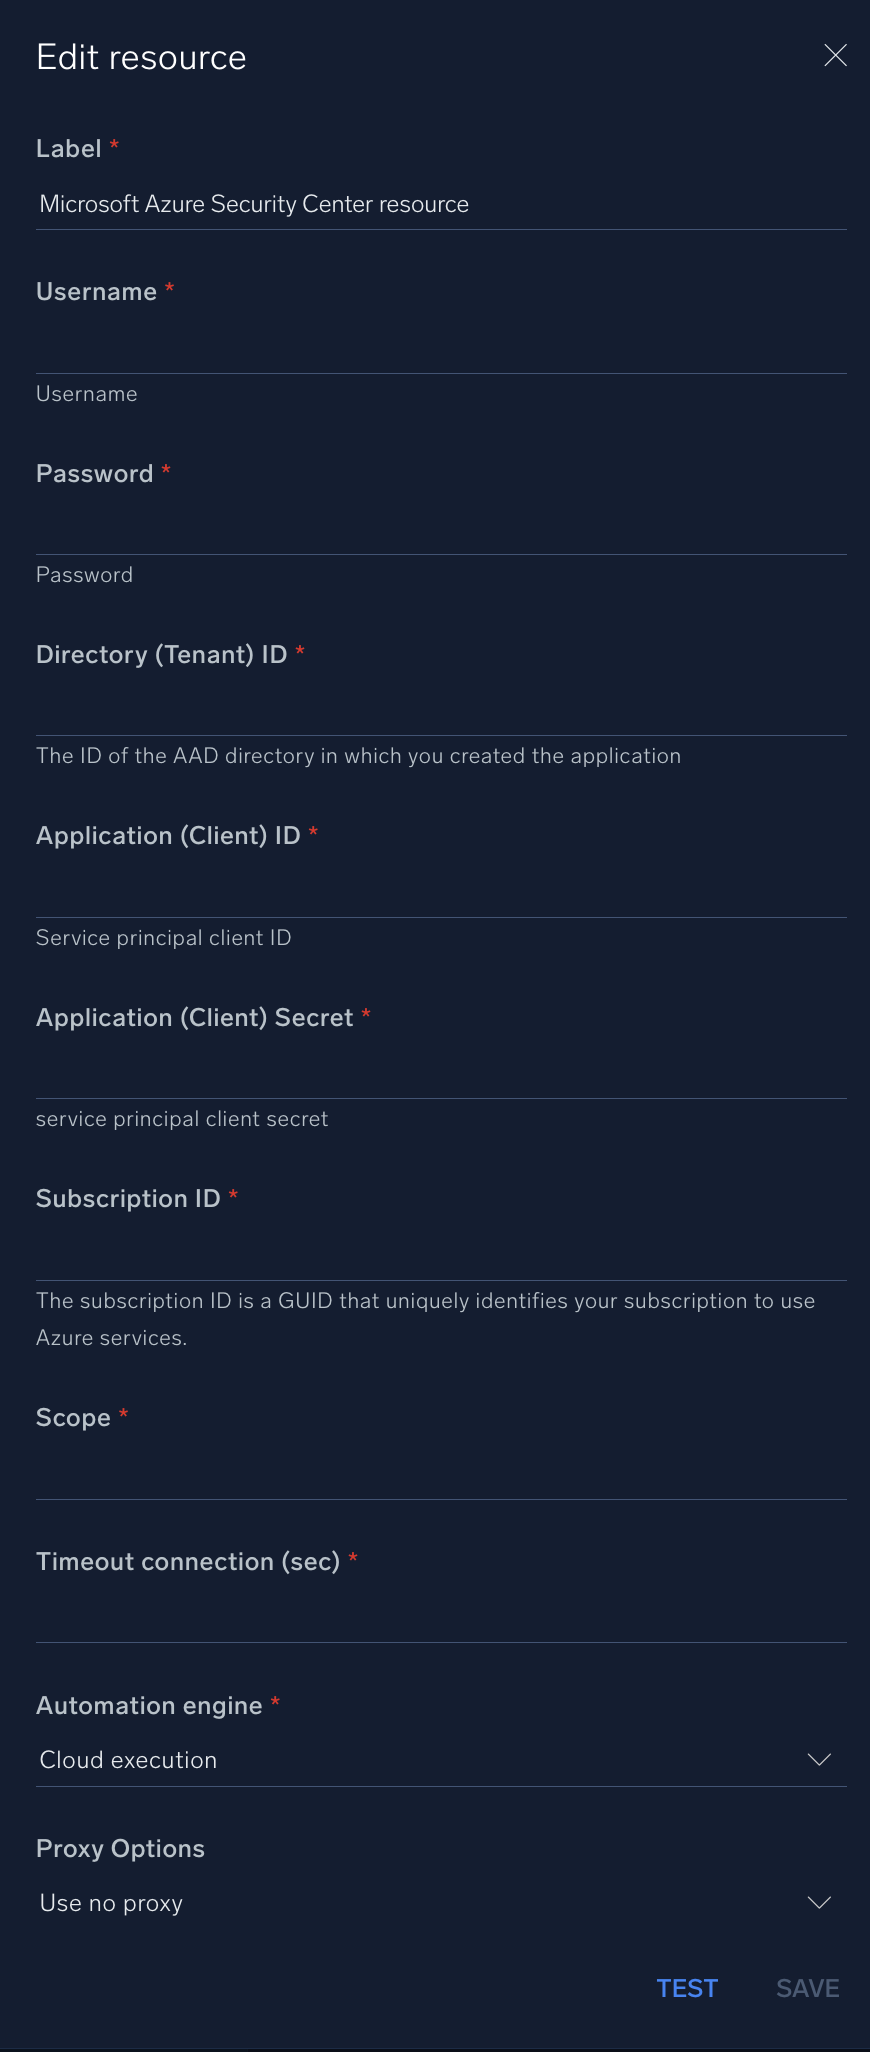
In the configuration dialog, enter information from the product you're integrating with. When done, click TEST to test the configuration, and click SAVE to save the configuration:
-
Label. Enter the name you want to use for the resource.
- Username. Enter the username of a Microsoft Azure Security Center admin user authorized to authenticate the integration.
- Password. Enter the admin user password.
- Directory (Tenant) ID. Enter the tenant ID of the AAD directory in which you created the application.
- Application (Client) ID. Enter the client ID from your application ID.
- Application (Client) Secret. Enter your application (client) secret.
- Scope. Enter the OAuth scope based on your authentication flow:
- Delegated (user_impersonation):
https://management.azure.com/user_impersonation - Client Credentials (app-only):
https://management.azure.com/.default
- Delegated (user_impersonation):
- Subscription ID. Enter your subscription ID. The subscription ID is a GUID that uniquely identifies your subscription to use Azure services.
-
Connection Timeout (s). Set the maximum amount of time the integration will wait for a server's response before terminating the connection. Enter the connection timeout time in seconds (for example,
180). -
Automation Engine. Select Cloud execution for this certified integration. Select a bridge option only for a custom integration. See Cloud or Bridge execution.
-
Proxy Options. Select whether to use a proxy. (Applies only if the automation engine uses a bridge instead of cloud execution.)
- Use no proxy. Communication runs on the bridge and does not use a proxy.
- Use default proxy. Use the default proxy for the bridge set up as described in Using a proxy.
- Use different proxy. Use your own proxy service. Provide the proxy URL and port number.
For information about Microsoft Defender for Cloud (formerly Azure Security Center), see Microsoft Defender for Cloud documentation.
Change Log
| Version | Date | Description |
|---|---|---|
| v1.3 | April 30, 2026 | Upgraded the python3_generic Docker image (Python 3.8) to python3_12_generic (Python 3.12) to address Python 3.8 end-of-life and improve security and performance. |
| v1.2 | March 17, 2026 | Aligned the integration with Microsoft-recommended authentication (app-only authentication). |
| v1.1 | June 21, 2023 | Updated the integration with Environmental Variables. |
| March 11, 2022 | Updated the logo in Microsoft Azure Security Center integration. | |
| March 22, 2019 | Initial release of the Microsoft Azure Security Center integration. |